Plenty of Hardware at c4di

We had a great meeting at the Hardware meetup this week. We had digital video, DC motor control, Lora networking and transistor insights. And some new faces. If you want to come along you can sign up here

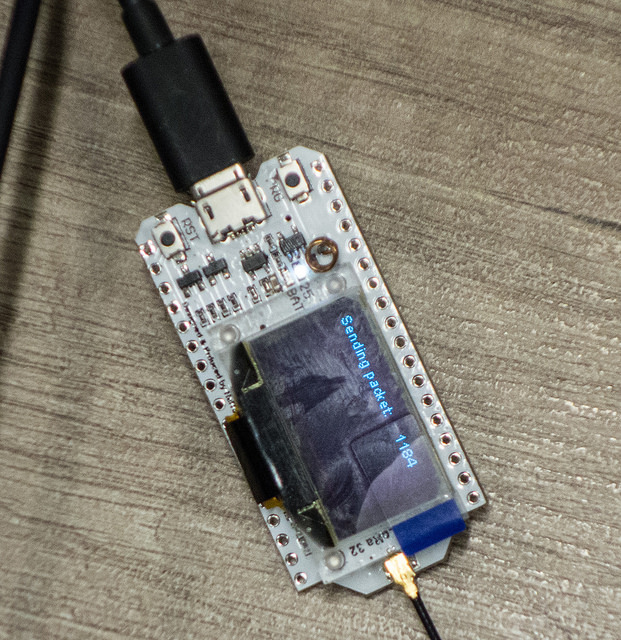
This is what I was working on. I had another Lora node receiving the messages. When it works properly I'm going to take the plastic cover off the display.....

Hardware meetup, with hardware

It's coming to something when I'm too busy having an interesting time to get around to taking pictures. But that's how it was at the Hardware meetup tonight at c4di. Ross was trying to get his Gameboy emulator to run off a rechargeable battery. He has the not unreasonable desire to be able to play games while the battery is charging. And one of his power supplies keeps glitching and cutting out. We actually used a soldering iron to try and fix things, but by the end we were perhaps a bit closer to getting everything working as it should. And we are having a lot of fun in the journey. And Paul showed me a bunch of very impressive stuff he had a hand in making work. 

All good stuff. More in two weeks. 

Microsoft Surface Ergnomic Keyboard and Bluetooth

Ha. It works now I've replaced the Bluetooth adapator. So, pro-tip. If you want to use the Microsoft Surface Ergnomic keyboard with your desktop under Windows 10 I would suggest that you use the Pluggable Bluetooth USB adaptor. This works a treat. If you've got a Surface Pro 3 I'd advise you not to get this keyboard at all, or at least try it to make sure it works before you part with any cash.

I'm hammering away at the keyboard now and I like it very, very, much. My previous keyboard, the Microsoft Sculpt Comfort one, was very good but it lacked the numeric keyboard and arrow keys that I'm used to. Mine version of the Sculpt Comfort also has the American keyboard layout which works fine most of the time, but had me keeping an old keyboard around (really) just so I could type the backslash character. Which I can type just like this now: \\\\ Yay.

The Pimoroni Mood Light Rocks

I just love a busy desk. 

A while back I ordered a Mood Light kit from Pimoroni. It never came (sad face). I told them about this and they dispatched a replacement. The same day. With no quibble or question (happy face). It arrived a couple of days ago and today I found enough time to assemble it.

With it being based on the Raspberry Pi I had to find a video display and a keyboard for it to get things going. I ended up using my video projector of Logo Blaster fame and a little remote keyboard that didn't work until I connected it via a usb hub.

The good news is that the Raspberry Pi experience has come on a lot since my early days with my Pi B. The great news is that the kit itself is awesome. Lovely attention to detail, even down to little rubber feet for the stand. It all fits together in a very impressive way and worked first time. If you're thinking of building one, you'll need to solder the connectors onto the Pi and the display device. If you've not soldered before it might not be the best thing to learn on, but if you've soldered a bit you'll have no problems. You'll need a power supply and a micro-SD card but nothing else, the kit has everything and comes beautifully packed in a nice plastic box. 

Once I'd got the Pi going and set up remote access I was able to do everything via my PC, so I could put my keyboard and monitor away. You control the lights (there are 32 neopixel leds on the lamp) from Python, so there is no limit to what you can make the light do. 

I'm very impressed with the kit and the Raspberry Pi Zero that it is based on. The fact that you can get the thing for thirty quid (or even less if they are having a discount offer running) makes this thing astonishing value. You should get one. So much power and potential for less than a full price video game. I'm going to get the Scroll Bot next.

Great Hardware Meetup at c4di

Just had one of our best Hardware Meetups of the year. Not that the others haven't been great, but at this one we had loads of new members, lots of excited talk and some really interesting hardware that folks had brought along. We've still got room for more folks though. If you fancy coming along to the meetups you can find out more here.

If you're having bother finding us, we're in the bottom of the shiny gold c4di building. Doors open at 6:00pm or so. 

Hardware Meetup Gadgets

We had another really excellent Hardware meetup tonight at c4di. What surprises me about the events is that we get people walking in with awesome projects and things they've built. Last time we met up Andrew was showing us the thing he'd built above. Just because he'd only got one of his two robot motors hadn't stopped him from building something really neat.

The two "eyes" at the front are a distance sensor. You can place Andrew's device in the middle of the room and it will spin round and generate a polar plot of the distance of objects around it, measured by the ultra-sonic distance sensor and transmitted via WiFi to a web page hosted out of the device itself. The leds are to show the motors being driven, and just to look awesome.

Tonight we also had Brian showing off how he was using Blink to wirelessly connect sensors together and also provide remove monitoring via an iPhone app. And Steve demonstrating a really neat Raspberry Pi powered wildlife camera which automatically converted it's camera from infra-red to normal during daylight hours.

Great stuff. If you want to come along and show us what you're up to (or just find out how you can build something awesome) you can sign up for our next event here, or just come along to c4di and say hello at our next Meetup on Thursday 6th of April.

Getting Started at the Hardware Meetup

Too busy to take any snaps at the meetup, here's a picture of some fireworks

I went to the Hardware Meetup with a bunch of things to do. Didn't get to do any of them because there was too much interesting chat. Which was great.

A few new folks turned up too and they were asking what to do to get started. Here's "Rob's Handy List of Hardware Fun Things to Do"

Get a bit of hardware to play with

The clue's in the name. We play with bits of hardware. This doesn't mean that you need to spend a lot of cash though. You can start with just an Arduino and a few leds and switches.  The Arduino is the embedded device that we like to start with. It's easy to program and cheap to buy.

The best place to buy an Arduino is probably eBay. The one you want to gets started is an Arduino Uno (or compatible). Search for "Arduino Uno". You should be able to pick one up for less than a fiver. 

An Arduino on it's own can't do much (although you can flash a light on it) so you might want to take a look at one of the kits that are available. You could start with one that contains a bunch of lights and switches and a few more advanced components. These are also on eBay; I quite like the ones branded Sintron, although others are quite good.

Download the Software

You program your Adruino using a PC, Mac or Linux device. The Arduino software is a free download from here.

Make something work

There are some getting started tutorials here that you might find useful. You can also search YouTube for Arduino videos; these are especially useful if you want to know how to use some of the more exotic devices in the kits.

Once you've got the examples working, have a go at something of your own.

Come to meetups

If you end up making something impressive, bring it along and show us. If you try to make something and get stuck, bring it along and we'll try to help out. We meet up approximately every two weeks at c4di in Hull. You can find the agenda for the meetups (and lots of other things) here.

Potential Dividers for Pixelbots

..a divider with potential

I've been working on the HullPixelbot hardware today. I want to use an HC-SR04 distance sensor so that a robot can detect when it is getting close to something. These devices are not perfect, but they are very cheap (less than a pound from China). Snag is they are 5 volt devices (i.e. they are powered by, and produce signals at, a 5 volt level).

The Arduino Pro-Mini that I'm using to control the motors and sensors is a 3.3 volt device. Directly connecting a distance sensor to it would not end well. It might actually break the Arduino. There are special converter chips thatyou can buy to addressthis, but they are expensive and need to be wired up. Fortunately the only signals you need to worry about are those going into the Arduino, and the only input signal is the echo pulse. So I just have to adjust the level of that signal.

The way that the sensor works is that you give it a signal to say "please measure the distance". The sensor then makes an ultrasonic "squeak" and times how long it takes for the squeak to bounce back. It generates a pulse, called the echo signal that represents this time. The longer the echo pulse, the longer it took for the sound to bounce back, and the further away the target is from the sensor.

The echo signal provided by the distance sensor is either at 0 volts or 5 volts. We want to convert the 5 volt value to 3.3. I've used a potential divider to do this. This uses the principle that the voltages in a circuit are distributed according to the resistances in each element. The higher the resistance of one part of the circuit, the more volts are "dropped" across this part. This probably doesn't seem sensible, but it is how a lot of electronic devices work.

In the old days we used to use lots of low voltage bulbs in our Christmas lights. The mains voltage of 240 volts would be spread over, say 20 bulbs, each designed to work with 12 volts. All the bulbs were connected in a chain, so the voltage dropped across each bulb was 12 volts (a twentieth of 240). Bad news, if one of the bulbs fail the whole chain goes out.

Worse news, if a human being (who has a resistance a lot higher than a 12 volt bulb) puts themselves into the circuit trying to fix this they will find that nearly all the voltage is dropped across them, which is how until recently Christmas was always accompanied by grisly stories of people electrocuted when they were fixing the lights on their tree.

Anyhoo, back to the robot circuit. The total resistance of our two resistors is around 3K. The voltage dropped across the 1K resistor will be around the third of the 5 volt input. These are the volts I don't want. The voltage across the 2K resistor will be around two thirds of 5 volts, which is as near 3.3 volts as makes no difference. And it works, which is nice.

If you think about it, what I've made is a machine that can divide by 3 at close to the speed of light. Any signal going into the potential divider will be divided by 3 on the output because physics. The speed of these two resistors massively outperforms even the most powerful of digital computer, and so-called "analogue" computers like this were much used in the past.

RC2014 Homebrew Z80 board

It turns out you can have a lot of fun failing to get something to work. Number one son has bought an RC2014 homebrew Z80 kit. At the moment it is not doing much, so we had a go at finding out what the problem might be. The kit has a backplane board that brings out all the signals from the processor and then you can plug in a processor board, clock, RAM board, ROM board and serial port. It really took me back to the days when you could print out the entire circuit for your computer on a single sheet of paper.

If you really want to discover how a computer works you could do a lot worse than get one of these. Although in our case what we discovered was that it doesn't work just at the moment. 

Fixing problems like these is always a matter of working through each part of the system, checking it and moving on. By the end of our session we'd proved that the serial data was getting from our terminal into the UART, the processor clock was running and the Z80 was trying to load things from the bus. It still wasn't working, but we had a great time anyway.

Amazing Everything Meter

Amazing, even with the odd spelling mistake..

Amazing, even with the odd spelling mistake..

James thinks I should get one of these. It is a kind of "everything meter". The idea is that you can just connect an electronic device and it will tell you what kind of device it is. It can detect and measure resistors, capacitors, coils, diodes and a few different types of transistor. For around fourteen pounds I reckon it is a bit of a steal. Very tempting. If you've not already got yourself a multimeter I reckon one of these would be at least as useful.

Hacking Electronics

I like Simon Monk. He writes the kind of books that I wish I'd written. They are sensible, instructive and above all practical. I've read some of his Arduino texts and found them very useful. He's also written the a book that you'll find useful if you want to get into electronics. 

Hacking Electronics is a great guide to getting started with components and computers. It gives you a good grounding in the basics, teaches you how to solder and then gets you making genuinely useful/fun things. Some of them have computers in (usually the Arduino). Others are just circuits. This is very nice to see. I think of electronics as "programming with hardware". You can write a program to make a light flash, or you can make a circuit that does it.

In software you change what happens by adjusting the value of variables inside the program. In hardware you change what happens by altering things like the resistance or capacitance of the components themselves. 

If you are looking for a book to give an inquisitive 11 year old (and then have fun together burning your fingers and "letting the smoke out" of devices) then I reckon this would be a very good one to go for.

Organising Components

While I was up town recently I noticed these rather stylish boxes in Tesco that you can get for a reasonable price. 

I'd been looking for some way of storing my increasing collection of electrical components. I have this worrying (but, fortunately not very expensive) habit of searching ebay for the word Arduino and then being completely unable to resist buying things I find at amazing prices, post free from China.

My plan was to fill each box with envelopes containing particular components.  I stole the idea from the excellent Arachnid Labs blog

It works really well. When I want something I just have to flick through the envelopes to find it. The Computer Scientist in me will probably sort the envelopes into alphabetic order at some point, but for now I've not got enough devices to really make it necessary.I don't have any anti-static envelopes, so I just used ordinary stationary ones. 

Home Made Minishift Spacers

I spent a very happy afternoon making up an ArachnidLabs MiniShift that I got a while back. At least I was very happy until I got to the point in the instructions where it said "Now, take one of the spacers and fit it to the circuit board..."

Of course I'd lost mine.

However, the good news is that I happen to have a 3D printer. And so I was able to design and print a set in a rather attractive blue colour and then continue the build. I've not tried firing them up yet. That's for next week.