Superhuman
/
Looks like rain dear
Today I’ve filed my tax return and merged two branches in GitHub.
What a man…
Looks like rain dear
Today I’ve filed my tax return and merged two branches in GitHub.
What a man…
The computer is eight years old though….
What do you think I was doing to raise the CPU loading to the dizzy heights you can see above?
Well, I was moving some files from one folder to another. There were quite a few files, but even so.
I think I need a new computer.
Just plug your Pixelbot into your computer to set up the network
The latest version of the Raspberry Pi PICO Powered Pixelbot (I love a bit of alliteration) now supports Wi-Fi programming. You can connect your robot to your local network and then use a web interface to create and deploy programs into the robot. You can find all the details, plus the images you need to put into your PICO-W here.
The MakerSpace is a good looking place..
I’ve put together a schedule for hardware meetups for the first part of this year:
I'll bring in some examples of colour printing and show how to use Bambu Studio to colourise prints and create lithopanes. I'll also show off some work made with HueForge (https://thehueforge.com/)
We'll set up a Hull Pixelbot rugby match and get a game going.
I'll bring in a bunch of MIDI music devices (some Pico and Pi powered) and we'll have a go at making some tunes
I'll show you how to get started taking analogue photographs on instant and black and white home-processed film. If we can have access to running water in the Hackspace we can take a bunch of pictures and process them on the night.
All the meetups are in the Makerspace in the Central Library in Hull. Doors open at 5:30 pm and we start the presentations and whatnot at 6:00pm after some chat. We finish around 7:15pm or so. Anyone can turn up and you don’t need to book. If you have a topic that you’d like us to cover (or better yet you fancy running a session yourself) get in touch. If you want find out more you can find it all on our Mattermost page here.
Every time they failed to deliver the chair they added a new one to the order…
We needed a chair bed to put up a family member at Christmas. So we ordered one. The delivery came and went, and came and went again. Chairs were not delivered owing to “un-foreseen circumstances”.
There are worse things in life than missing out on chair deliveries. Although after four attempts where we had changed our arrangements to fit around their schedule we were getting a bit fed up.
The chair arrived today. Just three weeks or so late. It is very nice. They’ve sent me an email asking for my opinion of the service they provided. Every single person I dealt with, from the folks on the first call to the delivery team, has been lovely to deal with. But I’m forced to conclude that they are trapped in a system which is not working very well.
Built some shelves today. There were no nuts or bolts, the parts just needed to be slotted together and tapped into place. It’s the first time in a while that I’ve made something using a hammer.
A few attempts and the camera I’m trying to use
I’ve been trying to print Minox film cassettes for a while now with no success. I love the Minox system for its tinyness and amazing design, not to mention the nice pictures you can get with it. But I’ve only got a few film cassettes and I’m too mean to buy any more. So I thought I’d print some with my lovely new printer. It kind of works. The finished articles are almost useable. But not quite. Even if I use the high resolution 0.2mm nozzle. The problem is that some of the sides of the cassette lids are just one strand of filament wide. The printer can print these just fine, but they haven’t got enough strength to stay attached to the lid for very long, as you can see above.
I’d be happy to trace printability for film length: in other words a 24 shot exposure film held in a cassette that has double thick walls would be just fine with me. Unfortunately I’ve not found a way to tweak the design just yet. If anyone reading this can point me at designs I can work with I’d love to have another go.
Fame at last at last
My article about the Hull Pixelbot has reached the dizzy heights of the Raspberry Pi news stream. You can find the HackSpace issue containing the article here.
This is fresh from the printer plate, complete with purge tower
HueForge is amazing. It lets you care 3D printable pictures from images.
I’ve mapped different colurs in the image to different filaments
The original image is on the right. The predicted print is on the left. On the bottom left you can see the four colours I’m using (black, blue, grey and white) and you adjust the sliders to determine the image colours they match. It works wonderfully well and drops out an STL file. You just have to tell your printer the layer numbers where the colour changes and away you go.
If you have a 3D printer that can print different colours you should get HueForge. It’s as simple as that.
Carbonized Duck ready for printing
Around ten years ago I created one of my first ever GitHub repositories when I uploaded the code for my Kinect Carbonizer. You can find it here. Now that I have a 3D printer that can print things in colour (and at speed) I thought I’d revisit the project with a view to making some multi-coloured carbonized images. I installed the Kinect toolkit, plugged in my Kinect sensor, downloaded the repository, pointed Visual Studio 22 at it and it just compiled and ran.
Amazing.
I had one issue, where the USB on my Windows 10 machine refused to properly recognise the Kinect sensor. I’ve updated the GitHub page with the fix for this.
You can pick up Kinect 2 (not the the original Kinect 360) sensors really cheaply nowadays. You can’t plug them into your computer directly - you need an adapter and power supply - but you can pick them up on ebay at a good price too.
Bambu Studio lets you set the colour of each layer in a print so I should be able to make multi-coloured carbonized prints quite easily. Such fun.
I thought you might like to see the original picture. I took it in Melbourne a few years ago
Most 3D printers use a print nozzle which is 0.4mm in diameter. This is a good compromise between speed and quality. But you can get 0.2mm diameter ones too. So I’ve tried printing the same lithophane as you saw yesterday, but with a 0.2 nozzle. There is a definite improvement, but I don’t think it is worth the extra six hours of printing.
This is using a 0.2mm nozzle for best results
The detail is improved, but I would have to add more layers to get rid of the sky banding. Which would make the print time even larger. I reckon a good compromise is 0.1mm layer height with a 0.4mm nozzle. And perhaps not an image with lots of gradual colour changes.
This is about half way through
What better way to start the year than by printing some lithophanes.
This is Melbourne
I’m quite pleased with the results. I got a Cyan, Magenta, Yellow, White kit from Bambu. They have a little wiki which tells you how to do it. This image took around 2 and a half hours to print, which is not bad. Next step is to try a 0.2mm nozzle and see how that turns out.
Guess which camera?
A happy new year to all (both) my readers. Here’s to many more test photographs of my favourite trees with an ever increasing range of interesting cameras……
One of the standout things about technology is that as soon as you have bought something a newer and possibly better one is released. A month or so ago I summoned up the courage to invest in a new 3D printer - the P1S made by Bambu which was acclaimed as the best one you could get. Then, last week Bambu released the A1 printer which seems to do everything that my printer does, but for a bit less money. Should I be upset? Read on to find out.
When number one sun arrived here for Christmas the first thing he did was order up a Bambu Lab A1 printer (the new one) to be delivered to our address. This means that for a while we’ve had both 3D printers working in the same room. Let’s take a look at them. The pictures here are from the Bambu website. I hope they don’t mind. I totally forgot to take any shots of my own.
This is the A1. The thing on the right is the Automatic Media selector (AMS)
This is the P1S. The AMS is on the top.
The A1 is what is known as a “bed slinger”. The print head moves left and right over the bed, which moves forward and back. The print head gantry is lifted up as the object is being printed. The P1S puts the print head on a carriage above the print plate. The build plate moves down as the object is printed. But which is best? And should I have waited for the A1 (assuming that I knew it was coming)? Some points to ponder:
First things first. Both printers produce excellent prints at very high speed. There is little if anything to choose between them on print quality. At one point we were printing different parts for a gadget (the amazing Toriodal Launcher) When we finished we just put the parts together and they fitted perfectly. So I can’t say one printer is better than the other at printing.
The A1 really does sling its bed around at speed while it is printing. It made the desk underneath really bounce. This would worry me if I was printing something tall and thin, but we didn’t have any problems during printing.
The P1S is completely enclosed, which means you can print materials which need to be kept warm. The AMS system on the P1S is also enclosed, which means that reels of filament won’t get damp or dusty while they are waiting to be used. Everything is open on the A1.
The A1 has a lovely little colour display which shows you what is being printed and provides a nice touch interface. The P1S has a four line text display which does the business but is nowhere near as fun to use. Having said that, you can control both printers from you phone, so the amount of button pushing you do on the device can be zero.
Both devices (as purchased) have automatic media selection. They can change filament during a print. This lets you do multi-colour printing and would also allow the printer to switch to a different filament roll if one runs out. I think the AMS solution of the A1 is much more elegant than that on my P1S which seems to involve lots of toing and froing as the filament is wound all the way back onto the roll when it is changed out. The A1 just retracts the filament from the print head itself (although it does have to have four filament feeds to the head). The A1 can only support 4 different filaments; the P1S can be expanded to use 16 by using 4 AMS units.
It is much easier to get at and change the print nozzle on the A1 series. The print head itself is more accessible and the nozzle is clipped in rather than screwed in, as it is on the P1S. If you want to regularly switch nozzle sizes this might be a thing to consider.
So, am I regretting my purchase? Is the A1 better than the P1S? I reckon they are pretty much the same. The decision goes down to form factor. I started 2D printing 12 years ago with Una the Ultimaker who was very similar in design to the P1S. I prefer this “enclosed” design, although this is very subjective, so I’m happy with my P1S. Number one son started with a Crealty Ender 3 which is a bed slinger, so he went for the A1. The P1S also takes up less desk space as you can put the AMS on top of it (although you can print a bracket to mount the AMS on top of the A1 as well).
If you are looking to buy one of these formidable devices my advice would be to go for the A1 unless, like me, you prefer the look of the P1S. Both work well and should be equally reliable.
Finally hitting the bigtime
Hull Pixelbot has been around for a while and has appeared in all kinds of places. But now it has made it to HackSpace magazine. The latest version can be powered by a Pico and I’ve built a website which you can use to program it directly over a serial port. You can find the magazine in newsagents now.
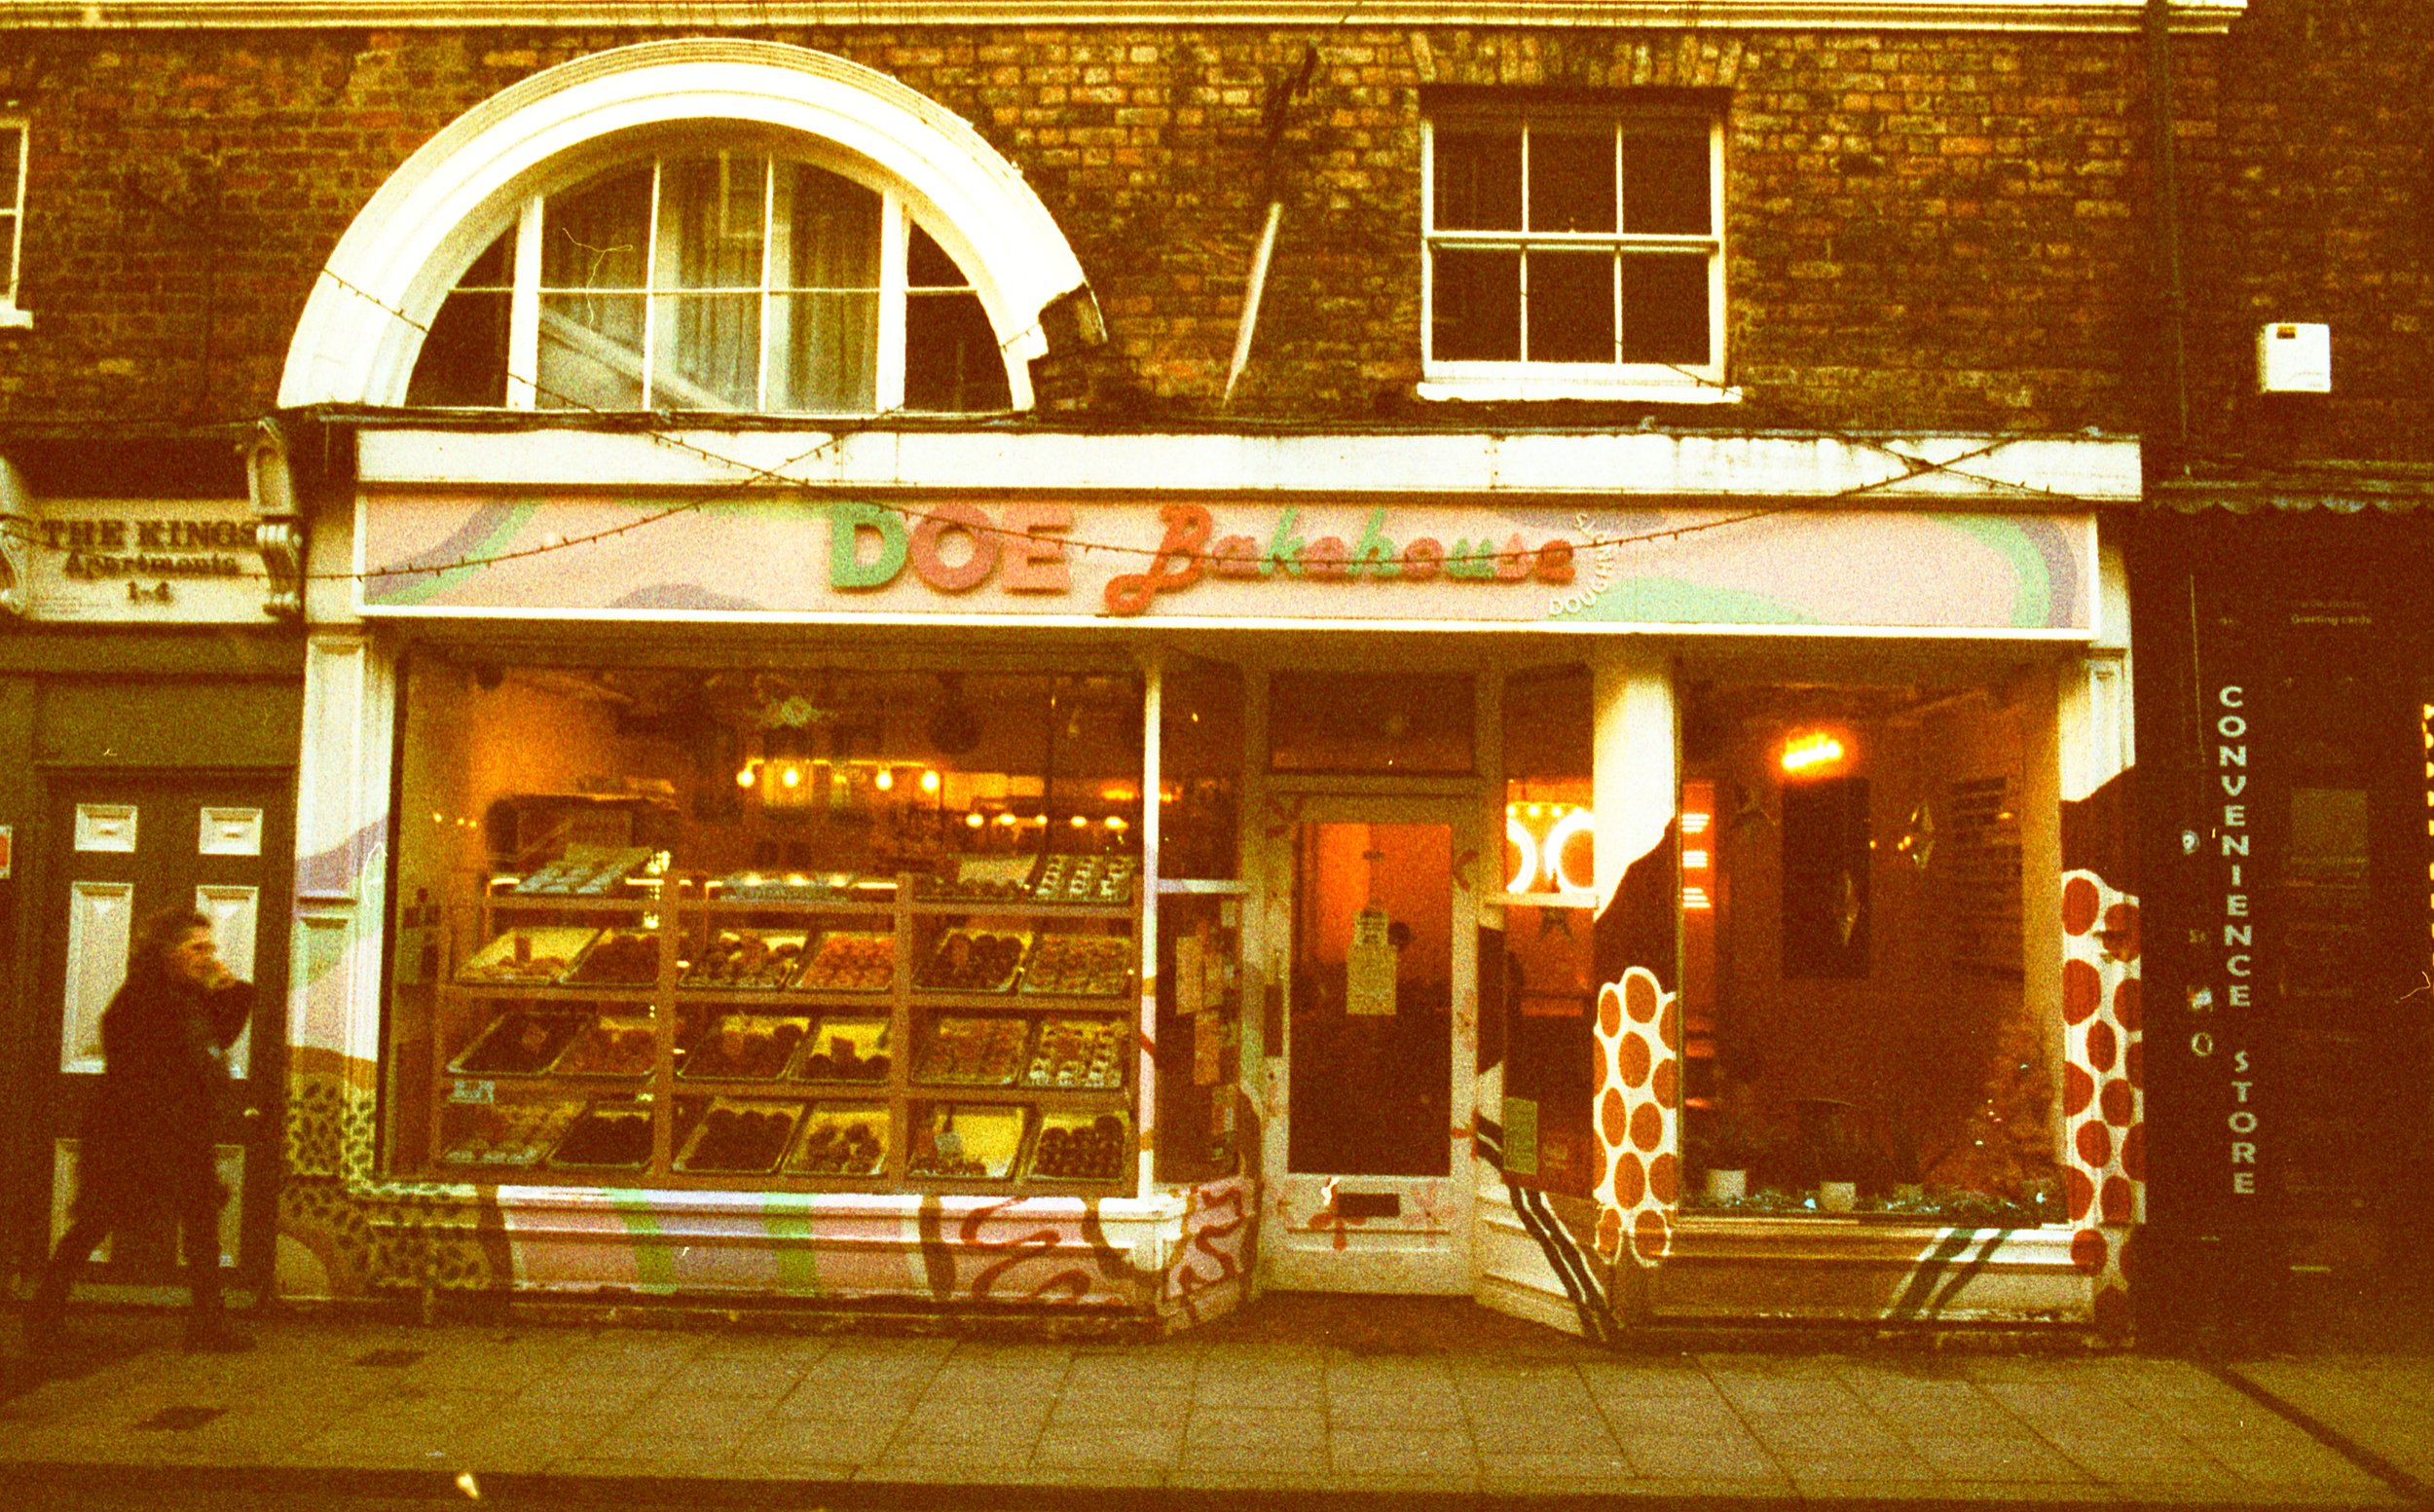
The film certainly has that seventies vibe..
Phoenix film is quite something. It’s an entirely new colour film launched by Harman Labs, who also make Ilford films. I got myself a roll of it for Christmas. I loaded the roll into my newest old camera, the venerable Pentax ME Super and we headed off for York. It’s sold as an experimental colour film. It’s an experimental film all right.
My biggest problem turned out to be that Phoenix film likes plenty of light. But the Pentax ME quite likes to under expose a little for moody dark shots. So I ended up with a whole bunch of muddy underexposed pictures that were lacking in much colour. The picture above was of a vibrant shop front full of colourful cakes. The sharpness is fine and the shot is not without merit, but the above was only achieved after considerable tweakage to bring up the light levels.
I’m going to have another go with it later (assuming I can get my hands on another roll). And when I do I’ll expose it at around half its speed. And I’ll make sure that I’ve got something very big and colourful right in the middle of the frame.
I’m on the Agile Octopus electricity tariff, which means that the price of my electricity changes every half hour depending on the cost of electricity generation. The cost is predicted each day and so I can plan when to do things like charge up the car, bake a cake or smelt some aluminium.
I love it when the weather is warm and windy. This means that demand is low and the wind generators are busy. For the last few days the cost of power has been very low (everyone being on holiday probably helps too), with more than a few occasions when the price went negative and I was being paid to consume electricity. I didn’t actually get up at three am to get paid to charge the car, but I was very tempted.
I could show you the inside where the film is stored, but it wouldn’t end well
The device above is called a “bulk loader”. The big round bit at the back is where you put a big spool of film (best to do this in the dark). You then close off the film storage area and open the light-tight hatch to load an empty 35mm cassette. Then you close the hatch and wind 24 shots of hopefully unexposed film into the cassette.
It’s a way of recycling old film cassettes and saving money on film, as film in bulk is a bit cheaper to buy. I’ll let you know whether or not it works when I’ve run a film through the camera and developed it….
I did say “don’t move” as I took the picture. Not everybody heard me.
With family members heading home I thought I’d get out the pictures that I took with the 3D printed camera at the Rather Useful Seminar I did in November and do some Boxing Day development. One picture seems to have suffered with a light leak (I need to be very careful not to pull the film holder away from the camera when the dark slide isn’t in place). But the other is quite good. At least the people there will be able to recognise themselves.
I need to work on my exposure
Although I have a policy of not sharing family pictures, I thought I’d break that rule and post a picture I took of everyone round the table. This was taken with one of my large cameras and the best thing I can say about it is that the bits you can see are quite sharp….
Merry Christmas everybody.
Rob Miles is technology author and educator who spent many years as a lecturer in Computer Science at the University of Hull. He is also a Microsoft Developer Technologies MVP. He is into technology, teaching and photography. He is the author of the World Famous C# Yellow Book and almost as handsome as he thinks he is.
Begin to Code with JavaScript is now available for purchase and download. You can find it here