Mobile phone cameras are just too good..
/
We went out for lunch today. I took a camera along but I think I’d be very hard pushed to create a better picture than the one above that I took with my phone.
We went out for lunch today. I took a camera along but I think I’d be very hard pushed to create a better picture than the one above that I took with my phone.
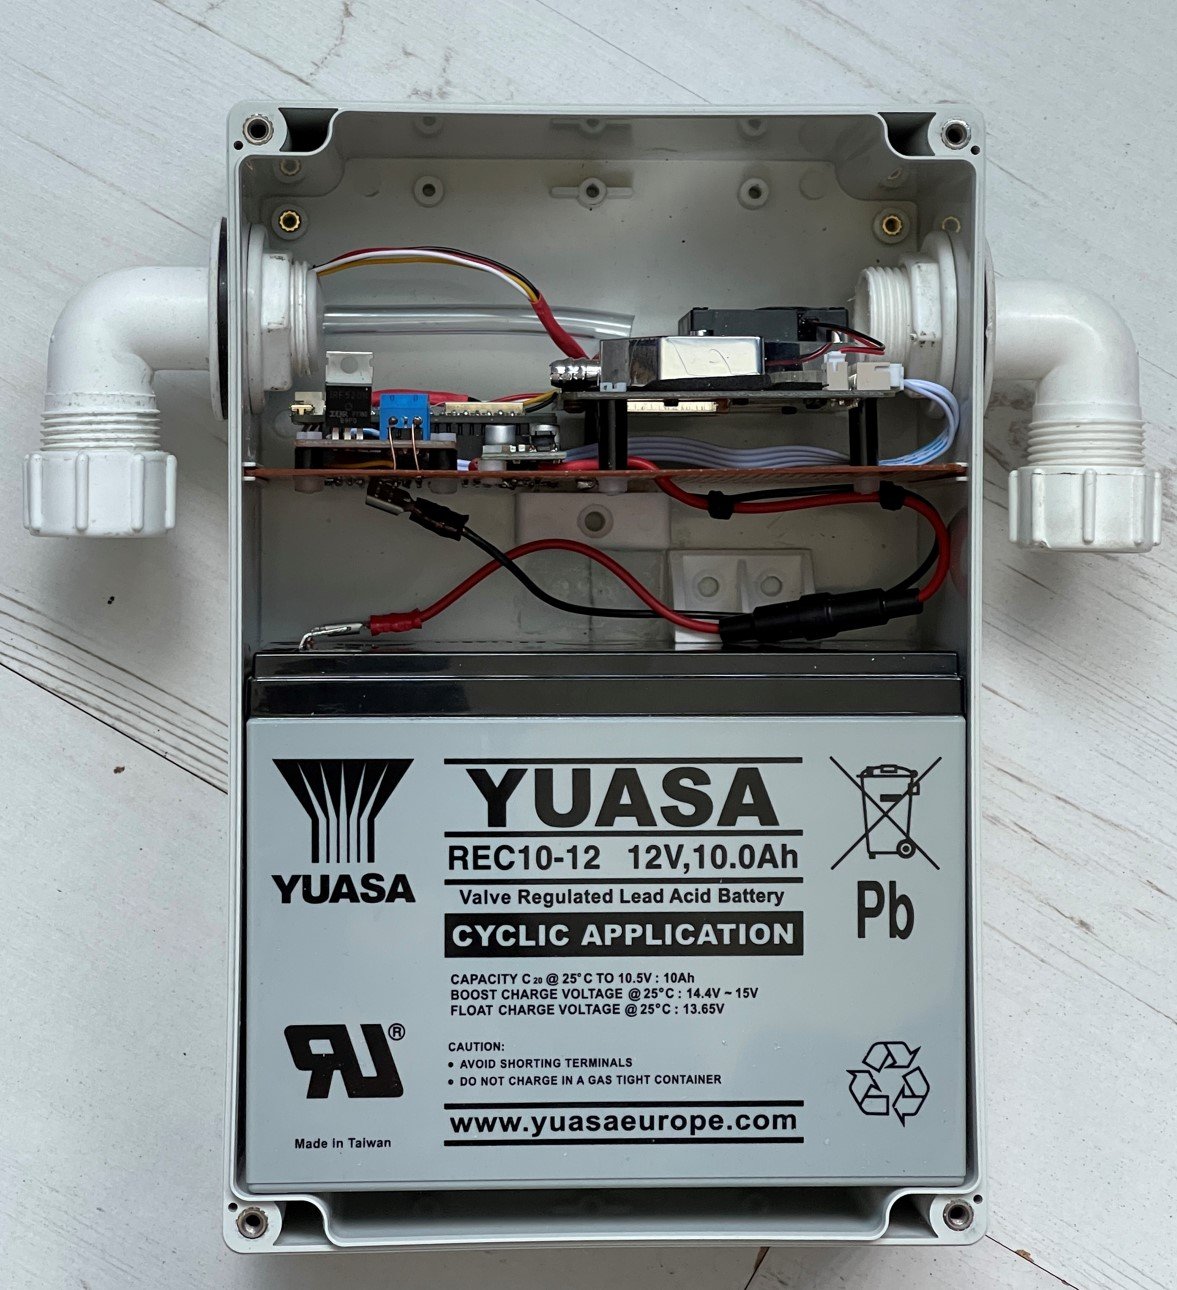
I like making things slim and low profile. Yesterday I discovered that I’d overdone this, when it turned out that I couldn’t fit the lid onto a box I’d just spent five hours printing. There were two ways to fix this. One way would be to spend a while finding the right-angled header pins, solder them into a new PICO and then spend another while transferring all the wires from one device to another. The other way would be to just bend all the pins flat on the existing device. Guess which I did? 'm not proud of this solution. But I'm very proud that it works.
Did you know that there are two sizes of 8x8 neopixel panels? I do now, having bought a new one and discovered that it is too small to fit over the pixels in the box I’ve just printed. Wah.
And then I discovered that the box I’d just managed to print was too small to take the PICO and the connections. The lid wouldn’t fit properly. As you can see, I have managed to fix this problem though. I’ll tell you how I did it tomorrow.
I drop in on Hackaday every now and then to see what folks are up to. I’ve just discovered that they have done a write up of the PICO Chord Keyboard which is rather nice. Thanks folks.
One of my golden rules about 3D printing is:
“As soon as you start to think of your 3D printer as an appliance it will go wrong. “
Today I made that mistake. And on Friday 13th too. I was rewarded with the above.
The good news is that all I had to do was adjust the Z offset to make the print nozzle a bit closer to the print surface and all is well.
There should be a special place in hell for people who design booking sites that don’t work properly on mobile devices. I’m talking about you, Hull City Theatre folks. Hull City and Hull New Theatre are both lovely venues. But getting tickets to go to performances is always a fraught business. For a start the booking page is a stinker to use on a phone or tablet. Then it insists that you log in before you can buy anything. And when you get to the final page you discover that you’ve been charged an extra booking fee for using this “service”.
Ugh.
I love working with PureData on the Raspberry Pi. But there are one or two issues. You can see a partiularly irritation one above. When you create a new window in PureData the window is positioned so that the top of the window us underneath the task bar. This means that you can’t click on the top of the window to move it around the screen. I’ve been racking my brains for ages to find a way to get the window into a more useable position. It turns out that the solution is really simple. If you hold down the ALT key and then click anywhere in a window you can then drag that window around the screen.
Wonderful when you know it….
Achievement unlocked. Number one son tells me that my Raspberry Pi PICO keyboard made the Raspberry Pi news feed last month.
If you’re wondering who Ben Everard is, he’s the editor of Hackspace magazine, which published the article about the keyboard. You can find it here.
I never thought I’d be running Visual Studio Code on a Raspberry Pi. But now you can. The Raspberry Pi 4 is just about powerful enough to make it useable. Normally I’d be using remote Visual Studio Code from my PC, but for some environments - in this case using the Raspberry Pi PICO in-circuit debugger - you have to work on the Pi itself.
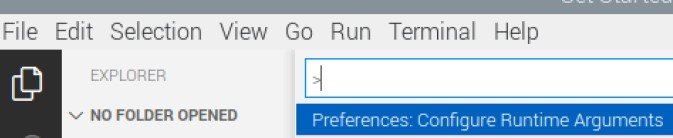
I tried this and was surprised just how horrible it was. Keystrokes were talking seconds to register. It turns out that there is a fix for this. You need to turn of hardware acceleration in Visual Studio Code. Open it up, use CTRL+SHIFT+P to open the command window and type: Preferences: Configure Runtime Arguments
This opens up a configuration file which contains a property called disable-hardware-acceleration which is normally commented out. Remove the comments so that the line “lights up” as below. Then quit Visual Studio and restart it. And you should find the user interface properly useable.
I’m connecting to the Pi on my PC via a VNC connection. It might be that working this way interferes with the way that graphics are rendered too, but it is easy to reverse if you find it makes things worse.
Out and about with number one grand-daughter (5 years old). She told me that she’d just got an “invisible laptop”. I’ve been thinking about this. I wonder what happens when she presses the delete key?
Went on our first proper “up town” shopping trip for ages today. In the Lego store they were selling Muppet mini-figures. Managed to get this chap. It says a lot about me that I’m very pleased about this.
This week I got a call from John who has been building some more air quality sensors for deployment around Cottingham. These connect via WiFi and are designed to wake up, sample the data, and then go back to sleep for a while. Such are my data management skills that it took me a few minutes to find the original files and build the firmware. My software worked fine, but it looks like the BME280 sensors that we are trying to use are not working. I’ve seen this problem with these before. People are quite happy to label all kinds of other devices as BME280 compatible, or change the I2C addresses of them. Anyway, hopefully we’ll get some working ones soon and do a bit more air quality monitoring.
Today I had the magical experience of finding a Raspberry Pi 4 that I’d forgotten I had. It was bought for playing retro games but I never used it much. So it’s been moved into the Chocolate Synthbox where it works really well. Transferring the program code was very easy. I just removed the sd card from the existing device and popped it in my “found” one.
It just worked. The only problem was that ssh (which provides the secure terminal connection between my desktop PC and the synthbox) got upset because some of the properties of the network connection hardware were different after the swap. If you ever have this problem the solution is quite simple. Open up a command shell and navigate to the folder .ssh folder.
cd .ssh
Now use notepad (or your editor of choice) to open up the known hosts file:
notepad known_hosts
Now you have to delete the line of the hosts file that refers to the machine named in the sd card that you have just moved. Next time you try to connect to that machine the ssh command will make a new entry in the file for the new machine.
I was moving the card between one Raspberry Pi 4 and another. I’m not sure what would happen if you moved it to a different model of Pi.
More tulips today. Not a horrible joke this time, just a picture of some from Burnby Hall. I took along a camera and a flash gun to take the pictures this time. I like the effect of using flash on pictures even when there is plenty of natural light. In this shot the flowers seem to “pop” of the background quite nicely.
This the same picture, but it looks different. For this one I pointed the flash directly at the subject which produced a lot of unwanted shadows. The first shot had the flash pointed at the ceiling giving a “bounce” effect which I prefer for this kind of shot.
So there’s this chap in Holland with lots and lots of hamsters. And then they had the great hamster plague of 1673 which left the poor bloke with lots and lots of dead hamsters. So he did the only thing he could. He made some jam out of them. He was hoping that this hamster form of meat paste would sell well, but nobody wanted it. So eventually he threw the lot out of his kitchen window. Six months later he’s looking at the flowerbed outside the window and wondering why there was suddenly a huge patch of daffodils growing there. He mentioned this to a gardening friend who thought for a while, and then replied (altogether now): “That’s strange. You normally get tulips from hamster jam”.
Yesterday I rediscovered something that I have now learned many, many times. I’m hoping that writing it down in the blog will make it stick this time. Worst case it will turn up in a search next time I try to find out why my neopixels are flickering. It’s all about supply and signal voltages. A rule to remember is:
The voltage on the data signal for a neopixel must be at least 60% of the power supply voltage.
If your power supply is 5 volts and your data signal is 5 volts you are laughing (or at least grinning happily because it works). If your power supply is 5 volts and your data signal is 3.3 volts (which is the signal voltage used by the Raspberry Pi PICO amongst other devices) then you might not be smiling because things get a bit marginal.
Sixty percent of 5 volts is 3 volts, so in theory it should work with 0.3 volts to spare. However, if your power supply is up half a volt (which can happen) your pixels won’t light properly. Worst case your power supply voltage might vary a bit depending on load and you get pixels which work sometimes but flicker or fail to light every now and then. And it turns out that some neopixels are more fussy about the “60 percent rule” than others. So just changing to a different type of pixel can break a previously working device.
I had this problem with the pixels attached to the chocolate synthbox. I was powering the 8x8 pixel grid you can see above from the 5 volt output from the PICO device. And it flickered. Much unhappiness ensued. Devices were swapped out and reconnected to no avail. Then I remembered the 60 percent rule. And an issue reported on the PICO Chord keyboard. So, I attached the power for the pixels to the 3.3 volt output from the PICO. This solves my “60 percent problem” at the risk of raising another one, which is that the 3.3 volt output from the PICO can’t deliver much current for the lights. The good news is that if I keep the brightness levels down (which I need to anyway to stop light bleeding between the dots) it works a treat.
If you have this problem with your pixels I don’t advise that you do this every time because of the power supply issue. A better way of solving the problem is to use a level converter to lift the 3.3 signal voltage to 5 volts.
There’s nothing quite like being able to go from a silly idea to a lump of working technology in around a week. It’s not finished yet, but it is looking a lot better than I expected. We do live in amazing times.
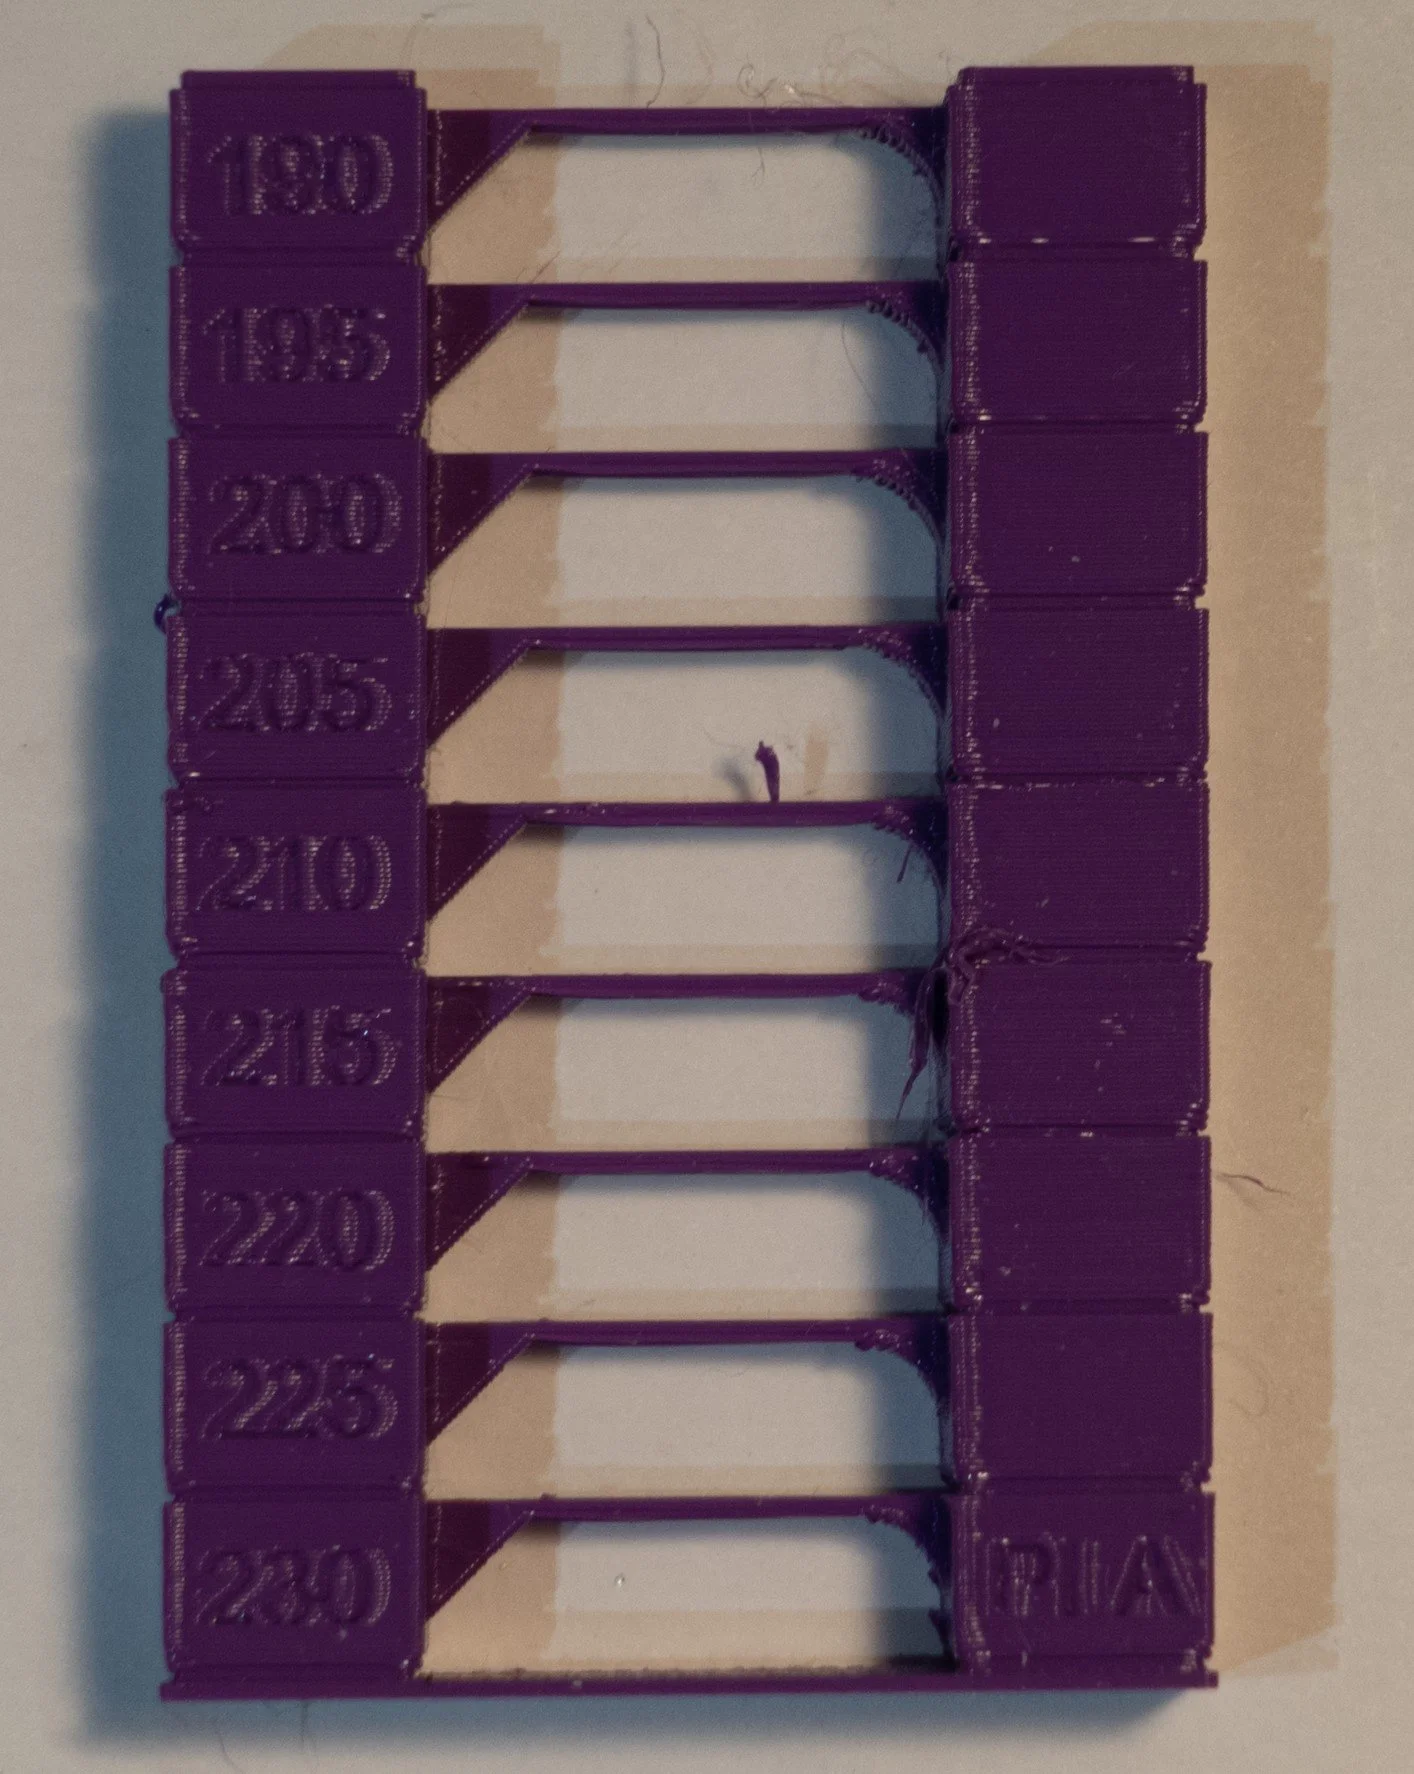
“Print a temperature tower” they said. It will make it much easier to decide which temperature to print at. Frankly I’m not convinced.
Nothing like a bit of patriotic bunting. Even though it is probably made in China…
Edge is a wonderful browser, but it doesn’t seem able to recognise a truly quality site just yet….
Rob Miles is technology author and educator who spent many years as a lecturer in Computer Science at the University of Hull. He is also a Microsoft Developer Technologies MVP. He is into technology, teaching and photography. He is the author of the World Famous C# Yellow Book and almost as handsome as he thinks he is.
Begin to Code with JavaScript is now available for purchase and download. You can find it here