Stuck Lock

stucklock.jpg

One of my favourite jokes comes from a Naked Gun movie:

“Who are you and how did you get in here?”

“I’m a locksmith. And I’m a locksmith.”

I didn’t say it was a good joke, just that it was one of my favourites. I was reminded of this when searching the internets for advice on fixing sticking locks. Every website that found seemed to contain the phrases like “…which should only be performed by a trained locksmith.” This seemed like overkill to me, and so I had a little look.

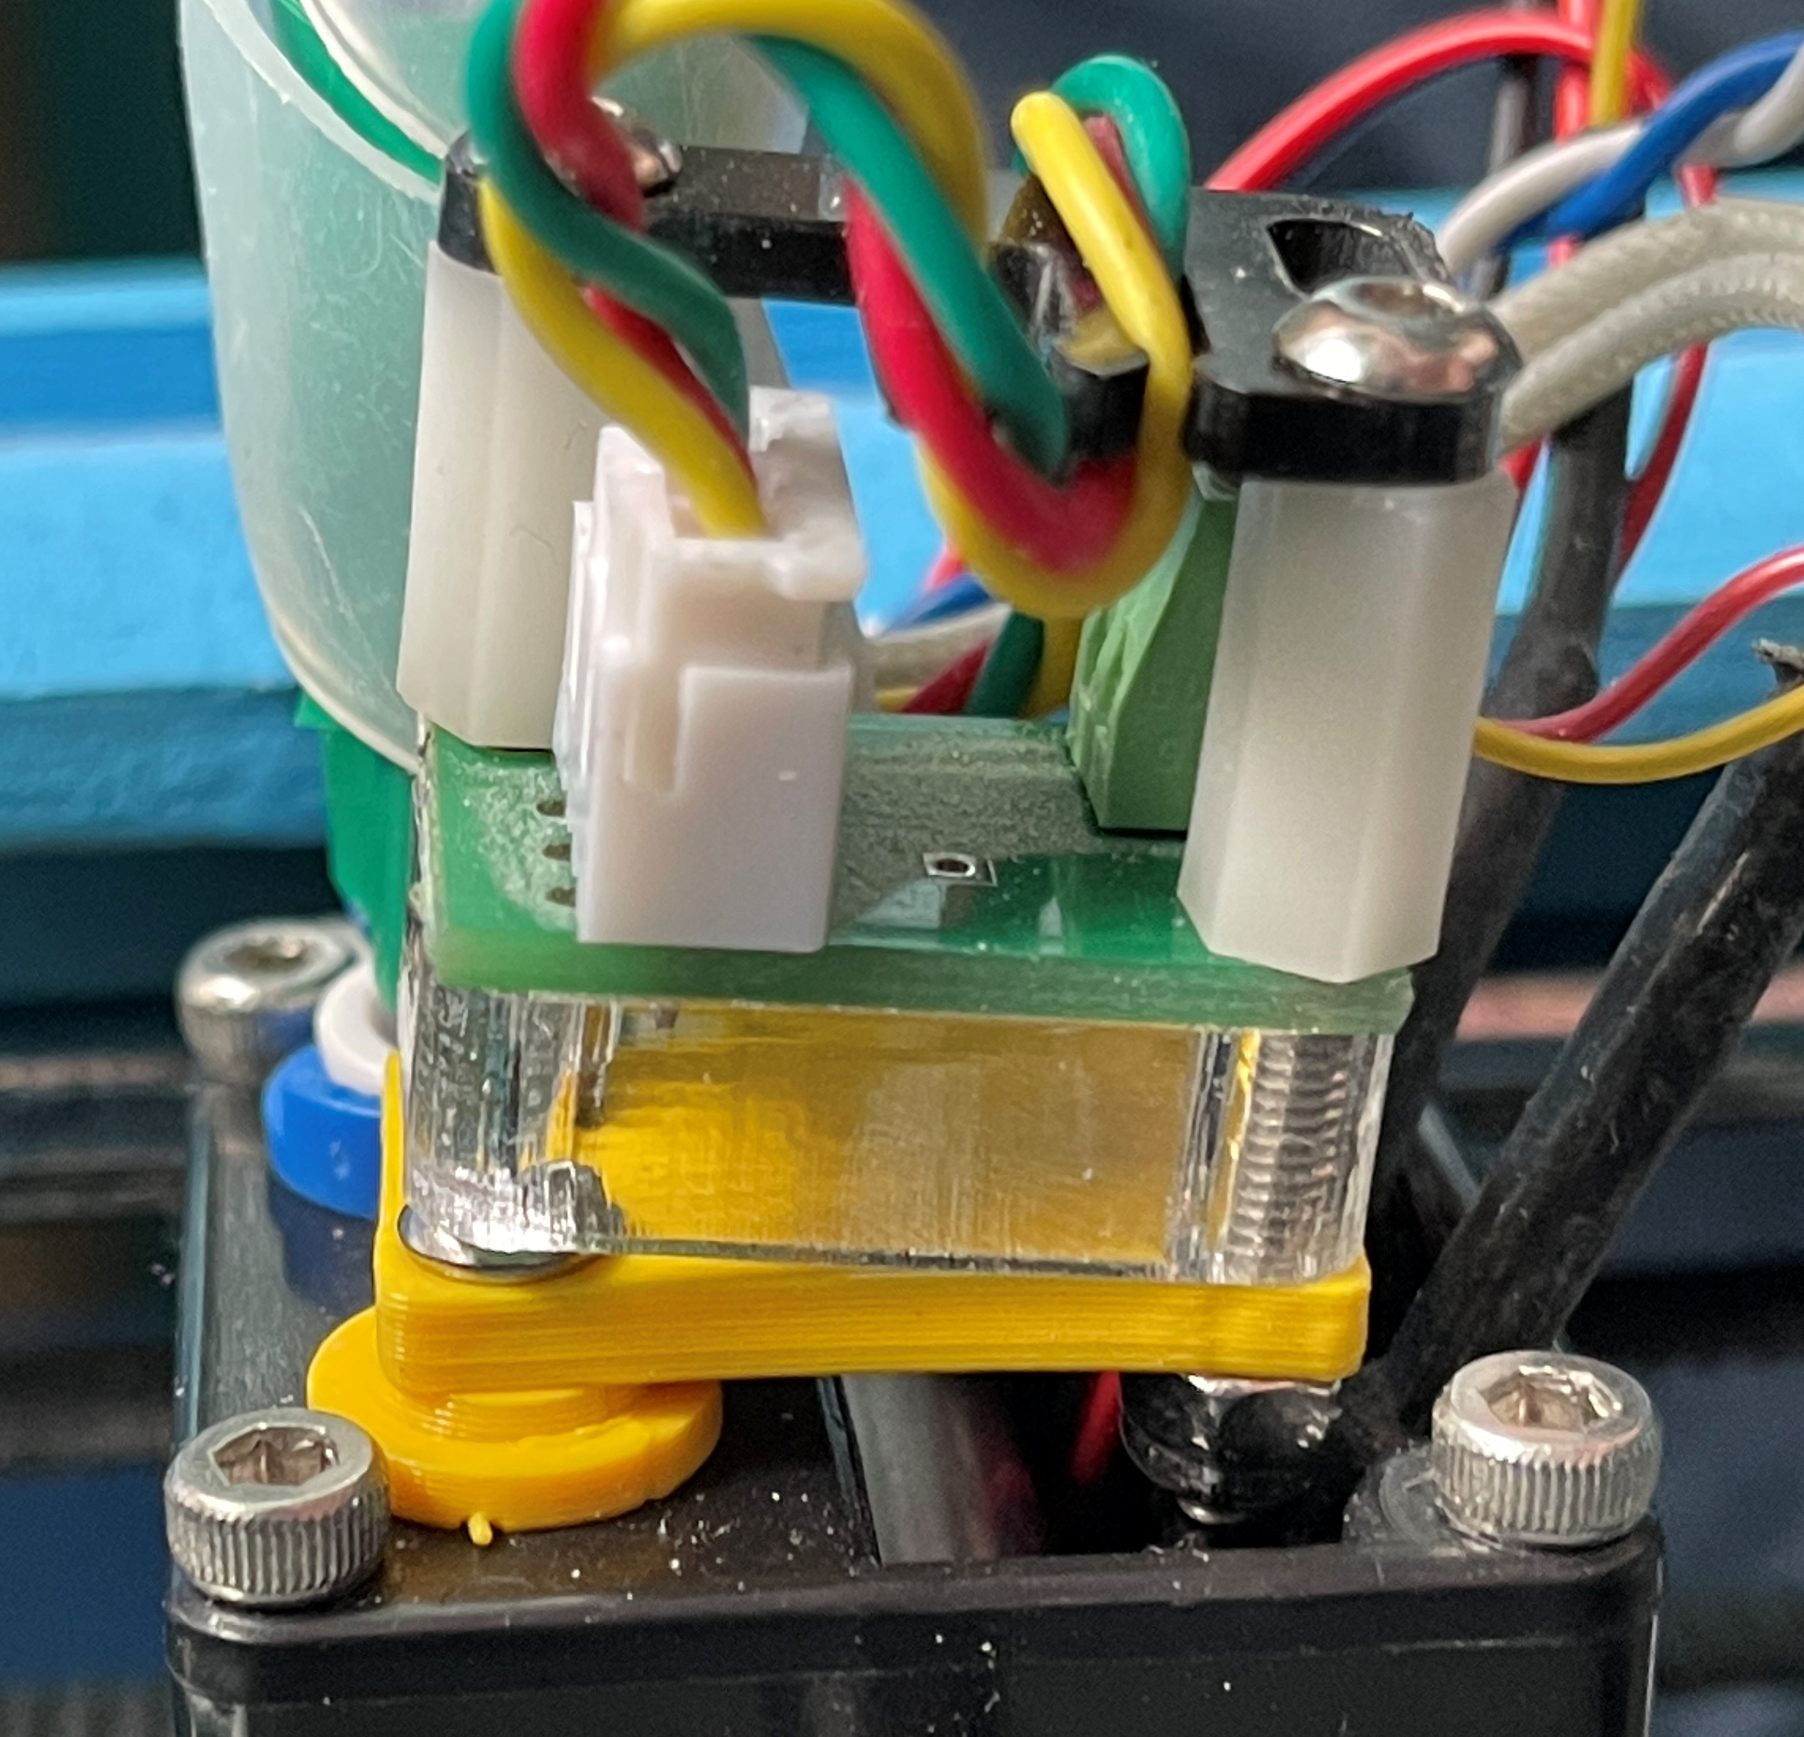
I traced the problem to the thing you can see here. It’s one of the claws that engages with the locking plate in the door frame and holds the door shut. It also contains a locking pin that goes into a slot in the locking plate. The pin should move smoothly in and out, but ours doesn’t. It gets stuck sometimes, usually when I’m headed to the bins with a pile of empty pizza boxes balanced on one arm. I wonder how it knows?

Anyhoo, I contacted the people who made the lock and asked them if they could sell me a spare. They couldn’t, but they did suggest adding a bit of “Three in One Oil”. I’ve done that, and now things seem to work a lot better. Although we haven’t had pizza for a while, so I’ve yet to perform a proper test…

Floppy photos

mavica5.jpg

We went out for a walk today and I took my camera that takes pictures onto floppy disks. It works a treat. The picture above has been slightly tampered in Lightroom, but I think it looks pretty good for such an old device. Each picture file is around 80K (which is very small) and has to undergo a lot of compression

mavica6.jpg

The camera clicks and whirrs happily after each photograph as it stores the picture on the disk. You really do feel like you’re actually capturing something. It has a 10x zoom lens which lets you get close to the subject but makes it hard to hold the camera still. The display is low resolution and hard to see in bright sunlight. I can get far better pictures from my phone, as can just about anyone else these days. But my Mavica works, and I love it.

Taking photos onto a floppy disk

mavica1.jpg

I’ve wanted one of these for ages. And now, thanks to the magic of ebay and the resilience of consumer electronics, I’ve got one. It’s a Sony Mavica and it cost me less than 20 quid, as opposed to the hundreds I’d have to pay back when it was released in 1998. And it works. Very exciting (at least for me).

mavica2.jpg

It takes pictures onto a floppy disk. You can get around 12 or so pictures on one disk. The resolution is not great, but at the time this was amazing. Particularly as you could then just put the disk in your computer and read the pictures straight off it. The camera arrived today with the case and all the documentation. For a device that is over 20 years old it’s in fine fettle. Everything works and the battery seems to hold charge.

mavica4.jpg

..and I’ve found a use for all those floppy disks I’ve been hoarding over the years. I’m really looking forward to taking it out and grabbing some pictures.

Simple encryption with the ESP32

esp32andesp8266.jpg

Early versions of the software for my Connected Little Boxes stored all the settings in an area of EEPROM memory. This is because the settings code was originally written to run on an Arduino Uno which only provides EEPROM as persistent storage.

Now that I’m using a the ESP8266 and ESP32 I can use a proper file system to store the settings for a device. This is nice, but has left me with a problem. On the Arduino Uno I was quite happy to store passwords in EEPROM. My software won’t let you read back the contents of password settings, you can only put values in. If you want to read the settings you’d have to get hold of the device and then swap the internal program for one which shows you the contents of the EEPROM. But with the new code I’ll have a bunch of files on the device which someone might be able to just take a look at.

So I started looking at really simple encryption. Not really encryption as such, just something to make it impossible for someone reading one of the settings files to be able to read back the values of protected settings. It’s not really proper encryption as the key and the code which uses it are both stored in the device so anyone with the time and the inclination could break it. However, I think what I’ve done is OK for its purpose.

#if defined(ARDUINO_ARCH_ESP32)
#define PROC_ID (unsigned long)ESP.getEfuseMac()
#endif

#if defined(ARDUINO_ARCH_ESP8266)
#define PROC_ID (unsigned long)ESP.getChipId()
#endif

#define ENCRYPTION_SALT 1234

void encryptString(char * destination, int destLength, char * source)
{
    randomSeed(PROC_ID+ENCRYPTION_SALT);
    int pos = 0;
    char * dest = destination;
    destLength= destLength -1;
    while(*source)
    {
        int mask = random(1,30);
        *dest = *source ^ mask;
        dest++;
        source++;
        pos++;
        if(pos==destLength)
        {
            break;
        }
    }
    *dest=0;
}

This is my encryption code. You give it a string and it scrambles the text. I’ve done it this way so that the characters codes still remain in the printable ASCII range. I use the processor ID number of the device and a salt value for each device to seed the built-in random number generator. I then use the magic of exclusive-or to scramble the text. The decrypt process is exactly the same code.

It seems to work OK. I only encrypt the passwords themselves. This reduces the amount of data that a cracker has to work with. You could crack it using any one of a number of attacks, but what you can’t do is just read out the text from a settings file and then use it, which is the level of security I wanted.

The way I see it, once someone gets hold of your physical device all bets are off security wise. Particularly if the algorithm is in the public domain too. That’s why I advise you to make a guest WiFi network for your IoT devices so that you can reduce the effects of a security breach.

Plumber Rob

new tap.png

“Last week there was a tap on the front door”

“Our plumber has a strange sense of humour”

Actually our plumber is me. And last week I got to show my lack of plumbing skills when the hot tap in the kitchen suddenly stopped delivering water.

After spending a night worrying about blockages in the pipework and failing hot water cylinders I decided to start by buying a new tap. If that didn’t solve the problem the next step would be to call in a proper plumber.

The tap arrived on Friday and I started fitting it that morning. I instantly rediscovered why I hate plumbing so much. When it leaks you never can tell quite where the water is coming from. You can only really tell that it is coming.

The most important thing I remembered though was that you only tighten things as much as you think you need to. Then you leave it for a while to see how much it leaks and tighten a bit more until it stops. By the end of yesterday I reckoned that things were staying dry and now it’s officially fitted. And we have hot water in the kitchen again.

Cantaloup

cantaloup.png

Cantaloop is about a man with a mission and a nice line in snappy dialog. Returning to his home town after a spell in prison for a crime he probably didn’t commit he’s recruiting a crew to take down the villain of the piece. Your job is to help in by guiding him through a series of scenes that play like a point and click adventure game from the eighties. The game is packaged as a spiral bound book. You flick between pages using your magic viewer (actually a red filter) to find out what your actions end up doing.

The scenes are really well drawn and after a while the interaction becomes second nature. Along the way you get to have conversations with the locals which are set out as scripted scenes, allowing those playing to hone their amateur dramatic skills. We’re a way into the first book in the series and having great fun. Well worth a look if you want to spend a few hours with friends or family solving nicely made puzzles and enjoying some truly awesome puns and one-liners.

Connected Little Boxes now use files to store settings

clb storage.png

Maybe not a totally gripping headline, but it works for me. Up until now the setting information (pin assignments, network connection options, MQTT connection details etc) for a Connected Little Box device have been held in EEROM. This meant that the software would work fine on devices that only have very simple storage, but it meant there was only 2K of space for setting storage in the device.

But now that has all gone. All the settings are stored in a little text file inside the ESP32 or ESP8266. Passwords and other sensitive items are stored using my “encrypto-obfuscation” technology which converts them into text that is a bit harder to understand.

This update has also solved another problem. Previously adding a new setting value to a process or a sensor could invalidate the stored values in the memory block. With the use of text based storage that limitation has gone away, so that my planned “over the air” update feature can be used to update the device without needing to have all the settings re-entered.

You can find the latest version of the build on the Connected Little Boxes repository here.

Read "Moonflower Murders"

If you’ve got an Amazon Prime account you can read “Moonflower Murders” by Anthony Horowitz for free. And you should. It’s the second book in a series.

You’ll have to buy the first one (and you probably will). Both are a good read in an Agatha Christie kind of way. I don’t want to spoil your experience by telling you what happens but if you like traditional murder mysteries I think you’ll rather like it.

moonflower murders.png

In search of stripy lawns

mower.png

I’ve had my mower a long time. It broke around 10 years ago when some little pins that linked the drive to the motor hub sheared off. My first repair, using the metal bits of treasury tags I had lying around was not successful, but my second attempt using steel nails worked a treat.

I got the lawn mower out last week, what with the grass starting to wave in the breeze. I had a look underneath to see how my repair was holding up. The repair was fine, but the bearing that holds the metal blades (lumps of sharpened steel that whizz around at amazing speed and cut the grass) seems to have collapsed. I can move the end of the blade up and down a worryingly long way. And since these parts are very close to my ankles when I’m mowing the lawn, I thought a new mower might be in order.

The mower has arrived. It turns out that mower technology has not moved on a great deal, but the new one does have a roller at the back. This means that I can get the same “striped” effect that you see on posh lawns and tennis courts. I hope it lasts as long as the old one did.

Fitting an Ultimaker 2 print head on an Ultimaker 1 printer

una head.jpg

I’ve had Una, my Ultimaker 1 printer since 2012. Over the years she’s delivered lots of 3d prints and quite a bit of frustration. It turns out that 3D printers are a vocation, not a platform. Recently Una has been through a bit of a purple patch, with poor quality and failed prints. I’ve tried a number of things to fix this, my most radical has been to completely replace the print head with one from an Ultimaker 2. I started with some shopping:

  • I bought a replacement print head here.

  • I bought a replacement head block to fit the heater cartridge here.

  • I bought a tiny fan to go in the print head here.

I made sure to buy the print head and head block for 3mm filament. When they arrived I got busy fitting them. There is a slight problem with moving from an Ultimaker 1 to 2, which is that the two rods that support the print head are not oriented the same way. This means that I had to rotate the top part of the new print head by 90 degrees so that the hole for the filament and print block lined up up. This means that I can’t use dual filament any more but didn’t bother me though, as I only ever want to print one filament at a time.

The other problem I had was that there was nothing on the new head to support the thermistor interface which is fitted to the print head of the Ultimaker 1. To fix that I’ve designed a little platform and a couple of washers that fit into the redundant second filament feed hole. You can find the designs on Thingiverse here.

topfitting.png

Yon can see how they are fitted above. I used the connection cable for the second thermistor for a second print head to supply power the little fan. It needs 5volts and should run all the time the printer is switched on. I found some very good assembly instructions here that told me how everything else fitted together.

This upgrade has been a success. Una now prints as well, if not better than before. I’ve not had to change any of the software settings because the fundamental elements of the printer remain the same.. If you have an old Ultimaker 1 that you want to give a new lease of life, I reckon it is well worth doing.

Tenet in "quite good movie" shock

tenet.png

I must admit that I wasn’t expecting that much from the Tenet movie. The reviews that I’d seen were a bit “meh” and made much of the mind bending “time running backwards” parts being highly confusing for the viewer.

For me it wasn’t that much of a problem, although a lot of the temporal tricks seemed to be there just so they could show some amazing set pieces. The good news is that time does run in different directions but the film does have a beginning, a middle, and a satisfactory ending, along with an over the top baddie, a damsel in distress and a ruthless hero.

If you view it as a James Bond movie with a title that reads the same forwards and backwards you’ll be just fine.

First BBQ of the year

Well, that was fun. In celebration of a family birthday we had a barbeque this afternoon. I have a record with barbeques that can charitably described as “patchy”. Most of the time I can argue that this is down to the weather, which used to reserve special levels of downpour for our barbeque events. Although the attempt to start the fire using newspaper, which filled the neighbourhood with tiny scraps of burning paper, was entirely down to me. This time I settled for the special lighting fluid, and plenty of it. This went up a treat, and left a little pile of happily glowing coals on which we were able to prepare some sausages and burgers. Which were very nice.

Una Reborn again

newhead.png

The tiny little fan for the print head for Una the Ultimaker arrived today. You can just see it behind the grille in the above picture. I’ve rebuilt everything and I’m printing with it. Expect to see an anguished post in a couple of days about how everything has broken again.

Update: Sooner than you think. The above print failed because some of the items came loose. I’m going to clean the print bed properly and double check the level…