Radios in tins = bad idea

Perhaps they might make a nice birthday present…

I’m making a new embedded device. It’s going to be a Bluetooth remote control. I’m on an upcycling kick at the moment, and in a tradition going back a while I thought I’d put the device in an Altoids tin. I bought the mints and then I realised that Bluetooth uses radio to work, and putting the PICO W in a metal box (i.e. Faraday cage) might not be for the best. Oh well.

ESP resources from Rob

Sprockets are apparently in…

I got a nice comment from Dave which also asks about any resources for the ESP8266 or the ESP32 devices. I thought I’d pop the answer in a blog post.

You can find all my ESP32 blog posts here. You can find all my ESP8266 posts here. I’ve written a bunch of articles for HackSpace magazine which include ones about ESP devices which you can find here. I’ve got a bunch of project repositories which include those devices on my GitHub pages here. I hope you find them all useful. Or at least one or two.

What is DNS?

A survey released today reveals that not many people know what “DNS” stands for. It’s a computer networking term that specifies the system used to convert internet names into the physical address of a computer. They say that this is bad, but I think they were asking folks the wrong question. If they’d asked folks “what is robmiles.com?” most of them would probably have said it’s an address on the web. Which is just about all you need to know about DNS.

What folks do need to know however is that robmiles.com costs me a few pounds a year to keep active, and that when I set it up nobody checked that I was really Rob Miles. A Domain Name (which is what robmiles.com is) can be bought for a tiny price and there is no process of checking that the names represent what they imply. Today I can buy the domain name “bbcradio.media” for less than two pounds. I can then set up websites with that address and pretend to be the BBC

You could be the BBC for less than a couple of Quid!

So the important thing to know is that internet addresses are easy to get and very cheap, which means you need to be seriously careful when you go onto the internet and start looking for things. You also need to be careful when you get emails from people claiming to be from a particular organisation or company.

Chunking your ESP32 Web responses

Note that this is not actually how computer memory works

Great title for a blog post eh? One of the wonderful things about modern embedded devices is that they can host web sites. You can use your phone to browse content served by a device that cost less than a pint of beer. Although some people prefer to buy the beer.

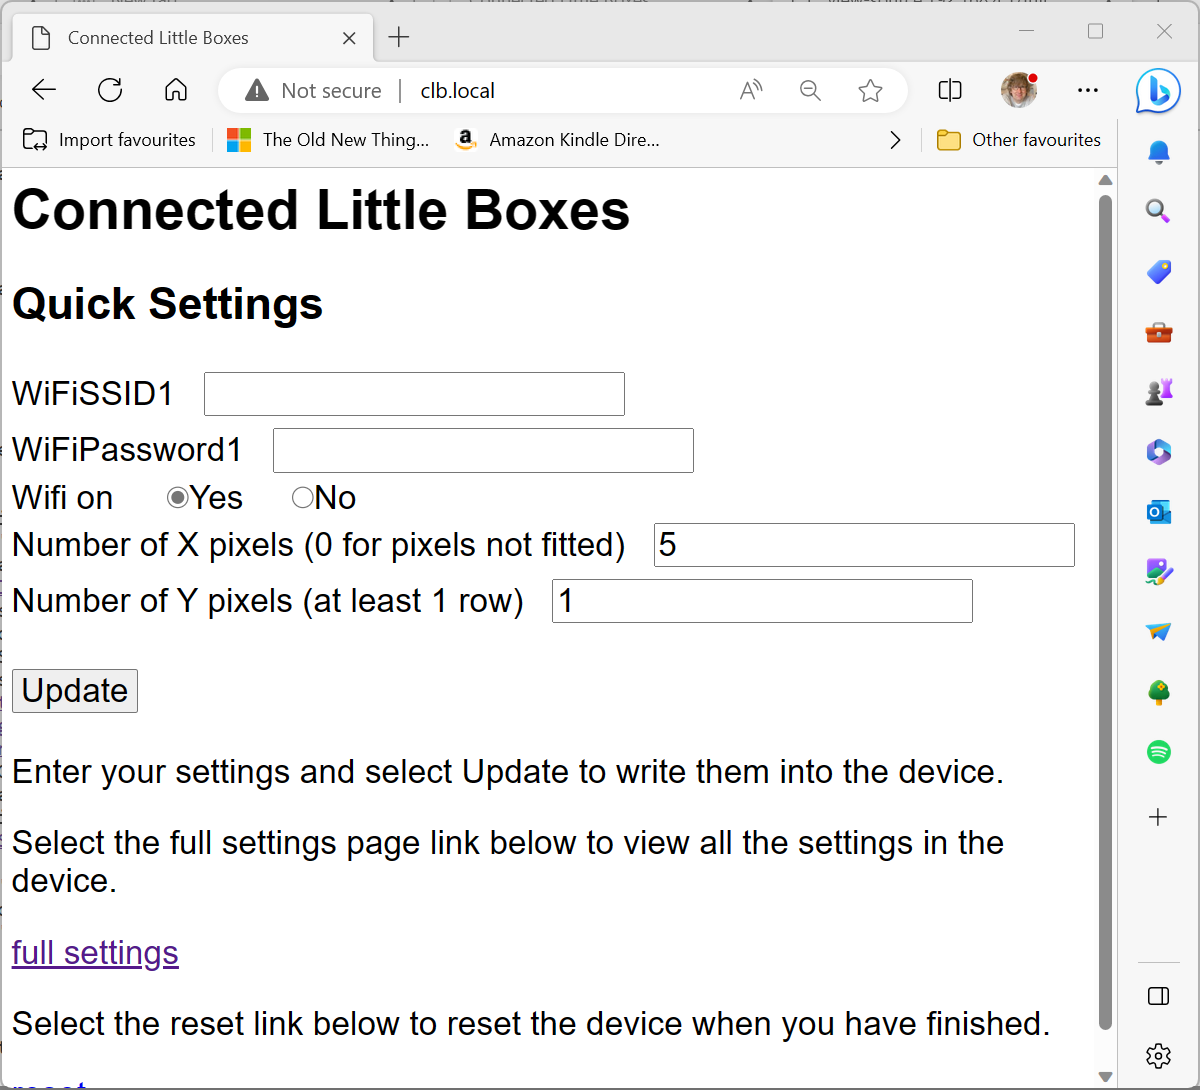
Anyhoo, I’ve been making devices that host web pages as part of the configuration process for my Connected Little Boxes. You turn the device on, scan a QR code with your phone which connects to a WiFi hotspot served by the device and then scan another QR code to get to a configuration page so that you can enter your local WiFi credentials and generally set the device up. This is how lots of connected devices work, and I wanted to make my own system for doing this. And I ran into problems with memory. Not forgetting what I’m supposed to be doing (ho ho) that happens all the time. More like the way that once I’ve got everything running on my little ESP device I’ve got hardly any memory left for large things (comparatively) like web pages.

Now, one way to serve out a web page is to put the page content into a string and then send that string out. This works, but you need enough memory to hold the entire string. Which it turned out I didn’t have. So a better way is to send the page a chunk at a time. The ESP8266 web server has a way of doing this:

server->chunkedResponseModeStart(200, F("text/html"));
server->sendContent(settingBuffer);
server->chunkedResponseFinalize();

The first statement tells the server I’m sending a bunch of chunks. The second statement sends a chunk of text from the settingBuffer string. You can send as many chunks as you like. The third statement ends the chunking. Very useful, particularly when you discover that you can send out chunks of text that are stored in program memory rather than ram.

So I got all this working and then I wanted to move the code to the ESP32 device. This chip is a bit more expensive than the ESP8266 but it is a lot more powerful. And it doesn’t do chunking. Wah!. Fortunately I found this wonderful post which told me how to extend the ESP32 web server to make chunked responses work in the same way as the ESP8266. It will be part of the latest version of the Connected Little Boxes embedded code (tentatively titled HULLOS-X) soon.

When in doubt - rebuild everything

Working work in progress

I’ve spent the last week trying to get an ESP8266 device to host a configuration web site for my Connected Little Boxes. It’s proved to be quite a challenge (see Monday). I had the worst possible fault. One that only appears every now and then. And causes the whole thing to just crash.

In the end I decided to go back to first principles and run one of the example applications in a brand new project. And it worked a treat. That’s good because I now know that what I’m trying to do is possible (always useful knowledge) but bad because my code still doesn’t work. In the end I migrated all my code into the working example and went from there. In the process I discovered that, for whatever reason, the code I had been using was based on very old driver code for the device. Early versions of the ESP8266 libraries were known to be a bit buggy and unreliable. I thought that mine had been updated as part of the normal behaviour of PlatformIO (which I’m using to build and mange the app). This turned out not to be the case.

So - if you’ve got problems that you don’t think are your fault, it might be worth checking to see if you are using the latest version of the libraries for your product. Of course, new versions also bring new bugs of their own, so make sure that you keep copies of the old version too…..

Don't make everything a challenge

This is actualy how it looked when I was working on it…

I personally think that a bit of failure is good for you. But not too much. One of the better ways to fail is to turn something into a challenge. Today I was faced with something broken. I figured out what was wrong and how it could be fixed. And then I tried to fix it. It looked like an interesting challenge. Of course I failed. It turns out that it was a bit more challenging that I expected. Perhaps with more time and more patience I could have completed the job but I ran out of both in the end.

I was just asked to find out what the problem was. I wasn’t expected to fix it - which made the challenge all the more enticing. The good news is that I did learn something (you should always learn something from your failures). The thing I learned was that sometimes the best thing to do is explain what is broken and then let an expert get on with fixing it. Not wade in yourself. Even (or perhaps especially) if the challenge looks interesting.

Pentax 67 at Hornsea Mere

Quite pleased with the detail in the clouds. Less pleased that the clouds were there in the first place…

Hornsea Mere is one of my favourite places on earth. Which is nice because it’s just down the road from our house. We went there for a coffee today. We could have had a round of golf too, but the weather didn’t really merit it, and we were missing our golfing enthusiast.

It was a bit windy for rowing

I took some pictures with the Pentax 67 camera. This takes huge pictures (you could fit around 50 Minox pictures on one Pentax frame). It is great fun to use but I’m still getting used to it. I was using some outdated film (expired in 2016) but I still got some reasonable results from it.

It looks even better with the lens cap off..

The Pentax 67 is a big heavy camera which is a bit hard to use and difficult to focus. I love it.

Developing Minox film

I think the light meter on the camera got this about right. There is some detail in the dark parts of the shot.

My empty 35mm cassettes arrived today. I needed them to transfer the film out of a cassette into cut strips. To do this I had to tape the end of the spool of film to the empty cassette spool and then load the cassette into the splitter. First lesson – the receiving cassette must be “upside down” or it won’t work. After that it all worked quite well.

The yellow block contains the blades that will cut the film

The film splitter is from camerahack. It’s beautifully made and works a treat. The receiving cassette is on the left. You crank the handle to pull film out of the cassette on the right, over the cutting block which has blades fitted in it. When I’d finished I had two lengths of 9mm film in the receiving cassette.

Anyone need any spare sprocket holes?

Then I just had to load one sliced film into a Minox cassette in a dark bag. Slightly complicated by the doorbell ringing as I was doing this. But it passed off OK. I had to answer the door with a huge black bag on the end of my arms. I then hand wound the film into a little roll and then popped it into the Minox cassette with the tongue protruding and put the cover onto that side of the Minox cassette. Then I could tape the tongue to the takeup spool and pop that spool in the other side of the Minox cassette in normal lighting. Ended up with a Minox cassette with a length of film in it.

I went outside and took some pictures, but this was slightly complicated by the way I’d not advanced the film counter on the camera to zero before I loaded the film so I had no idea when the film ended. I really didn’t want to run all the film off and back into the cassette so I gave up early. Then I got the cassette out of the camera, punched a hole in the end of the film and loaded the film into the Minnox daylight tank. This worked mostly OK. I used a 25ml measure to work out 53ml of liquid. Did the 1+50 develop which was rather hard to measure. I think I need a syringe.

Developing was OK but I didn’t let the developer fill up the tank as well as I might. Same for the wash and the fix. I did get some pictures though, but the film has opaque deposits which I think are silver from where the fixer didn’t reach. Scanner had real problems with some of the film too. Some of the pictures came out quite well though. A bit grainy but no evidence of problems with the splitting and the cassette transfer. Things to remember for next time:

  • Zero the counter on the camera before you put the film in. Also set the film speed – although the exposure was generally pretty good.

  • Fill the tank properly and give the liquid time to go into the tank. Especially important during fixing.

  • Hopefully the old cassette will dry out (it gets immersed in developer during processing) and I can reuse it.

  • The Minox thermometer that came with the tank is badly broken, but the tank itself is properly watertight and works a treat – although I need to get better and agitation and making sure that all the film is covered. I think for the fixing process I didn’t cover the top part of the film properly.

  • There were some issues with frame spacing but these might be to do with me not opening and closing the camera firmly enough.

  • Use “Film (with film holder)” as the Document Type for scanning. Don’t click “thumbnail”. Scanning works best if you select the entire length of film and then chop these up afterwards – I think. Use 3200 dpi for maximum detail.  

Phone Plans

I’ve not tried dialing the number. I don’t think it would work

Another retro purchase today. I saw this phone calling me from a shop window in Beverley. I just couldn’t resist it, what with it being in good condition. And red. It’s been suggested that I might like to make it into a Batphone, but instead I’m going to pop a Raspberry Pi into it and try to turn it into some kind of personal assistant. You select the options you want by using the dial. I’d also like to use the telephone bell for an alarm signal. This will be a bit tricky as these are usually powered by 50 volts, but I’m going to take a look at inverter technology to see how I can make it work.

Great fun.

Focus is important

I think I still might have a light leak…

It’s taken me a couple of goes to get this picture, taken on using my 3D printed camera. The first version was horribly blurred because I assumed that I could set the focus distance approximately and it would come out OK. This turned out not to be the case. The bigger the negative, the more important it is to get the focus right. The cameras uses film which is 4 inches by 5 inches, which is rather large. There’s a lot of detail there, but you only get it if the focus is correct.

Happy Birthday Me

It’s a lovely little device

It’s my birthday today. Yay! Above you can see my present to myself. It’s a Minox daylight developing tank. It lets me take film from my tiny spy camera and develop it without needing a darkroom. You put the film cassette inside the tank and the film is pulled out into the developing spiral. Then you add tiny amounts of developer and fixer and then you get your strip of developed negatives. At least, that’s the theory. I’m looking forward to trying it for real.

My birthday was great. Lots of cards and presents. And chocolates. And cake. Good times.

Computer Speedup trick - turn off iCloud Photo Sync

Start the icloud app and then clear all thse options for Photos

The title of the post says it all really. For a while I’ve been bothered by the way that the fan in my PC kept coming on when I wasn’t doing much. Then things seemed to slow down every now and then. A little detective work with Task Manager showed that the Apple iCloud Photo Sync process was grabbing 10% of my machine for no apparent reason. I’ve turned off photo sync. There’s no particular need for it on the PC and it has solved the problem.

I had a look at the Apple support for this problem and the suggested solution was to remove iCloud and install it again. Which wasn’t terribly impressive.

Achievement Unlocked: Rediscovered my Meccano Motor

I have no idea what I’m going to do with it.

When I was around 12 years old I got a Meccano motor for Christmas. Not just any motor. It had a six ratio gearbox and it came with tiny plugs that I could use to connect it to my Minic Motorways transformer. It was awesome. I made all kinds of remote controlled moving things with it. Then I lost it.

A few years I ran across the same motor in an antique centre in Beverley. After a few weeks of dithering about whether or not to buy it the motor then vanished from the shelf. Oh well. Then this week it (or one like it) appeared again. So I pounced. It’s in the original box and it looks as if it hasn’t been used. I’ve not fired it up yet. I’ve got plans involving MOSFETs and low speed control.

Mdns makes your embedded devices easy to find

I’m making a network controlled light. The idea is that the light hosts a web site which you can find with your phone or computer. The light will have an internet (IP) address which you can use to locate it on the network (something like 192.168.50.5) but this might change as these addresses are assigned by your network router on a first-come first-served basis. What you really want to be able to do is refer to your light as “flashlight.local”. The mdns service makes this possible.

I’m using Circuit Python to host the website in a Rasbperry Pi PICO-W. They have a lovely HTTP server library which works a treat. It also supports mdns (Multicast Domain Name Server). This lets applications (for example your browser) ask if anyone on the local network has a particular name (in this case flashlight.local). The mdns server running on the PICO-W responds to these requests with a network address which can then be used to contact the PICO-W. The code below was added to the application and starts the service running. This code is slightly different from the example code for the service, but it does work very well.

import mdns


mdns_server = mdns.Server(wifi.radio)
mdns_server.hostname = "flashlight"

Once the server has been started it seems to just run in the background responding to requests.

This is the final website for the light

You can use this to make your embedded devices much easier to locate. If they get given a different IP address next time they start up they will just keep going.

Cockroach Circuits

I’d say “don’t do this at home” but I’m doing it at my home so it must be OK…

I can just about fit a PICO inside my remote controlled flash light, but there is hardly any room for anything else. So I’m using the “dead cockroach” hardware construction style. The circuit looks like a dead cockroach with wires standing in for legs. The connections are created by soldered wire-wrap wire into the holes in the board. I’m going to wrap the whole thing in insulating tape before fitting it into the flash. I like using wire-wrap wire. It is so flexible that it doesn’t tend to come undone from connections. I’ve got lots of different colours, which makes it much easier to follow. The circuit above is an implementation of this:

My level converter is blue though…

The important thing to do is keep testing as you build it, although so far it has kept working .

Hurray for Level Converters

At its brightest this pixel gives out 3 watts which is a lot of light

I’m working on my PICO controlled flashlight. Today it was time to wire up the output led. I’m using a Pixie light. This needs 5 volt levels to control it, but the PICO only produces 3.3 volts. This might just work (some things do) but I’m a bit concerned that if the power voltage for the lights gets a bit too high the light will not work or worse, be unreliable.

So I’m adding a level converter. These are very cheap and easy to buy (search for “arduino level shifter” on your favourite ecommerce site), but a bit of a pain to wire up as you have to connect input and output signals as well as power supplies and grounds for each side of the connection. However, as you can see above, the light works fine. Next I have to work out how to get the circuitry into the flash gun.