Using Wire.h and SPI.h in Arduino project libraries

The Wire.h and SPI.h Arduino libraries are kind of important. They’re used by programs to communicate with devices over the I2C and SPI busses. I hardly ever use them personally, I rely on people much cleverer than me to create libraries that I can use to talk to the hardware I want to use.

I’ve been creating a “Connected Little Boxes” driver for the BME280 environmental sensor (a personal favourite of mine). I’d added the AdaFruit libraries and at that point my program broke. The compiler kept complaining about the Wire.h and SPI.h libraries not being available. Except that they definitely were. I could see them.

I’ve had this before, it is very frustrating. It’s one of those horrible situations where you have to know the “magic” trick to make it work. The magic thing to know is that if any of your libraries use Wire.h or SPI.h you must Include them in the main source file (i.e. the program file that contains your start and loop functions).

#include <SPI.h>
#include <Wire.h>

This makes the linker happy and allows your program to build.

Humble Bundles for Makers and Gamers

Talking of Discord, as we were, Grace on the Hull Makerspace posted that there is presently a great “Humble Bundle” for Maker books going at the moment. You can get a whole bunch of ebooks from Make magazine for around ten quid. Find out more here or click the image.

Simon (on another discord channel) also told me about a really good bundle of tabletop games that is also available. You can find that one here or click the image.

We’ve played quite a few of these and they all work well, particularly for network play.

Hull Makerspace is on Discord

hullmakerspaceLogo.png

I had a splendid chat from Matt at Hull Makerspace today. It got even better when I turned my video camera on around half way through. Or perhaps it didn’t.

Anyhoo, one of the things that dropped out of the conversation was the fact that Hull Makerspace has its own Discord channel. Discord is a great place to meet and chat, usually about games but sometimes about other things - like making stuff.

The makerspace has an open chat on a weekend where you can talk about things you are building and discover what they can offer and they are building a lot of expertise in making stuff. You can get involved here.

I’m really pleased to discover that the makerspace is going from strength to strength, even in these horrible times.

The Humber Bridge is now on Microsoft Flight Simulator

Humber Bridge.png

When I first saw the new Microsoft Flight Simulator I muttered that the Humber Bridge didn’t look up to much. It does now. The wonderful people at flightsim.to have spent ages making a really nice looking model that you can add to your installation of the program. It makes a bridge that is truly worth flying round. I’ve no idea if you can fly underneath it, but I’m going to have a try.

You can find the model here. Its a free download once you’ve signed in.

Learn Internet of Things at my Red Nose Day lecture in rhyme

Funny is Power 1.png

Big news today!

I’m doing one of my world famous (in my world) Lectures in Rhyme in March. These go back over thirty years, to a time when I actually did deliver lectures for a living. You can find out what I’ve been up to in the past by taking a look at my archive here. This year I’m going to talk about something very close to my heart; the “Internet of Things”. In fact I’m going to tell you how to make one of your own.

Change your world with Connected Little Boxes

CLB-22.png

Do you want a light to flash red when someone goes near your stuff? Do you want a light to flash red when it is cold outside? Do you want a light to flash red when you’re late for your bus? What is it with you and red lights?

Anyhoo, in this poetic and technical lecture I’ll tell you how to do all these things, and also how to put your name in lights (as long as your name is Rob, David, Imogen, Mary or “Red Nose Day 2021”). You’ll also discover how to make connected objects that can move things, light up, detect a person, tell you the time and do something when you press a button or turn a knob. And you can’t say fairer than that.
The lecture will be on the 19th of March at 7:00 GMT on the Internets. And there will be slide decks, a recording and probably a T shirt.

Keep coming back here to find out more about how its going to work and how you can get involved.

Tags of Fun

CLB-34.jpg

For 2021 I’ve updated my Tags Of Fun so that they have mystery squares and circles on the bottom. I’m going to be printing off the tags and selling them to anyone who comes into “selling range”. If you’ve got a 3D printer you might like to make and sell some for yourself. Every tag is software generated and I can make you designs that are unique in the universe. Unless you print two.

You can play silly games with your tags or you can just collect the different colours and use them to liven up your keyring. You can find the design for the “starter kit” of tags here. If you want your own completely unique set of tags, let me know in a comment on this post and I’ll generate a set of 16 just for you. For a donation of course.

Talking of donations, you can give me money here.

Daring filament swaps

What do you do when you are just about to join in a networked game of pass the parcel and you discover that your 3D print job is just about to run out of decanted filament? I’m sure this is a problem that we have all faced from time to time.

Anyhoo, for me the solution was to pause the print from OctoPrint, unload the filament and replace it with a full roll and then resume the print again. And it worked. There was a bit of a blob on the print where the printer head had loitered for a few minutes but this is on the inside and not visible as it turns out.

So the lesson is that if you do notice that your filament is running low it is is possible to swap to a different reel during the print job. Just make sure you do it quickly.

Filament Decanting

filament decanting.png

Turns out that filament decanting is a thing. I’ve been 3D printing and I’ve just had a print fail after 5 hours because the filament didn’t unwind smoothly from the reel and got stuck. So my print had a 2 mm high section that just wasn’t there. Wah.

So this morning I spent some time winding filament off the offending role and onto an empty one. This works a lot better. It’s a pain to have to do this - I blame the way that the filament was originally rolled onto the reel, but at least it means that my prints get all the way to the end.

The Windows 10 Volume Mixer is Awesome

volume mixer.png

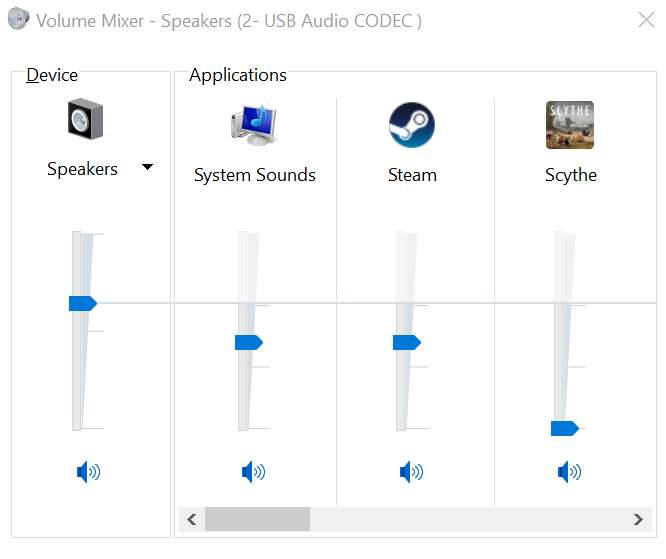
You might not know this, but on Windows 10 you can use the Volume Mixer to control the sound output from individual programs running on your PC. In the screenshot above I’m using it to silence the really annoying in-game music produced by the otherwise wonderful Scythe game. I’m always a bit confused by the background music produced by these digital boardgames. It’s not as if the physical copy comes with a CD or a download code.

The first thing that I usually do when starting a game like Scythe is to find the well hidden option that turns the sound off. Tonight I forgot to do that, and so we were stuck with a loop of unwanted music while we waited in the online lobby for others to join us. No matter, just right click on the speaker at the right hand side of the task bar, select Volume Mixer form the menu that appears and we could turn the output right down. It even remembers the setting for the next time you run the same application.

Most useful.

Arizona Sunshine for the Quest

arizona sunshine zombies.png

First the bad news. The graphics in Arizona Sunshine are not the best all the time. Zombies are not just hard to kill, sometimes they float backwards into the air and bits of them appear through walls. However, when playing the game this is not a problem. I guarantee you’ll be too busy hunting for ammo or frantically trying to reload to spot these glitches.

I’ve played about twenty minutes of the solo campaign and it seems quite fun. A story is unfolding and up until now the zombies I’ve bumped into have been quite easy to dispose of. However, I really bought the game for co-op play and last night four of us had a very happy time fighting off waves of zombie hordes.

The way that you hold and wield weapons works very well. You can manage both a rifle and a revolver quite comfortably. The reload action is nicely realistic although you’ll find your clip always runs out at the most inconvenient times which adds a lot to the atmosphere of panic. The networked group play is rock solid, and you do get to see the entire figures of your fellow players, which adds a lot to the gameplay.

At the time of writing this post the game is available for a third off in the UK, which makes it around 19 pounds. At that price it is very good value.

Using the Second Serial Port on the ESP8266

Wemos Printer .png

The ESP8266 processor chip has one and a half serial ports. One has both TX and RX connections, so that it can both send out data and listen for incoming data. This is port usually connected to via USB to the host computer and used to send programs into the device and to have conversations with our running programs. We can use this port to connect to other things but this makes it hard to interact with our device.

The other “half serial port” on the ESP8266 is a port that can only transmit data. That’s fine for me at the moment as I only want to send data to a printer. The TX signal for this port is connected to D2 on the ESP8266 and which is wired to pin D4 On the WEMOS D1 Mini, as shown in the diagram above. For numbering reasons (computer people like to start counting at zero) the second printer port is numbered Serial1. You can open and use it in the same way as the other port:

Serial1.begin(19200); // open the port at 19200 baud
Serial1.println(“hello”);

Your program can try to read from this port, but it won’t see any data.

What about SoftwareSerial?

At this point you might be asking “Why doesn’t Rob just create a software serial port and have done with it?”. Good question. A software serial port is a piece of code that twiddles a data output as if it was being driven by serial port hardware. This is called “bit bashing” because the code “bashes” the data out.

The only problem with a software serial port is that it usually requires the sole attention of the processor when it s being used. I thought when I first saw these that they might do cunning things with timers and interrupts that meant that they had no impact on performance, but this is not the case. If you use SoftwareSerial you will find that your program is effectively stopped while it sends and reads data. That might be OK for you, but not for Rob. I don’t want the lights on my Connected Little Box device to flicker when it prints something. So I much prefer a physical port which sends each byte of data without the involvement of the processor.

Rob’s Amazing Interrupt Driven Serial Port

On a slightly different topic, if you need to connect a very large number of serial ports to an ESP8266 device and you don’t want to use Software Serial to read them all (which usually doesn’t work if you have more than a couple of inputs) you might like to take a look at my “edge triggered serial port” code here. This is a Software Serial implementation that only stops the processor when it sees the edges of serial data.

It's still always the power supply

printertest.jpg

In a post a while back I surmised that if weird things are happening it is because of a problem with the power supply. It’s still true.

I’ve decided to add a printer to my Connected Little Boxes. I thought it might be fun to be able to print little messages on paper. I dug out my little printer and connected it a Wemos device. I did a tiny test and it worked fine. So I set to and built a printer module into the Connected Little Boxes framework. And it didn’t work. That’s not actually surprising. I’m deeply suspicious of code that works first time. It usually means that I am due a bunch of pain further down the tracks. This time it looked like I was getting all my pain up front, which is fine with me as long as I can fix it.

I did some tests and it looked like a buffer/timing problem. Short strings printed fine. I could print“12345678” but if I tried to print “123456789” it failed. The buffers were all the right size, the logging said the printing had completed OK. The little lights that I had connected to the printer data signals all flickered hopefully. The only thing missing was printed output. Wah.

I did what I usually do when I hit a problem like this. I went and had a cup of tea. I’ve discovered that if you hit a problem where the universe seems to be broken the best thing to do is walk away from it for a while. I’m lucky in that I haven’t actually got a customer waiting impatiently for the product and the printing feature is not the subject of a piece of my coursework that is due in (the other reason for fretting about deadlines).

After my second biscuit I’d figured it out. It was my old nemesis the power supply. The printer I’m using is thermal and prints a line of text all at once. The more you print the more paper it has to heat up and the more power it needs. I was powering it from the USB connection on my PC which can’t deliver much current. In fact, it delivers just enough to print “12345678” and no more.

I tested this by trying to print “1 2 3 4 5 6 7 8”. This is a longer string, but it needs as much heat to print as a shorter one. That printed fine. So I connected a proper power supply and off it went. As much string as you like.

Una Reborn

I’ve found another use for a 3D printer. You can use it to print spare parts for your other printer which is broken. I used Edna the Ender to print out the replacement fan ducts and also the rather fancy Bowden tube holder you can see above for Una who broke recently. I’ve re-assembled the print head (again) and this time I’m much more confident that Una will be back to her old self. The main reason for my confidence is that I think I’ve solved a problem that I’ve had for ages.

If you look at the picture above you’ll see that the print head (the brass part you can just see above the orange material that I’m printing) is tightened right up against the heater block (the shiny aluminium part). Previously, for reasons that must have made sense at the time, I’ve had the nozzle hanging down from the heater, which has meant that the heat from the heater block has only a small area to travel down to the nozzle. I think the result of this has been that the nozzle has been quite a bit cooler than the heater block, to the point where I’ve had to increase the print temperature just to get molten filament through it. With this new arrangement I’m printing successfully more than 10 degrees cooler than before. And it works a treat. Una is now producing stuff that is really good, very close to the quality of Edna.

So, if you are building a printer, make sure that the nozzle is as tight up to the heater as you can get it. That way it will spread the heat around properly.

Pimoroni Pico RGB Keypad base

pico buttons.jpg

This is a nice little add-on for a Raspberry Pi Pico. It’s a hex keypad with very pretty illuminated buttons. It’s easy to set the colours of the buttons and read their state into a Python program (not tried C++yet).

I’m very tempted to move the two button game onto this platform, I think it would work rather well. You can get the kit from here. Remember that you’ll need a Raspberry Pi Pico to plug into it as well.

ESP32 DOIT Mounting Plate

esp32mount.jpg

Just to be doing (geddit) I’ve modified my Pico mounting plate from yesterday and made one that can accept ESP32 devices on the DOIT platform. Up until the Raspberry Pi Pico this has been my go to device for embedded development but I think going forward I’m going to need both plates.

Stay tuned for my Wemos ESP8266 holder, which is a lot more complicated because that device doesn’t have any mounting holes. You can find the design here.

Raspberry Pi Pico Mounting Plate

pico holder design.jpg

I’ve designed a little holder for the Raspberry Pi Pico which makes it easy to fit inside a case. I usually make do with double sided sticky tape, but this lets me give my builds a slightly more professional appearance. The pillars will take M2 self tapping screws and the mounting holes M3 bolts. You can find it on thingiverse here.

The pillars have holes which have a radius of 2.0mm and the mounting holes have a radius of 1.6mm. These are numbers that I’ve found work with my printer. If you want to change these values you can find the OpenSCAD program that made the mounting plate here.

Pico Holder.jpg

This is the holder in use, fitted inside my two button game.