Shutter Success
/Well, all it took was a bigger servo and a battery pack. I’ve now got a computer controlled shutter. Now all I need to do is build the box, add the controls and find a two foot long cable release that works….
Well, all it took was a bigger servo and a battery pack. I’ve now got a computer controlled shutter. Now all I need to do is build the box, add the controls and find a two foot long cable release that works….
I was talking to some students last week about the interview process for the marking of their project. I said that they would do fine, as long as they didn’t use the “dustbin lid defence”. I used this when I was at school. If you were being approached by the class bully (every class had one) a good trick was to point over their head and shout “dustbin lids!” as loud as you could. Then, while they were scanning the sky for lids you made good your escape. It only worked once per bully, which was a bit of a limitation, but it was on occasion very useful. It doesn’t work in assessment interviews though.
Anyhoo, I thought it might make a good blog post but it needed a picture so I asked ChatGPT to draw some dustbin lids in the sky in the style of a 1950’s UFO sighting. Turns out that ChatGPT doesn’t know what a dustbin lid is. I got lots of floating dustbins. So I uploaded a picture of a dustbin lid for reference and now ChatGPT engaged in a debate with itself as it made the pictures:
It was really interesting to watch it at work. One AI process trying to get another process to do what it wants. I’m quite happy with the final result although there is a bit of a kerfuffle with the telegraph lines in the right hand edge. It was great fun, although I do worry about just how much electricity I used up just playing with pictures.
Update: After my search for dustbin lids to get an image of a lid the internet is now convinced I need a new dustbin and keeps showing me pictures of them wherever I go. But how would I throw away the old one?
I really, really want to be able to control the shutter on my Polaroid camera. So I’m in the process of building an actuator which will push the plunger on the cable release. Version 1 was a bust. Almost literally. The shutter button on the camera hardly moved while the servo made some very unhappy noises.
You can see version 2 above. Considerably more beefy. This servo actually contains metal gears. I’ve done a quick test and it seems to work, which is nice. Next thing is to build a cable release holder and attach it to the actuator.
If you want to see it in action, sign up for DD North and come along to my session.
We used RFID cards to manage the free drinks at our Fiftieth Anniversary Celebrations last year. If you want to find out how they work (and how to get free drinks) you can find an article about them in issue 150 of MagPi magazine which is in the shops now.
I’m trying to get into the habit of asking ChatGPT to create a blog post each time I do something I want to remember (and perhaps tell others about). I did this today to get a device ready for my shutter controller….
So, you’ve got an ESP32, and you need to flash some firmware. The official tool for the job is esptool, but before you go installing things system-wide like a reckless cowboy, let’s do it properly—with a Python virtual environment.
Why? Because keeping things self-contained means no dependency nightmares down the line. Trust me, future-you will thank present-you for this.
First, make sure you have Python installed:
python3 --versionIf that spits out a version number, you’re good. If not, go install it from python.org.
On Windows, also make sure pip is installed:
python -m ensurepip --default-pipNow, let’s create a virtual environment so we don’t clutter up our system’s Python installation:
python -m venv esptool-envThis makes a new folder called esptool-env, which holds its own little self-contained Python world.
Before installing anything, you need to activate the virtual environment.
esptool-env\Scripts\activatesource esptool-env/bin/activateYour terminal should now show something like (esptool-env) at the beginning of the prompt, meaning you're inside the virtual environment.
esptoolNow, install esptool inside your virtual environment:
pip install esptoolTo check if it installed correctly, run:
esptool --version✅ If you see a version number, you're all set!
esptool (No .py Required!)At this point, you might be tempted to type:
esptool.py chip_idBut stop right there! On Windows (and even some Linux/macOS systems), esptool installs as an executable, meaning you don’t need the .py suffix.
Instead, just run:
esptool chip_idMuch cleaner, right?
firmware.bin?When flashing an ESP32, you need a firmware file—usually named firmware.bin. This file contains the actual program that will run on the ESP32, including:
✅ The operating system (like MicroPython or an IoT framework)
✅ Libraries and runtime components
✅ The main application code
Think of it as the brain of your ESP32—it tells the chip what to do when it powers on.
If you’re installing MicroPython, you’ll need to download the latest ESP32 firmware from the official site:
🔗 Download MicroPython Firmware
Make sure you get the correct version for your ESP32 model (ESP32, ESP32-C3, ESP32-S3, etc.).
Once you have the firmware.bin file, you can flash it using esptool.
Before installing new firmware, it’s a good idea to wipe the existing flash:
esptool --port COM3 erase_flash(Replace COM3 with your actual serial port. On Linux/macOS, it might be something like /dev/ttyUSB0.)
Now, install MicroPython by flashing the .bin file:
esptool --port COM3 --baud 460800 write_flash -z 0x1000 firmware.bin🛠 Breaking this down:
--port COM3 → Specifies the serial port --baud 460800 → Speeds up flashing (can be lowered if issues arise) write_flash -z 0x1000 firmware.bin → Writes the firmware at the correct address (0x1000)When it’s done, MicroPython is now installed! 🎉
Once the firmware is flashed, you can connect to the ESP32 using a serial terminal program:
1️⃣ Install a terminal program like PuTTY, screen, or minicom
2️⃣ Connect using the correct port and baud rate (115200 baud)
3️⃣ Press Enter, and you should see the MicroPython REPL (interactive shell)
Alternatively, use Thonny (a beginner-friendly Python IDE) to interact with MicroPython.
When you're done, exit the virtual environment with:
deactivateThe next time you need to use esptool, just reactivate the environment and you’re good to go:
esptool-env\Scripts\activate  # Windows
source esptool-env/bin/activate # macOS/LinuxBy using a virtual environment, you've kept your system clean and organized—no global Python clutter, no version conflicts. And remember:
🔥 Just type esptool, no .py needed!
🔥 MicroPython firmware is just a .bin file that needs to be flashed to your ESP32!
Now, go forth and flash those ESP32s like a pro. 🚀
It would be lovely if it worked…
I want to take pictures of folks at my DDD North Session next month. And not just with any camera. I want to use my “self-fogging” Polaroid Camera. You’ll find out how to build your own if you come along. Snag is I don’t want to have to press the shutter button myself. I mean I could, but I really want to control the camera for a brief timed exposure (around half a second or so) for each shot and I’d love them all to be totally consistent.
I found a design for a remote controlled camera release which looked like a good starting point so last night I printed out the actuator and today I printed the box. I then put it all together, connected a microcontroller and fired it up.
It doesn’t work. Not a problem with the device itself, it can trigger the shutter on a lot of my cameras. But not on my “self-fogger”. The shutter on early Polaroid cameras is cocked as you press it. This makes the mechanism simpler and less prone to wear, but it means that you have to work quite hard to push the button down. Something which my little 9gm servo is just not equal to. So I’ve switched to a much beefier servo. We’ll see how it goes.
If you want to find out out how it all turns out, and maybe even get a ready fogged snap of yourself, make sure to sign up for DDD North on the 22nd February and come along to my session.
Now that I’ve got a very old digital back for my very, very old camera I thought it was time to take some pictures with it. I’m a bit constrained, in that the camera has to be connected to the computer when I use it, but this is still much easier and cheaper than using film.
The digital back that I’m using has a sensor which is around the size of a 35mm frame. This means that I’m only capturing the centre of the picture, but I’m not unhappy with the results.
It’s been great fun walking around the house and taking pictures of stuff. It has allowed me to practice focusing and framing without spending a fortune on film. I’m really looking forward to taking some portraits with the setup. The absolute picture quality is pretty good. I know that modern cameras, and even phones, can produce images which seem sharper and brighter, but that’s not the point. I love the filmic quality of the results I get from this kit.
If you have an old computer (and you will need an old one - new ones are no good) that you can dedicate to the project and you happen to have an old film camera that will work with a digital back you should definitely have a go.
Well, it certainly passes my Ego test
There’s been a lot of chatter about this new AI called DeepSeek. I had a little go with it this afternoon. I gave it a programming problem and it acquitted itself quite well. I couldn’t distinguish the replies from the ones I got from ChatGPT, although it did stop talking to me after a couple of questions. They say that DeepSeek is smaller and more efficient and all the code is open source.
I can remember back to the time when it was really cool to have a computer of your own running at home. The way things are going, the next cool thing will be to have your own AI running at home.
We do live in interesting (and a bit scary) times.
it is in good condition for its age
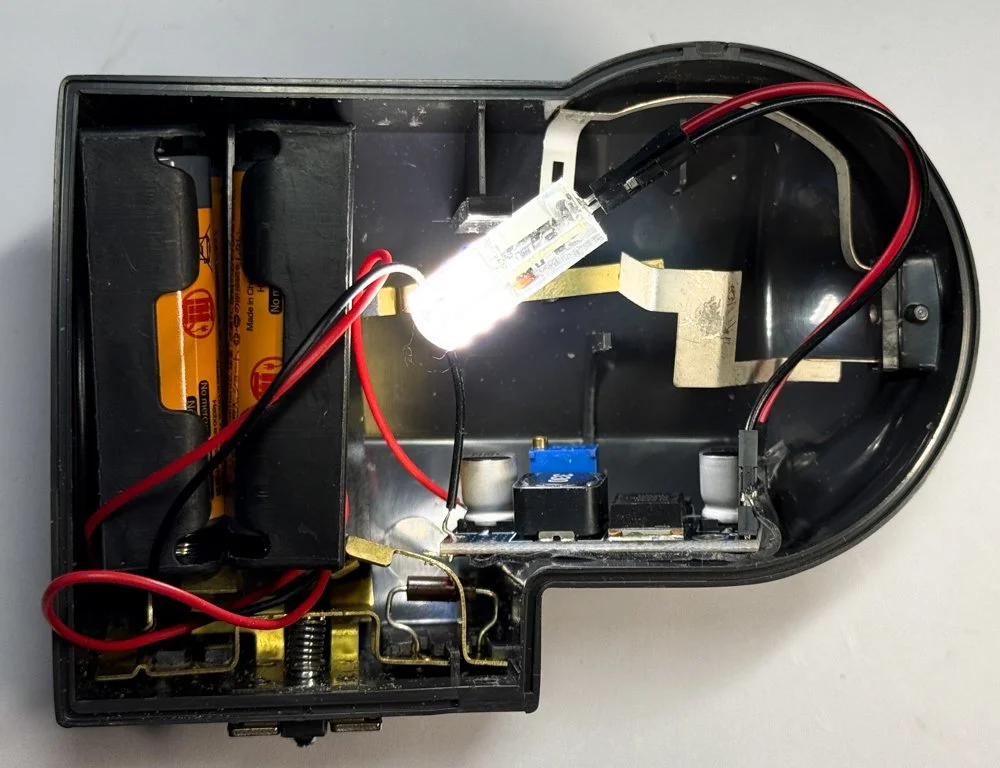
I’ve been messing around with Polaroid Land cameras for a while. Today I thought I’d do something with their flash lights. The Polaroid Wink light was created to add a bit of extra light to your pictures. If you buy a second hand Polaroid outfit you will frequently find one included in the package.
YOu can’t get 45 volt batteries any more. And this is a good thing.
Above you can see inside the light. The silver thing at the back is a capacitor which is charged up from the battery before the shot is taken. When the shutter is fired the charge in the capacitor is sent into the bulb producing a bright “wink” of light. The bulb in a wink light was made for use in cars which have a 12 volt power supply. The wink light sends 45 volts through the bulb making it get extra bright for a short time. If you want even more light you can plug a little holder into the side of a wink light which holds a “proper” flash bulb. These bulbs contain fine magnesium wire which burns with a really bright light - although you can only use each bulb once.
Anyhoo, I wanted to make the wink light actually do something. I had a number of ideas but in the end I decided to see if I could fit a standard G4 lighting led into the light. These use a 12 volt power supply. The most I could get from my batteries was 6 volts so I dug out a little voltage converter which steps this up to 12 volts.
The power switch is in the case at the bottom left hand side
Above you can see what I ended up with. There are two battery holders, each of which contains 2 AA batteries. They are connected via a switch to a “buck converter” which steps their 6 volts up to the 12 volts the bulb likes. I’m not planning on making the light switch on when the camera takes a picture. I’m a bit concerned that it might take too long for the circuit to fire up. Instead I’m going to leave the light on all the time while I take pictures. This also gives me a bit more light to focus with, which is nice.
Ready for action
Above you can see the light on the camera as it is meant to be used. The next step is to take some test pictures and get a feel for the exposure settings it needs. This was a fun way to spend a Sunday.
The keyboard is still great to type on
I was looking for something in the garage today when I found this. It still works really well. As a portable productivity device I’d much rather have it than an iPad. I’m now wondering if there is any way I can get the infra-red communication going so that I can edit documents on the move…
I might bring the duck along if I can think of a reason to….
DDD North is an awesome conference hosted at Hull University on Saturday 22nd February. It’s been going for ages and is always wonderful. You can find the schedule here. And you can register for tree here. I’m on with all my toys in the first slot, 9:30 in Lecture Theatre A. I really like this timing, it means that I can get my session out of the way and then go and see lots of other stuff.
I look forward to seeing you there.
I don’t usually wake up and think “Perhaps I’ll do some plumbing today”. But this morning the decision was taken out of my hands, what with the water cascading down the side of the house and all. I had a pretty good idea what the problem was, and a trip into the loft confirmed it. The float valve on the water tank had failed. The split pin that holds the ball cock had rusted through and the whole assembly had broken free, leading the valve to fill the tank forever. The good news was that the overflow was working perfectly, and all the excess water was being directed out of the house. The bad news was that I had to fix it.
I’ve been here before, around twenty years ago when pretty much the same thing happened. That time I didn’t have the luxury of a tap to turn off the water supply. Well, actually I did have a tap, it’s just that when I turned it the top came off in my hand. On that occasion (and I’m rather proud of this) I came home from work in my lunch hour, turned on all the cold-water taps, flushed the toilets and then managed to swap the broken assembly while the water pressure was reduced. I hardly made any mess. Then I ate a bag of crisps and went back to work. But of course, I was much younger then.
Today I turned the water off and then headed off to ToolStation to get a replacement (£7.98). Fun fact. If you search for ToolStation the first hit you get is for ScrewFix. And if you search for ScrewFix the first hit you get is ToolStation.
ScrewFix and ToolStation are competing building supply companies in the UK. In Hull their depots are actually next to each other. I have this idea that on Christmas Eve, when all is peace and goodwill, the staff from the two depots meet in the car park for a football match while someone plays the mouth organ and all talk is of “When will this war all be over….”. But I digress.
The fixing process was actually quite painless. Fortunately I’ve kept my big spanners. For me the worst part was seeing the corroded and aged part and remembering back to when I fitted it as a brand new shiny one. I don’t think I’ll be replacing this the next time it wears out.
Anyhoo, we now have running water in all the right places.
I found this awesome sticker on my toolbox…
I like a messy desk
We had a splendid meetup tonight. Sally from Drake Music came along to see what we get up to and we had Midi Cheeseboxes, a digital trombone, and a magical theramin. Brian had also brought along his lidar that can tell when you hold your hands above your head and the discussions were wide ranging, from “How do you hear a square wave?” to “What happens if you dream that you are lying awake at night?” and lots of places in-between
I’m not sure we found all (or indeed any) of the answers, but we are looking forward to having another go at the next meetup on February 5th at Hull Library Makerspace. You are welcome to come along. Ping me an email (meetups@robmiles.com) if you want me to add you to our mailing list.
It is a stylish little camera
Half frame cameras are having a moment right now. The attraction of getting twice as many shots on your roll of 35mm film is hard to ignore. Pentax have recently launched a new half-frame camera and there are also cheaper (although rather expensive for what they are) half frame offerings out there too.
The Fujica Half dates from 1963. It is a quality lump of metal that looks the part and unlike the new cameras you can buy today it has shiny metal and proper heft. It is quite easy to use. You set the film speed on the back and it sorts out exposure (rather well in my experience) but you have to do the focusing yourself, adjusting the lens to the right distance. The film advance uses a neat little lever.
No batteries are required. The exposure meter uses a light powered selenium cell which lasts for ever, or until it breaks. If the camera has been kept in its case the cell will probably be OK, if not you can set everything manually which is a bit more of a faff, but not a stopper. The viewfinder is nice and bright, and it shows the shutter and aperture settings selected by the camera along with marks that help you frame close up subjects. You can use a flash with it, but you’ll have to plug it into the socket on the front and then set the aperture by hand. The frame counter is hidden on the bottom of the camera. It goes all the way up to 72 shots, which is what you would get from a 36 exposure film.
The camera takes pictures in portrait mode. If you have a film processed you’ll get two images per frame, which is rather nice. The lens is lovely and sharp and I really like the pictures it turns out.
These are two of the first pictures I took with the camera
The Exposure meter coped well with low light. I need to work on holding the camera straight,
I had to tip the camera on its side to take these pictures
The lens doesn’t flare too much
If you are thinking of getting into film photography you could do a lot worse than pick up one of these. And if you are already into photography it’s a nice thing to have around - and you can use the camera in full manual mode and set the shutter and aperture yourself if you want to get creative.
They seem to be nudging up in price at the moment (at least in terms of what folks are asking for them on ebay). If you see a tidy one with a working meter for less than the price of a video game I think it would be worth a punt.
Very pleased to report that my session, “Making Stuff”, has been accepted by the DDD North folks. Registration will be opening soon here. It would be lovely to see you there. Unless I owe you money.
I’ll let ChatGPT explain what I’ve been up to today:
Context: We’re building a framework to store and load settings for a MIDI controller using CircuitPython on a Raspberry Pi PICO.
Challenge: Lists of settings needed to handle both uniform and mixed object types while keeping the JSON output compact and memory-efficient.
Solution: We dynamically added type information to list keys when uniform or to individual items when mixed, ensuring deserialization works flawlessly.
Result: A smart, efficient system that elegantly handles nested settings and mixed data—perfect for the PICO’s constraints and your MIDI Cheesebox magic. 🎶🧀
If you ever need a film holder to scan some APS film you can find my film holder on Thingiverse here.
The Minolta Vectis S-1 camera is not particularly pretty. But it is pretty cheap. I picked up the example above for less than ten pounds. It is cheap for two reasons:
It uses a type of film which is no longer made.
It probably won’t work when you get it.
The camera uses Advanced Photo System film which was launched in the 1990’s and abandoned in 2011. But this is not a huge problem, you can still get film cassettes for it, albeit ones which will be at least 13 years old. The system uses a very complicated film loading mechanism containing many whirring and clicking parts. The first example of this camera I got made a few unhappy sounds too, followed by total lockup. But the sample above was made of sterner stuff and seems to be able to load film and take photos OK. I got hold of some film and took some shots.
I’ve not made the holders that go on top of the film yet.
The system was designed so that the film stayed in the cassette at all times. The processing and printing machinery was clever enough to get the film out of the cassette, print the shots you wanted and then wind it back in again. Of course I don’t have any of that machinery, so instead I designed a little holder which I can load up with film for the scanner. I then pulled the film out of the cassette and cut it into lengths for scanning.
The negatives are 16mm high with a “widescreen” aspect ratio
The results are pretty respectable for a twenty year old camera using fifteen year old film. Above is one of the more interesting ones. There is plenty of detail and the image is sharp enough . The shadows are very grainy though, probably because of the age of the film.
I’m not sure if I’d use this camera and film combination for any pictures that I really care about (although the auto-focus and exposure seem to work well). But it is fun to get out and play with.
I think this has the appropriate level of recursion
I’m still not sure if anyone wants to hear about my travails getting digital back for my old camera. But things have gone so well today that I really want to tell everyone (or at least both of my readers) all about it.
Yesterday I discovered that it was all but impossible to get my recently acquired Phase One digital camera back (frog number two) working on a Windows machine. So today I went into the garage and dug out a venerable MacBook Pro that I’ve had for ages. I used it to write “Begin to Code C#” all those years ago. Just like me to write a book with that title on a machine with no # key on the keyboard. But I digress.
It turns out that things kept in the garage survive the experience. It booted up first time and I even remembered my password. It works a treat. In fact it works so well I got to wondering what new laptops do which made them worth the upgrade. Then I tried to pick it up, and I remembered.
I installed the appropriate version of Capture One, plugged the cable from the back into the firewire port on the side of the machine and lo and behold, it worked. It turns out that the FireWire port on a MacBook Pro (or at least this one) puts out enough current to power the back.
This was the first shot I took out of the window
I took a few pictures. It seems strange to be using a digital camera and still have to set the exposure. You configure the “film speed” of the back and then expose for that. But you have the advantage of seeing your shot straight after taking it. This gives you a proper “film” experience, just with really fast developing.
Capture One is an awesome program. I’m using version 6 from 2013. It runs fine on the MacBook. It is a professional tool, which means the learning curve is a bit steep, but it works a treat. I might try the newer versions (which might work on the Mac) but I’m not going to push my luck too far…
I now have a “portable” camera system, as long as I take along the Phase One back, MacBook and the cable that links them together. The resolution is not that great, but I don’t care. The pictures look really nice to me. And I’ve only had to kiss two frogs to get where I want to be.
My loft is now officially the place that things to to break. As part of the “digital back kissing frogs project” today I had a need for a computer running Windows XP. “No problem” I thought. “I’ve got one in the loft”. Well, that was true - sort of. I have a computer up there which I last used around 20 years ago. Unfortunately it doesn’t work. I set it up in the loft and got the result you see above.
Once it got as far as the Windows XP loading screen before collapsing with the blue screen of death. So it is now staying in the loft pending a trip to the tip. This is probably a blessing in disguise though, as I’m not completely sure I remember the login password……
Rob Miles is technology author and educator who spent many years as a lecturer in Computer Science at the University of Hull. He is also a Microsoft Developer Technologies MVP. He is into technology, teaching and photography. He is the author of the World Famous C# Yellow Book and almost as handsome as he thinks he is.