Picobox tall now availalble
/
One of my most popular models
By popular request (someone asked for it) I’ve made a version of my PICO box which fits a PICO with an expansion board on top.
One of my most popular models
By popular request (someone asked for it) I’ve made a version of my PICO box which fits a PICO with an expansion board on top.
The red lines are produced by the leds on the motor driver board
I spent a very happy hour this evening taking long exposures of a pixelbot bouncing off the walls. When the robot stopped I shone a torch on it for the last bit of lighting. I’m quite pleased with how it came out.
AS an added bonus, the mole wrench is now very easy to find.
A while back I mentioned my sinking feeling, caused by a failing gas support in my chair. The chair company have sent me a replacement, which is nice of them. However, it has proved to be impossible to fit, what with the broken part having welded itself into position. I’ve come up with a solution though. My chair now holds its position perfectly.
If your plate is gold (which is most likely) it will be the Textured PEI plate)
I’m getting to really like the Bambu P1S. It’s unlike printers I’ve had before. With those the very first prints I got with them turned out to be some of the best prints they ever made. With the Bambu it seems that the more you use it, the better it gets.
This is the first printer I’ve had with swappable build plates. They are held on with magnets but you can pop them on and off - especially useful for removing prints. There are also a few different types of plate, and herein lies a problem that I (and lots of other folks) had. My first prints looked good, but kept coming off the print bed or curling up at the corners.
It turns out that the print is supplied with a Textured PEI Plate, but the default setting for the Bambu slicer is the Cool Plate. So the temperature of the print bed was far too low. A peek at the forums revealed that lots of other folks have had this problem. So - if you are lucky enough to get one of these machines, make sure that you make the build plate match the slicer for best results.
the first PICO powered Pixelbot
I’ve not made a brand-new Hull Pixelbot for a while. Today I made a new one which is powered by a Raspberry Pi PICO. I usually power the robot from four (or sometimes five) AA batteries. This gets me around 6 volts. I did that today with the new robot and it failed to work. It turns out that the Raspberry Pi doesn’t like voltages much higher than 6 volts, and shows its displeasure by not working. I had scrabble around to find a set of “slightly worn” batteries to get it going.
Scary fast
I’ve been working quite hard recently. And rather than fritter my earnings away on fripperies like food and fuel I decided to get a new 3D printer. This is my third one. I’ve still got number one, Una the Ultimaker because she has huge sentimental value (and can still print up a storm when required). But number two, Edna the Ender, has now moved on to a new home.
I’ve been watching videos about Bambu printers for a while. I didn’t think I’d be able to afford one of their amazing X1-Carbon printers. In fact, I still can’t. Instead I’ve got myself a P1S which seems to offer all the advantages with a much smaller price tag. They also offer the very interesting AMS which can switch prints between four different filaments. I’ve wanted to try using multiple filaments in a single print job for a while, and now I get the chance to have a go.
The printer arrived yesterday and it is lovely. So far. It reminds me of one of those posh “bean to cup” coffee machines. You set it off and it makes all kinds of whizzing noises. Then some filament goes in one end and a well printed item drops out of the other. Unlike previous printers which I spent many happy (and some unhappy) hours fettling I’m kind of hoping that this one will just work and keep working. I’ve printed a “benchy” (the standard little boat design used to test these things) and it came out very well in double quick time.
I’m looking forward to printing a few more things in the future.
The missing motor
Niryo make nice robot arms. They also support them very well. We’ve got a student project at the university using a Niryo arm. When the team came to assemble the robot they opened the box and found that one of the motors was missing. We’d no idea why this was the case, all we knew was that we suddenly had one less degree of freedom than we needed.
I emailed Niryo and they were super terrific. They asked us to send them a picture of the missing motor (an existential question that was easily resolved because we have several of their robots). They then just sent us a replacement, which was a completely amazing thing for them to do.
Thanks very much.
Two things that have occupied a lot of my time recently have been Connected Little Boxes and the Hull Pixelbot. And now I’m working on combining them. This will create a Connected Little Box which can operate as an autonomous robot. It will also being scripting to the Connected Little Box so that you can create tiny programs for each of the box interfaces. Whatever happens, it’s going to be fun.
I really should have waited for a train to go by. But then the rainbow would have gone…
Today finds me in Harrogate with a 45 year old lens. I think it worked rather well.
Deliberately wrong?
I was preparing for a talk to students a while back (really must develop the pictures I took) and I asked DALL-E (an AI powered image generator) to make me a notice with the message “Don’t Panic” written on it. Above you can see the closest that I got. During the session I said that I thought this proved that “proper” AI is some distance away. But I’ve thought about it since and decided that actually AI might be ahead of us on this one.
Perhaps the creators of DALL-E don’t want anyone to be able to create fake notices and signs and so they have the system do a bit of scrambling to the letters before they are rendered.
Interesting times.
Our Alexa device keeps trying new things to get us to interact with it. Today it came up with a display which said something along the lines of “Try asking me how to spell exfoliate (or whatever the word was)”. This struck me as a strange thing to do, what with the word I wanted to know about being spelled out right in front of my eyes.
Hull University campus looking good
It’s strange the things you discover when you try to do something. Today it was all about slow baud rates.
What’s a baud rate? I hear you ask. Well, baud apparently stands for “binary asynchronous unit of data”. Or it’s an abbreviation for the name Emile Buadot who was a French pioneer of digital communication and had an amazing moustache and beard. Emile was sending text down a single wire and he was doing it one bit at a time. Assemble enough bits and you can match patterns of ons and offs to particular characters. The data stream would begin with a start bit (to tell the receiver that a character was coming) and then have a bunch of signal levels that represent the character being sent. One thing that was important is that the sender and the receiver needed to agree on the rate at which the data was sent. Otherwise things get garbled. So they invented the baud rate (number of bits per second) and created some standard speeds (110,300,600,1200, 2400, 9600, 115200 and so on…) Baud rates are still used today. The GPS receiver in your mobile phone will be sending position information into your phone processor via a serial data stream with a particular baud rate.
When I connect a Hull Pixelbot to a computer I have to set a baud rate for the serial connection. I use the horrendously slow “baud rate” of 1,200 bits per second. This is because the program that the robot receives is stored in EEPROM in the robot (EEPROM stands for “Electrically Erasable Programmable Read-Only Memory). This is so we can turn the robot off and it will still remember the program it has been given. EEPEOM is awesome, but it is also very slow to write. The hardware has to bash the bits into the hardware components in the memory device and this takes time. I could have added handshaking - where the robot sets a signal to tell the host computer to stop sending - but instead I did something quick and dirty, which was to slow down the robot baud rate to the point where the EEPROM could keep up.
This kludgy decision came back to haunt me today when I tried to use an Arduino programmed Raspberry Pi PICO at 1200 baud. The PICO seems to get upset when you try to talk to it via a serial port running at 1200 baud. Not sure why, but the result is that my robot code doesn’t work properly. Oh well. I’ll just have to speed up the serial port and add some handshaking. I believe this is called “paying off technical debt”….
Uh-Oh One seems to have escaped…
I’m getting all the Hull Pixelbots ready for some Robot Rugby action at the moment. I’m updating the firmware, reworking the server and making a new Pico powered version. Great fun.
Nothing to do with the subject of the post. Although the I guess you can see the “SEa”
You’d think it would be easy to move a C program from the Arduino platform to the Raspberry Pi PICO. After all, we have the wonderful libraries from Earle F. Philhower, III and the fabulous PlatformIO framework you can use to manage your project (don’t forget to perform this stuff before you try to build anything). And anyway, C is the same everywhere. Right?
Wrong.
When I write the Arduino stuff a while back I made one or two questionable design decisions. One of them was to use the char data type to hold 8 bit values. This was kind of OK back in the day (and by this I mean the 1980’s) but it turned out to be a stupid thing to do. Because some C compilers think that char holds a signed value (-128 to 127) and some think it holds unsigned (0 to 255). Of course the Arduino C compiler goes one way and the PICO C compiler goes the other way. Neither are wrong - the C language standard doesn’t specify this - and you could argue that anyone daft enough to perform maths with variables that are supposed to just hold character codes deserves all the trouble they get. But we are where we are, which in my case was looking at a program that has been working for years and has suddenly gone nuts.
I actually fixed it quite quickly once I figured out the stupid thing I’d done. The Pico debug probe proved very useful for this. I was able to set breakpoints in the timer interrupt handlers and then watch as various counters were updated. When I saw the code subtract 1 from 0 and get the answer 255 I knew exactly what had happened…..
Great fun to build
Spent a happy few hours over the weekend building one of these. It’s powered by a Raspberry Pi 4 (I needed to get the one with 4G). it works very well. There’s an iPhone app that you can use to control it remotely. The default configuration has the robot setting up an access point you connect your phone to before you run the app. Then you can steer the robot around viewing the world through its onboard camera. You can also have the robot pick up and recognise the red, green and blue blocks that come with the kit.
I thought that it would be powered by the Robot Operating System but it turns out that everything is controlled by some well written Python code that controls the motors directly. The vision system uses OpenCV to find coloured bricks and perform line following. It would be quite easy to modify this code and make the robot perform new tasks. There is also a program you can use to record robot arm positions and create behaviours.
There were a couple of tricky parts to the construction. The first was downloading the software itself. The links are on a card which comes with the robot. Find a way to open these on your desktop computer (they are given as QR codes) and you’ll be sent to a Google Drive folder which contains the stuff you want. There are also links to videos which you must watch before you build anything. The second tricky bit was attaching the arm servo cables to the little Raspberry Pi hat that connects to everything. You are just pushing sockets onto the pins, but one of the sockets (the one for the fan) has some alignment fins on the side that get in the way. One fix would be to chop the fins off, but I opted for slightly bending the pins to make room.
My robot worked second time (I’d not connected one of the robot arm servos properly) and was great fun to drive round. If you want the vision system to recognise the coloured blocks properly you will need to make sure the surroundings aren’t too confusing.
If you want a powerful and robust little platform I can strongly recommend it. One tip: You’ll need some rechargeable batteries for it and these are not in the kit. I got myself a flashlight, charger and some batteries in rather a nice kit I found here.
I reckon it should be around -20 in here..
I did some film developing today. The developer (the liquid you put the film in to convert the exposed areas into tiny particles of silver) needs to be at a particular temperature for a given development time. I’m a big fan of the Massive Development Chart which gives development times for all kinds of film and developer combinations.
Anyhoo, I’ve been using the thermometer above to measure the temperatures and today I noticed that I had to get the water really warm to get it to the indicated 20 degrees. Which seemed wrong. A quick comparison with a cooking thermometer showed that it was indeed very wrong.
This rang a bell. I’ve noticed that quite a few of my pictures appear grainy and a bit murky. As if they have been developed too long. Which is what would happen if I had the developer at a high temperature. I’ve even been shortening the developer time to compensate for this. It never occurred to me that I was using the wrong temperature. I used the proper temperature and the recommended time and the pictures came out rather well.
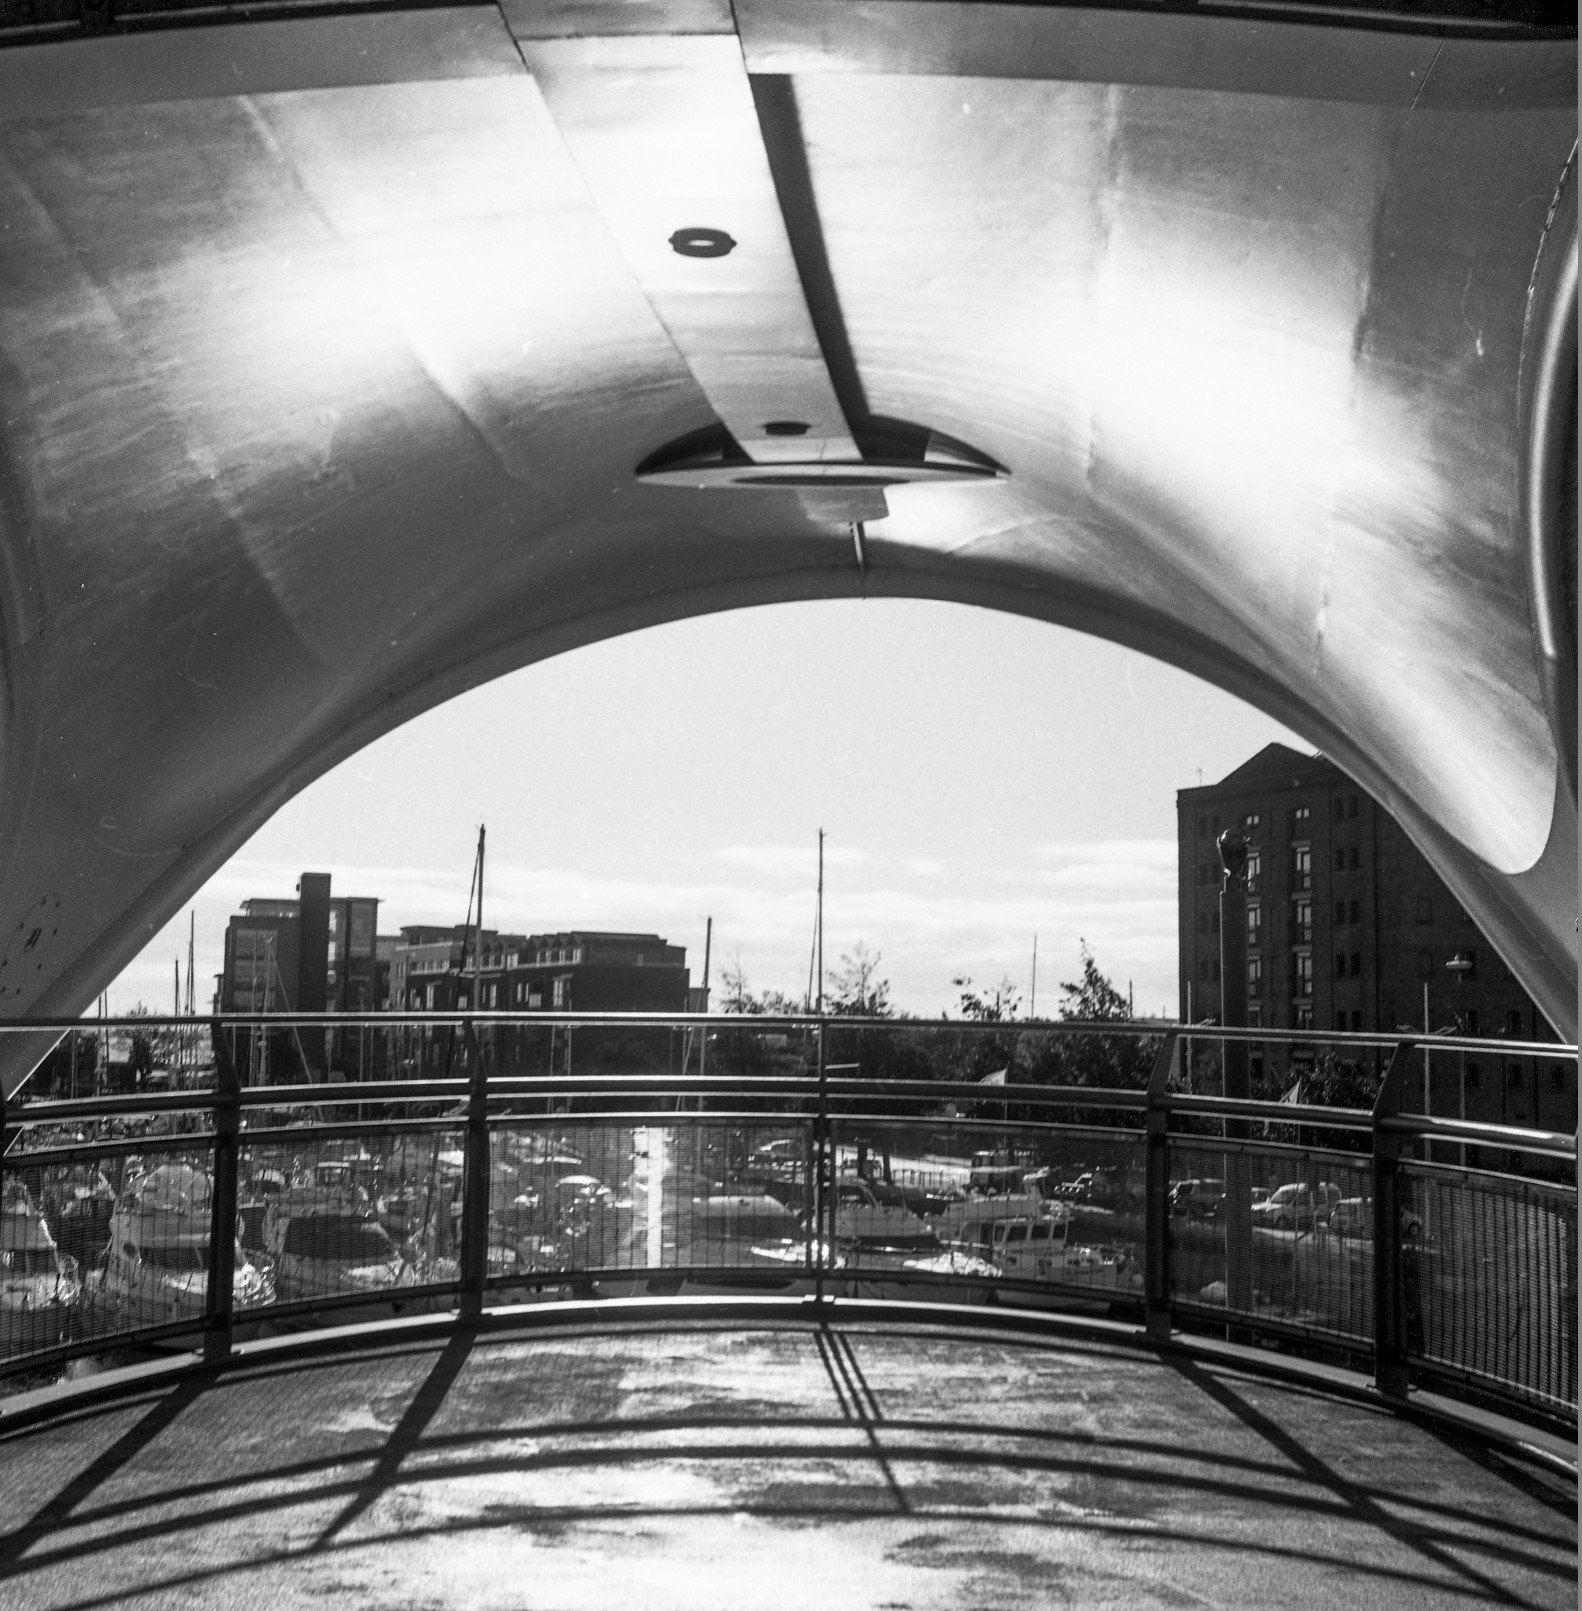
Princes Quay looking good
We got some good weather today so I took the Microcord up town today and grabbed some shots.
There’s a bit of camera shake on this one because I keep catching the camera shutter lever on my fingers.
I really like this old camera. It forces you to move slowly when taking a picture (which can be annoying for people you are with) but I think the results are worth it.
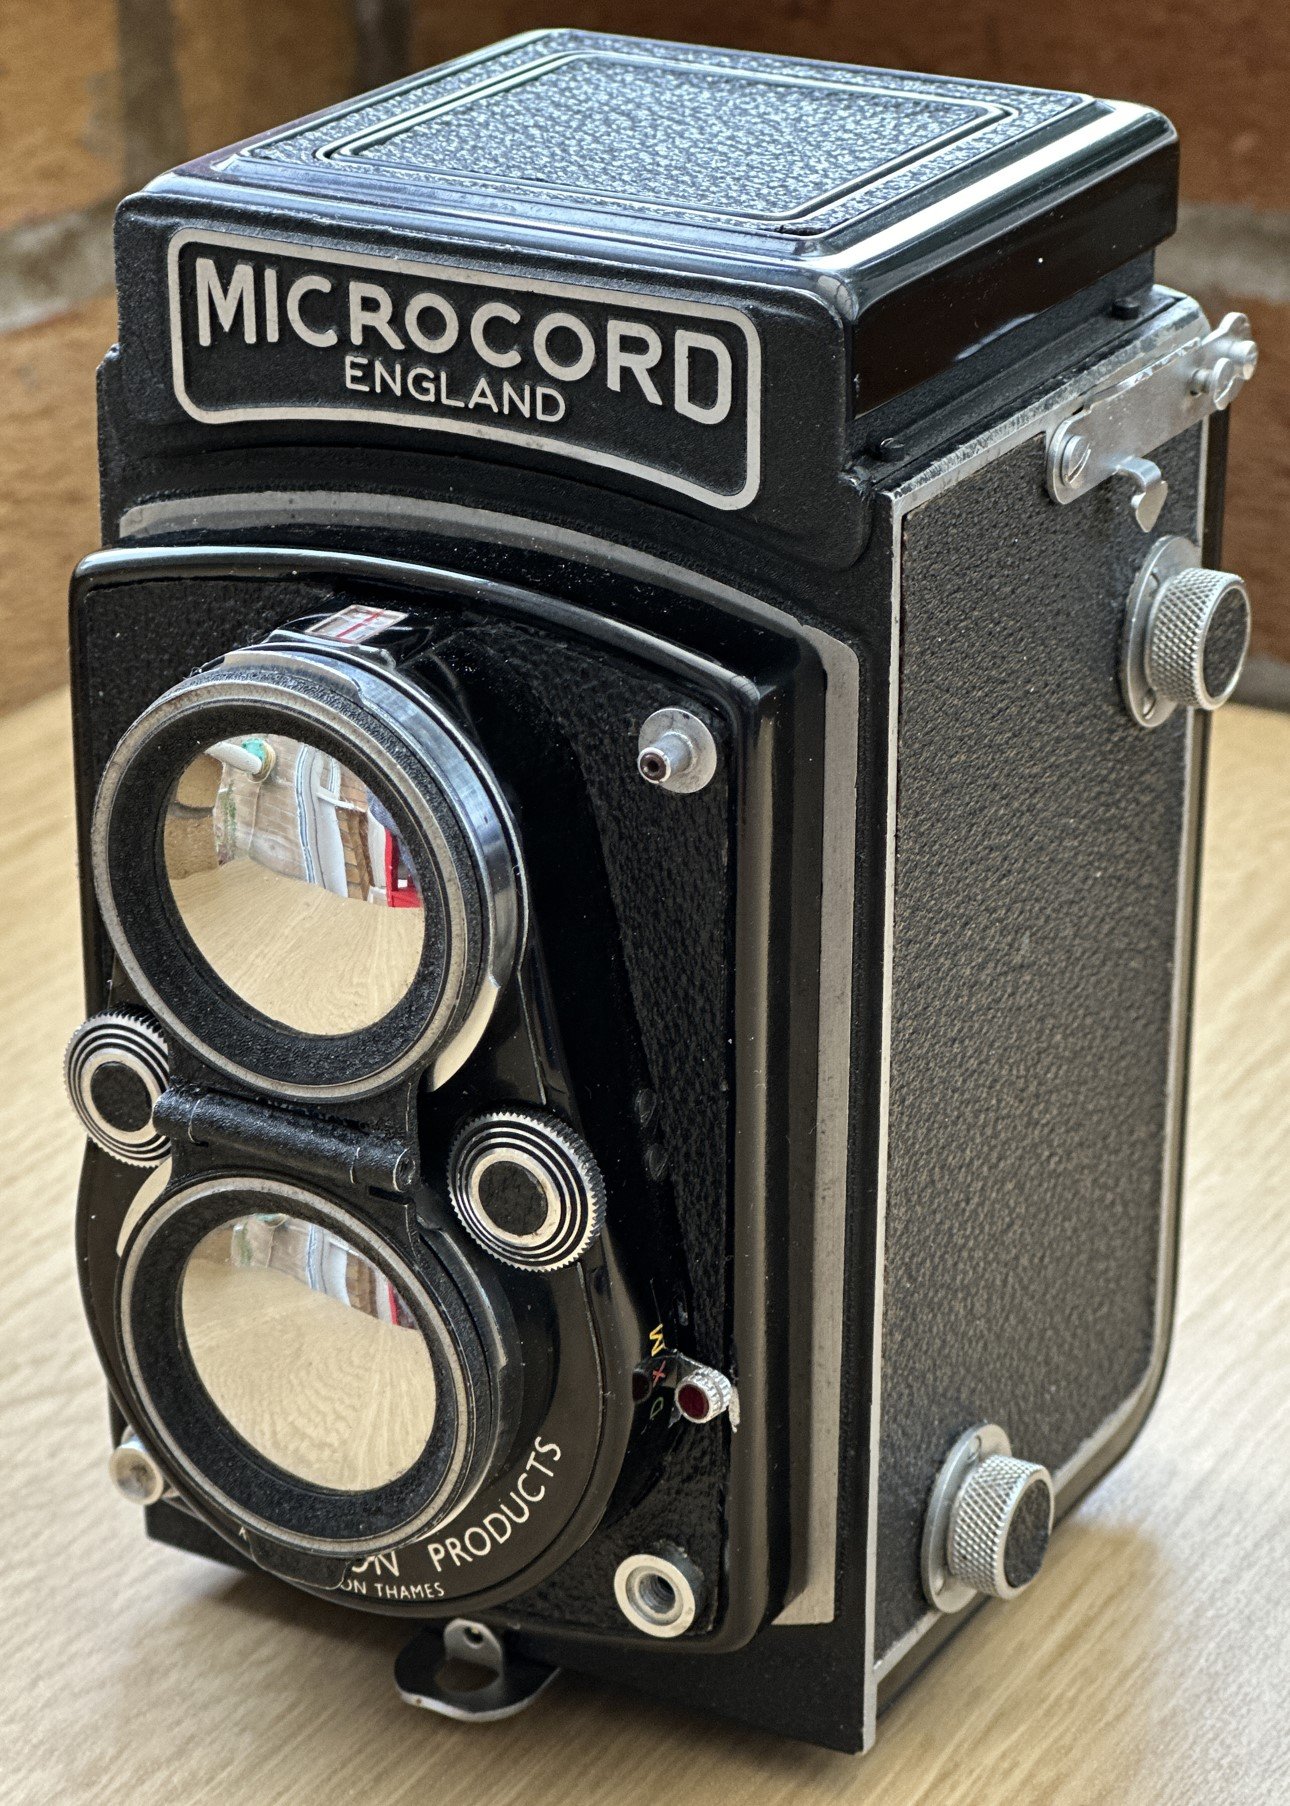
It has the most amazing lens caps……
Yes, I’ve bought another camera. And yes, it is very old. Actually around the same age as me. It was made by a company called “Micro Precision Products” which started making cameras in the 1940’s and gave up in the 1980’s. They made a range of different types of cameras for press and technical use, and in the 1950s they made a couple of “twin lens reflex” cameras, of which the MicroCord was one. It is based (as in “Here’s one - see if you can copy it”) on Rolleiflex cameras which were popular at the time.
A twin lens reflex camera has two lenses. The top one is used for viewing and the bottom for photographing. You compose and focus by looking down into the top of the camera at a ground glass showing an image reflected from the viewing lens. Both lenses are mounted on a plate which is moved backwards and forwards to adjust the focus. The idea is that if the view in the viewfinder is sharp, the photograph being taken will be too. This was back in the day when you actually had to focus your photographs.
I took this shot on the university campus
I’m still getting used to it, but I’m having fun at the moment.
I’m on the university a bit more these days and I must say it is looking very nice. And if you don’t believe me, I have photographic evidence -
This is right next to the campus
Some of the grassy areas have been left uncut, which looks nice too
I also took a picture with the 3D printed camera. We’ll have to wait to see how that one turns out….
I did my Rather Useful Seminar today all about the joy of making hardware. Thanks for being a wonderful audience. You can find the slides here. I promised some links. Here they are:
C# Yellow Book: http://csharpcourse.com/
HackSpace Magazine: https://hackspace.raspberrypi.com/
Pomodoro Timer Repository: https://github.com/CrazyRobMiles/PICO-Talking-Pomodoro
FreeCAD design tool: https://www.freecad.org/
Bluetooth chord keyboard: https://github.com/CrazyRobMiles/PICO-blue-chords
KiCAD pcb layout tool: https://www.kicad.org/
Pure Data audio manipulation language: https://puredata.info/
Pico MIDI Cheesebox Repository: https://github.com/CrazyRobMiles/PICO-MIDI-Cheesebox
Crackers Controller Repository: https://github.com/CrazyRobMiles/PICO-MIDI-Crackers-Controller
Hull Pixelbot Repositories: https://github.com/HullPixelbot
Connected Little Boxes Respositories: https://www.connectedlittleboxes.com/
Lights in Names Repository: https://github.com/connected-little-boxes/lights-in-names
It was great to be out in front of a student audience again.
Rob Miles is technology author and educator who spent many years as a lecturer in Computer Science at the University of Hull. He is also a Microsoft Developer Technologies MVP. He is into technology, teaching and photography. He is the author of the World Famous C# Yellow Book and almost as handsome as he thinks he is.