Gadget Show Live 2013

DSCF1504.jpg

Went off the the Gadget Show Live today. This is our final trip out of the holidays, and has been much anticipated. We last went in 2010 (scared to find that this was actually three years ago). This time we actually made it to the live show, which was great, family friendly, fun. Including audience controlled video gaming, as shown above. There were lots of things on show (although there were fewer 3D TVs on display this time – funny that…) Anyhoo, I took pictures of the bits and bobs that took my fancy.

DSCF1473.jpg

These robots are great. Just don’t ask the price.

DSCF1497.jpg

These are a bit smaller and simpler, but no less interesting. They move around as a swarm. I’m very tempted to write some XNA that does what they do in software, although the hardware ones are a lot more fun.

DSCF1485.jpg

There were lots of 3D printers around the place. This one looks nice enough, but I prefer Una.

DSCF1479.jpg

What a pity none of these phone cases will fit my Lumia….

DSCF1553.jpg

This is a “4K” resolution TV, although I’m not sure the photo does it justice. You can’t quite see the price tag, which was 25,000 pounds…. For that money you could probably buy a house with that view.

Refining Una the Ultimaker

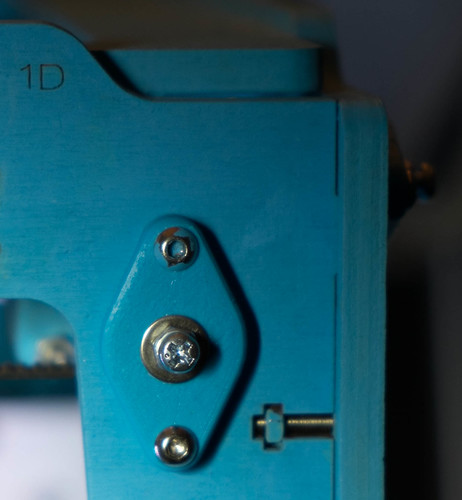
DSCF1560.jpg

I think you should know I endured a lot of pain to fit this part…

Just because I’m on holiday, doesn’t mean I don’t get to play with tech. I spent a big chunk of today fiddling with Una, my Ultimaker 3D printer. I don’t usually give my devices names, but since I’ve discovered that this particular device has moods I thought a name would be appropriate. The great thing for me about 3D printers is that they don’t work all the time and you can always persuade yourself that there are things you can do to make them better. Perfect for a tinkerer like me, who was brought up on Meccano.

Today I convinced myself that by replacing the wooden end bearing caps with adjustable plastic ones I could probably improve print quality. I could certainly cut down on the banging and crashing that I was getting during printing, when the print head changes direction and the rods it slides on are pushed into the side of the case. I’d already made one change earlier in the week, when I upgraded the fibre feed mechanism that pushes plastic into the machine. That had improved print quality a bit and so I figured I was on a roll with this.

So I set to and printed all the parts (finding a matching colour for the case, which was nice) and then I had to fit them. This was where the fun started. I put the original fittings on as I was constructing Una, and then put lots of parts around them. This meant that the nuts holding the end caps in place were really hard to get to. I tried printing out a “nut calumet”, which sounds like a desert from a posh restaurant, but is really something you can use to put the nut on the back of the bolt. But eventually I found the best way to replace the fittings was just to jam my finger inside the machine behind each nut, so that it held it in place, undo the existing bolt and put the new one straight back in. This removes the need to put the nut in place, as it never goes anywhere, and leaving aside the pain involved in forcing your finger inside very tight spaces, worked very well.

I’m not sure if the print quality is that much better to be honest, although printing is a lot quieter and smoother than it used to be. I’m a bit worried that steel bolts in the end caps are going to grind chunks out of the steel rods they are rubbing against, so I’ve ordered some brass bolts (which cost the princely sum of 14 pence each) to replace them with. These should form a bearing against the steel and be a bit smoother.

If you have an Ultimaker then I think it is a worthwhile upgrade, just because it makes printing much quieter. If you are about to build one from a kit, I’d advise getting some end caps printed so that you can put them on during construction and save yourself a bit of pain later.

Whitby Again

IMG_6301_2_3.jpg

..and so to Whitby. Love the place. And the Fish Pie served at the Magpie Cafe. Actually I like the cafe as much for its technology and business approach as its food. They have large screens showing you what fish is available on the day. All the attentive and hard working waitresses enter your order into a PDA (and have done for quite a while now). The cafe is on Twitter, and they are continuously updating what they do. In these respects they are very like Fudge in Hull, working to improve and extend that their reach while still remaining very good at their core business, serving really good food.

We were blessed with some of the best weather I’ve seen for, well, months, and so I took some more pictures of the place.

IMG_6321.jpg

We didn’t take a trip on the boat, but these folks seemed to enjoy it.

IMG_6324_5_6.jpg

Last time we came the sea was so bad that we weren’t allowed this far out on the pier.

Elsham Hall

Took a trip out to Elsham Hall today. The weather was cold and grey, but didn’t actually rain, which was something of a relief. We were able to see the promise of the place though, definitely going back there in a few months when the gardens have got going properly. As it was, the main attractions were the livestock, of which there was plenty.

IMG_6151.jpg

They have a peacock there.IMG_6205.jpg

.. and a turkey…IMG_6193.jpg

.. and some rabbits.

If you’ve got kids and are looking for somewhere to take them and tire them out, I can recommend the place. After all, that’s how we found it a few years back. And with Humber Bridge tolls down a bit now, going south of the river for a trip out is looking a lot more affordable.

Zombie Dice for Brain Eating Fun

image

Another day, another game review. I’m taking quite an aggressive stance on the holiday this week I’m afraid, so that means that if you don’t receive a response to a work related email it is because I’m, quite literally, too busy doing nothing. Normal servicer (or what passes for it) will be resumed on Monday next week.

And so on to Zombie Dice. It is a nice, simple, dice game with you playing the role of a zombie, hungry for brains and rather less keen on shotgun blasts. The mechanic is simple enough to get your head (or at least skull) round and great fun.  For me the best bit though was looking up the product on Amazon for a link and finding that game was linked with the following special promotion:

image

Just what your average Zombie needs….

Lego City for Wii U

image

If you are forming the impression that I’ve spent the last few days going to movies and playing games then you are pretty much right. I’m on holiday.Go me.

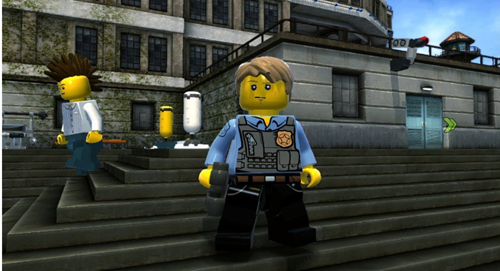
Anyhoo, today I got hold of my copy of Lego City Undercover and finally got to play it. It was a bit more finally than I expected actually, as firing up the game triggered a console update of the Wii U itself and the game does have its share of loading screens. But it is well worth waiting for. I like the Lego versions of the films that have been around for ages. But this is in a different league. The story is all home spun (but none the worse for that) and there is lots of dialogue (which is all very well presented). There are lots of movie in jokes and characters that you start to care about after a few missions. The Wii U gamepad is used to very good effect, as a mapping device, communicator and crime scene scanner.

I’m really enjoying myself going round solving crimes and arresting bad guys. As the whole thing has been designed to be played by seven year old kids I’m finding that I can actually do quite well, which is nice. The only real gameplay issue that I’ve noticed really is that the handing of the vehicles is a bit tricksy. But everything else is great fun. I don’t think you should buy a Wii U just to play this game. But if you already have the console, the game is a really, really good buy.

Braggart–a great game of boasting

image

Spent some time today playing Braggart. This is a splendid little card game. Each player takes the role of a hero in a bar, boasting of their great deeds and daring dos. You assemble your boasts and present them to your opponents to gain points and win the game. But they can call you a liar and change your story to one which is considerably less impressive. The artwork on the cards is great and the tales you can spin are hilarious. Great fun and well worth tracking down.

GI Joe: Retaliation Movie Review

image

OK. Lets get this out of the way at the start. GI Joe “Retaliation” is as good as any movie inspired by plastic dolls made for boys to play with can be. I saw the very first one and thought it was a great piece of lightweight throwaway fun. This one is a bit darker though. And they’ve thrown away the silly gadgets and added Bruce Willis. I think the director must have watched “The Expendables” a few times before making this film, and made a few changes to match. Unlike “Trance”, there is hardly any plot and things are mostly moved along by cartoon violence and blowing things up. Which is fine by me.

XNA Resources Follow-up

DSCF1380_1_2.jpg

Further to the talk on XNA earlier this week, some folks have been in touch for any other XNA references that I might know of. Here are a couple.

You can find a complete course which teaches programming using XNA at Microsoft Faculty Connection here. There are slides, labs and all kinds of good bits and bobs that you an asset strip and use as the basis of your teaching.

My Microsoft Press XNA 3.0 book (not the most recent, but still good for getting started) can be found as a free download from here.

All of the stuff will work on MonoGame too.

Trance Movie Review

image

We went to see Trance tonight. We got a two for one deal on the tickets, which is kind of appropriate, because you get around twice as much plot as you need in the movie. The starting point, art heist that goes wrong when the man on the inside forgets what he did with the haul, is enticing enough. But then things go pear (as well as a whole number of other fruits) shaped really quickly. It is as if they sat down and decided every possible permutation of bad person and sucker and then worked through them in sequence for completeness.

The gushing interviewer on the “One Show” (always a source of unimpeachable and incisive movie reviews) said something along the lines of “Just when you think you have it figured out there is another twist that changes everything”. What happened to me was that after the film has led the audience through the third successive “bait and switch” move with the plotline you just stop caring who did what to who and just wait for the credits to roll so that you draw some kind of line under the thing.

Sometimes when I write about a film I worry about spoiling the plot. But this time I reckon that this time the director Danny Boyle (who did a great job on the Olympics)  got there first.

Windows Gaming Awareness Event

DSCF1395.jpg 

A great audience. I kind of have to say that because I’ve not left Birmingham yet. Although they actually were a great audience.

Just done a talk at the Windows Gaming Awareness event about XNA and MonoGame.Great fun. Well worth getting up at 5:45 am to catch a train to Birmingham to deliver. You can find all the content here.

It has also been very interesting to see what other gaming tools and techniques there are out there. I’m going to have a play with quite a few of the things that have been discussed.

Game State Management in MonoGame on Windows 8

ApplicationLog

I’ve been trying to make sense of how Windows 8 and MonoGame interact when the application changes state. I think I’ve figured it out.

There seem to be broadly two things that can happen to your game when it is running. It can get deactivated (the user finds something better to do) or it can get “snapped” to the side of the screen. If you are going to sell the program in the marketplace it needs to handle both these situations.

protected override void OnActivated(object sender, EventArgs args)
{
    addMessage("activated");
    base.OnActivated(sender, args);
}
protected override void OnDeactivated(object sender, 
EventArgs args) { addMessage("deactivated"); base.OnDeactivated(sender, args); } protected override void OnExiting(object sender,
EventArgs args) { addMessage("exiting"); base.OnExiting(sender, args); }

To handle the activation issues you override the event methods above. I’ve just put some logging code in so that I can work out what is going on. The events are fired when you would expect them to be. When the game starts you get an “onActivated” message and when anything happens to interrupt your game (for example the user minimises it or switches to another application) you get a “onDeactivated” message. At the very end, when the user quits your game you get the “onExiting” message. The activated and deactivated message come in matched pairs. The only slight trickiness is that a game will get an activated message at when it starts and when someone returns to it, but you can use a variable to keep track of this.

When your game is deactivated it should probably pause the game (because the user will not be able to interact with it). When your game is reactivated you can either resume the game or stay in pause mode and give the player a few seconds to compose themselves before continuing. When the game is exited your game should store any persistent game state and the first time it is activated your game should load the state.

The next thing you need to do is handle changes to the application view. These occur when the user “snaps” you to the side window or when the orientation/size of the screen changes. The first thing you need to do is bind an event handler to the event which fires when the application view changes:

ApplicationViewChanged += 
(sender, args) => ViewChanged(args.ViewState);

Your event handler will have to deal with changes in orientation and also “snapping” to the edge of the screen.

private void ViewChanged(ApplicationViewState viewState)
{
    switch (viewState)
    {
        case ApplicationViewState.Filled:
            addMessage("filled");
            break;

        case ApplicationViewState.FullScreenLandscape:
            addMessage("fullLand");
            break;

        case ApplicationViewState.FullScreenPortrait:
            addMessage("fullPort");
            break;

        case ApplicationViewState.Snapped:
            addMessage("snapped");
            break;
    }
}
This is my test method. It just sends a message out for the different states.

When you get snapped your game could display a “Mini-screen” in the snapped area. Above you can see what a snapped game looks like. The cornflower blue area on the right is the snapped area. When the game is unsnapped it will get a message to indicate the orientation of the screen. My games just pause when they are snapped.

One thing to remember is that when you get snapped the size of the screen changes.You need to change the size of the screen so that things are still drawn correctly in the snap panel area. You can grab the new values of the viewport size to do this.

cheeseRectangle = new Rectangle(0, 0, 
_graphics.GraphicsDevice.Viewport.Width,
_graphics.GraphicsDevice.Viewport.Height);

The above snippet resizes a cheese drawing rectangle to fit the whole screen. I could use this to make sure that my cheese is always displayed full size (although when the program is snapped this will make for a rather long and thin display).

Having got this far you are pretty much sorted. There is just one more thing you need to know, and that is the sequence of the messages. The log sequence at the top of this post will help here. The important thing to note is that you get viewport changed messages after you have been deactivated. If you think about it, this makes sense. The user can start to drag your application screen and then either put it back, or drop it into the snap area. It is important that the application is stopped when the user begins to perform such an action. So if your program is snapped you will get the sequence:

  1. deactivated
  2. snapped
  3. activated

You never get the view changed messages in isolation. This even the case when you use the Windows + . command to snap the game from the keyboard.

Gaming in Academia Event

Doncaster

I got this email from TripIt today. It doesn’t seem to understand that I’m changing trains in Doncaster to go on to Birmingham for the Windows Gaming Awareness event. Not that there is anything wrong with spending time in Doncaster.

I’m doing a session tomorrow in Birmingham about XNA and MonoGame in Windows 8 and Windows Phone 8. If you want to come along too, I think there may be a few places left if you are quick.

Building a Door of Mystery

IMG_6031_2_3.jpg

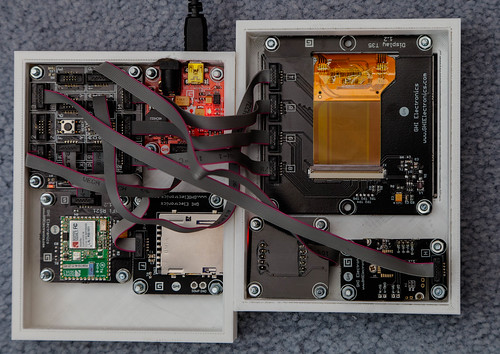
After a considerable amount of tweakage of designs and waiting for the printer to finish I now have my “Door of Mystery” machine complete. This is how it looks inside. I’ve added a WiFi card so that the door can upload pictures after they have been taken.

After all my careful planning the box needed a bit of surgery because I’d forgotten that power connector protrudes from the front of the board, but apart from that (and having to go and get some more bolts) it is now pretty much complete.

IMG_6067.jpg

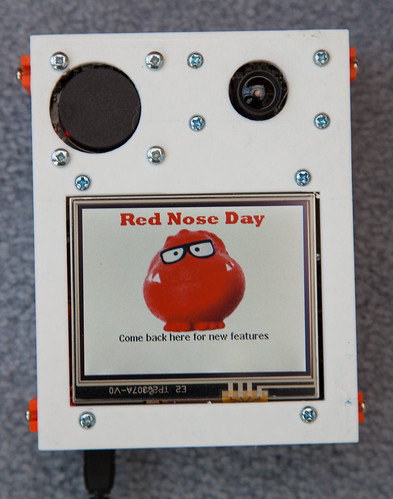
This is the finished device. I’m going to have to slightly adjust the hole for the RFID reader in the next version, but it is quite pleasingly solid and works a treat.

You buy an RFID tag to enter the competition, show it to the “Door of Mystery” above and it will give you your entry number and take your picture. Then, I can use my special “Pick a Winner” tag to pick a random entry and even view their picture. We might even use this for bashes, where we might want to give out random prizes, pick team members or let people take it in turns to use some of the games.

Get a Scope

image

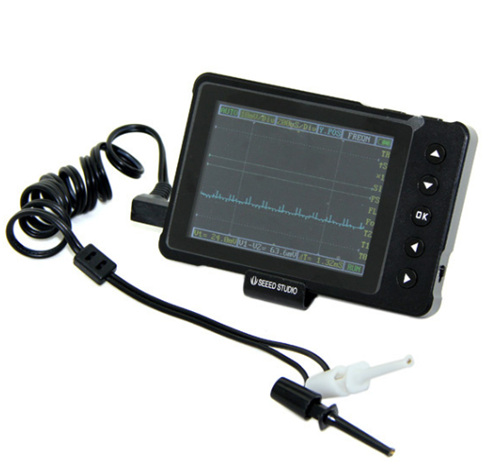
I really am a sucker for mailshots (hmm. Perhaps I shouldn’t put that in the blog). Anyhoo, I got a mailshot from Cool Components advertising the above (or actually the slightly cheaper version 2 which you don’t seem to be able to get any more). So I bought one. It is a tiny digital storage oscilloscope which costs around 80 quids or so. I reckon this is extremely good value. It has an SD card that you can use to store waveforms and the whole thing is powered by a Cortex A3 and open source, so you can even put your own firmware in there if you fancy it. It is powered from a rechargeable battery and will go up to 1 MHz which for me is fine.

If you are not sure what an oscilloscope is, it lets you “see” electrical signals. It draws a plot of the voltage in the signal as it changes over time. The original ones used a cathode ray tube that drew a single dot on the screen. The dot was moved across the screen at a regular rate by a timebase generator and the value of the voltage in the signal was used to control the height of the dot. If the signal was regular then you could take a a peek at the waveform and see what it was doing.  Newer ones are of course digital. The input voltage is converted into numbers which are then used to draw a graph on the screen.

Sometimes, when a circuit just doesn’t work you need to take a look at what is happening. A voltmeter will tell you if there is anything on the wire, but not how it is changing over time. If you have any hardware aspirations I think a little device like this is a pretty good investment, and it only costs around the same as a couple of video games.

Just the Wrong Size

IMG_6046.jpg

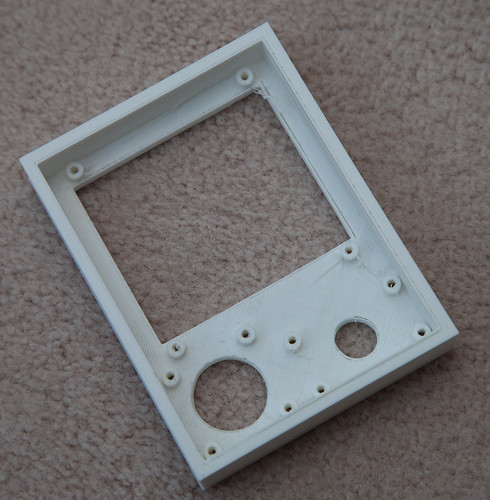
So today I had a go at printing out my designs. Above you can see the result. And I’d made a mistake that I’ve made before. I made the holes exactly the same size as the things intended to fit into them.

Do. Not. Do. This.

Of course they don’t fit. One thing just sits on top of the other looking exactly the same. Wah. I did think I could solve the problem by filing a bit off. Not a win.Turns out that PLA is actually quite tough stuff. After about ten fruitless minutes and quite a bit of pain (who knew you could get splinters from plastic things) I gave up and went back to the software. The good news is that I just have to tweak a couple of values and rebuild everything. I’ve even added a feature where objects can cut holes in the entire finished piece, so that the SD card and the screen can cut slots for themselves.

Ongoing.

Making Boxes with Software

BaseDesign

This is the base design I came up with. You can also see one of the Gadgeteer part designs where it will be fitted in the finished product.

I’ve been designing a box for the “Door of Mystery” Gadgeteer device that I built for the Red Nose Day event. But I’m very lazy. I don’t want to have to lay out the various elements by hand and position them individually. I want this to happen automatically. So I’ve wanted to write a program to do this. Peter likes OpenSCAD, so I went there first.  OpenSCAD lets you create 3D images programmatically. It is really easy to use, and you can preview your designs very quickly.

module panel(width, height, x, y)
{
    translate([x,y,0])
    {
         cube(size=[width, height, baseDepth]);
    }
}

I used this tiny snippet of OpenSCAD to place a panel on the drawing surface. I move the axis to the position of the panel and then create a box of the required size. You can perform unions to merge things together and differences to cut one shape from another. In no time at all I was programmatically creating bases for the Gadgeteer devices. And then I hit a brick wall. What I really wanted to do was have the program work out where each device goes in relation to the other ones and lay out the box contents.To do that my program has to keep track of where things have been put. This means that I need some variables.

OpenSCAD does not provide variables as such. It provides constants (such as baseDepth above) but these are evaluated at compile time, and so I can’t use them to keep track of things as the program runs. This is not necessarily a criticism of OpenSCAD, it isn’t really meant to run programs, but it does mean I can’t use it.

So I went back to my old friend FreeCAD. I first used this ages ago, when I made the case for my Tweet Printer. FreeCAD can be controlled by Python programs and I’ve always fancied learning a bit of Python, so of I went. The designer has a Python console into which you can paste and run lumps of code. You can also add libraries and user interfaces on top, but I was happy to cut and paste for now. All the actions you take in the designer are exposed as Python calls via the console, which makes it quite easy to figure out how to do things. You just do it in the designer and then look at what comes out on the console. There is also an API reference which tells you how the commands work.

def makeBoard(self,x,y):
    b = Part.makeBox(self.width,self.height, 5, Base.Vector(x,y,0))
    return b

This method is a member of my “Filler” class which places the filler (which has a width and a height) at a particular place on the design. Note that the filler is 5mm thick in the above code. The program can take the object that is returned and fuse or cut it with other shapes as you build up the finished design. By the end of all my fiddling I’ve got a class hierarchy of Gadgeteer device specifications and a layout engine that will place them in a box of a particular size.

def MakeTop():
    doc=FreeCAD.newDocument()
    f1 = Filler("Filler", 5,25)
    f2 = Filler("Filler", 6.5,25)
    f3 = Filler("Filler", 6.5,20)
    rfid = RFIDReader("rfid", "landscape")
    camera = Camera("camera", "landscape")
    display = DisplayT35("display", "portrait")    
    topComponents = [rfid,f1,camera,f2,display,f3]
    test = Layout(91,121,topComponents)
    board = test.layout()
    Part.show(board)
    Gui.SendMsgToActiveView("ViewFit")
    Gui.activeDocument().activeView().viewAxometric()

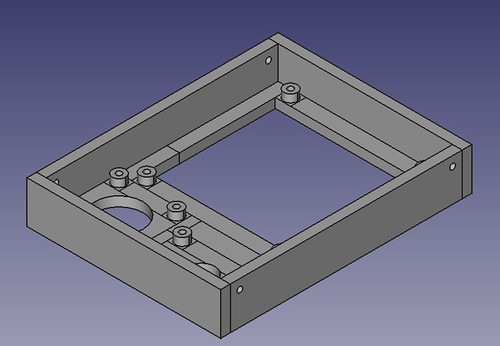
The MakeTop method creates the top of the box which contains an RFID reader, a touch display and a camera. These are laid out in an area with a dimension of 91x121 mm. Each component can be either “landscape” or “portrait” orientation and you can create filler elements to push things around in their row. The design method is given a list of components and an output area. The finished design looks like this:
TopDesign

These elements cut extra holes for themselves so that they show through the front of the box. The layout method also creates the sides and puts fixing holes in them, so that I can join the top and the bottom together. If I want different size of panel thicknesses I just change the static members that control these values and run the method again. If I want to make a different design I just create a new method which contains the devices that want.

The system is not completely automatic, what I end up doing is fiddling with the output from the method and then changing the orientation and adding fillers until I get what I want. The good news though is that it provides a really quick way of making Gadgeteer boxes. I’m going to have a go at printing the designs later in the week.

I find it fascinating that I’m now writing programs where the output is a physical artefact. We do live in interesting times.

New Kinect SDK now out

image

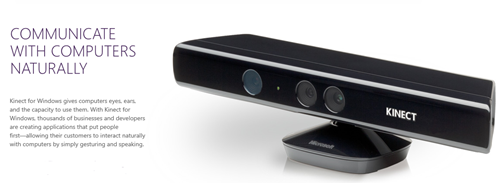
The new SDK for the Kinect sensor is now available for free download. This brings with it a whole ton of upgrades for those who want to make their computers more aware of their surroundings. There are new sensor modes and all kinds of good stuff. There is also a sizeable gallery of sample programs which you can just play with. This makes it worth a look even if you don’t intend to write any programs for the sensor, but just want to get a feel for the kinds of wonderful things it can do.

The highlight, which I’m really looking forward to playing with, is “Kinect Fusion”. This lets you use the sensor as  kind of hand held 3D scanner. You wave the Kinect around a scene and the program will build up a 3D model of what is in front of it. You’ll need a fairly beefy graphics card in your PC to make it work quickly (it uses the power of the GPU to crunch the scene data), but the results look really impressive. I’m really looking forward to printing little plastic models of me that I can give as Christmas presents…

You can download the SDK from here.

TechDays 2013 Sessions Now Online

image

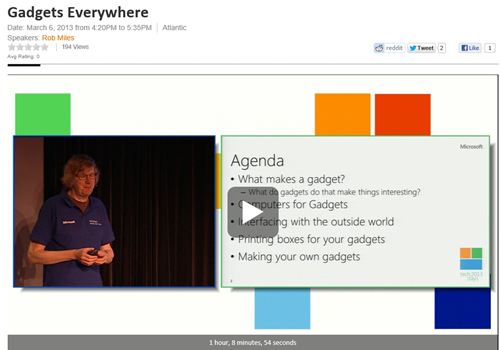
If you want to see a proper Gadgeteer session, not in rhyme, but with working demos and a lot more detail, then you can get hold of my TechDays session on gadget development by clicking on the above image. If you want to see all my Channel 9 sessions (including the ones on Windows Phone Agents and Windows Phone Speech) you can find them here:

http://channel9.msdn.com/Events/Speakers/Rob-Miles