Windows 7 Pin To Task Bar Trick

image

I like pinning things to my Windows 7 task bar (well, everyone needs a hobby I suppose). It provides quick access to the programs that I use most often. However, I found a snag with doing this, which was that it was hard to start a second copy of the program pinned on the task bar. If you press the icon on the task bar once the program is running you get sent to the open program, it doesn’t start another one.

Then, by mistake I found the answer today. If you right click on the icon in the task bar you get a menu the option to run another copy of the program. Very useful.

Making Boxes for Gadgets with an Ultimaker Printer

IMG_0302.jpg

Ultimaker and Gadgeteer would seem to be a match made in heaven. Gadgeteer gives you a bunch of hardware devices that you can connect together and program using .NET and Ultimaker gives you a way of making a box to put them in. I’ve spent today finding out just how easy it is to do this, and just how much fun. I spent some time last week printing my name, which was fair enough I suppose, but today I wanted to get started making some boxes for gadgets.

I started off using the AutoDesk 123D software but in the end I gave up on it. It is a great program for making ornaments and trinkets, but didn’t seem to make it easy to create engineering type drawings. I wanted everything to be just the right size and correctly positioned, and the program didn’t seem to make it easy to do this. So I switched to FreeCAD, following up on advice from Andy in a comment on the post last week. This has the feel of a proper CAD program (although I’ve never used a proper one, so I don’t have much to compare it with). Finally I figured out that the best way to make something complex was to use the Sketch view to draw something on a plane, and then extrude that into the model. That way I could cut quite complex shapes.

FreeCad.jpg

This is the view of my finished product, It has mounting blocks for a Sytech processor, power connector and button. The blocks are all individual components which I can assemble on a grid any size. The nice thing about the Gadgeteer devices is that they are all based on a grid mounting, with everything happening on 1cm boundaries. This makes it very easy for me to create some pins that I can use anywhere. The design above needs a little work, as the round mounting pillars are a bit too wide for the Gadgeteer standard, but for most of the devices I’ve found they work just fine.

Once I had made my design I had to convert it into an STL file (no problem, FreeCAD just does this) and then make the set of printer instructions. I used Cura for this. Finally I put my design on a memory card and turned the Ultimaker loose. I’m slowly getting the hang of 3D printing. Now that I’ve fixed all the leaks my problem is that sometimes the very first layer is not sticking to the printer bed. This means that the printer just extrudes plastic into the air and nothing gets made. I think I know how to do it now though, you have to adjust the print head so that when it is closest to the surface there you can just about pull a single piece of paper back and forth underneath it. And you have to make sure that this is the case across the entire printer surface.

IMG_0307.jpg

These are my early prototypes. For the first one, on the right, I tried to extrude pillars that I could just drop the board onto. I had a theory that I could just tighten a nut down onto the pillar and it would just self tap a thread into the pillar. Didn’t work. The pillars are not that strong and they snapped off. But for me the really amazing thing was that the Gadgeteer board just fitted onto these pillars. All the dimensions I had carefully put into FreeCAD were being reflected exactly in the finished article. Kudos to the Ultimaker crew, they have made a printer that prints things exactly the right size. If anything had been even slightly out of whack nothing would have fitted. As it was, once I’d cleaned off the excess plastic, I could just drop the board on.

IMG_0306.jpg

Version 2, which is where I am now, has bolt holes through the plastic pillars which I can then use to screw the boards down onto. I’ve made a three board carrier which you can see above and again, everything just lines up. Astonishing.

I’ve even managed to break one of the golden rules in 3D printing, and print overhangs that let me countersink the bolt heads in the surface underneath.

IMG_0309.jpg

This is the view from the other side of the board. The heads are all countersunk. the big hole in the bottom is meant to be there, it is a push button. The idea was to make a round button to fit into the hole. Unfortunately, being an idiot, I’ve got the large and the small holes the wrong way round, so that my button will just drop onto the floor. Still, I’m very pleased with the results from just a day of playing with the software and the printer. Last night I also made a case for my thermal printer, which turned out rather nice too.

IMG_0298.jpg

Once I get everything sorted I’ll put the designs on the interwebs somewhere for anyone who is interested. Just a great way to spend a day….

Drill Power

IMG_0281-Edit.jpg

I bought this today to replace my old rechargeable drill, which started to make a funny smell whenever I tried to use it. Who knows what damage I can do with this new one?

Incidentally, I’m a bit confused as to why they call it a “funny” smell. It didn’t strike me as particularly amusing. The only funny smell I can think of is laughing gas. Ho ho.

Microsoft Bluetooth Keyboard

image

Another day, another plug from Rob for some Microsoft stuff. Actually I do buy things from other companies too you know, as far as I’m aware Microsoft do not make Strawberry flavoured milk yet.

Anyhoo, they do make some things that are quite nice. I’ve always liked their bendy keyboards, being fairly sure that the main reason that my fingers have not dropped off/seized up yet is that I’ve been using their Natural Keyboards for many years now. They provide very good wrist support and let you type at a more natural angle. Of course you lose all that when you open up your laptop. Until now.

The Microsoft Bluetooth Mobile Keyboard 6000, which you can see above, is intentionally bent. It also comes with a somewhat superfluous numeric keyboard which I’ve left in the box as I can’t see the point of it. But the keyboard is very good. I’ve paired it with the Samsung Slate and it works a treat. It is very thin, so it fits in my bag with no problems, and when I’m typing I can feel the difference.

The key action is pretty good for a device of this type. The Bluetooth keyboard that comes with the Samsung Slate has a very nice action, but is not bendy, and for me some of the keys are now wonky on that keyboard, which is a bit annoying. Actually, the mobile keyboard with the best key action is the Apple Bluetooth one, but unfortunately it isn’t bendy – at least not in a way that would leave it useful afterwards.

I picked up my keyboard cheap from Amazon. They have this thing now where you can find used examples of stuff that you want, and for the first time I tried this. It worked very well, the item arrived well packaged and in good time. This is looking like a good alternative to eBay. None of the bidding daftness, and the prices are very competitive too.

Making a Name for Myself with Ultimaker

DSCF8302.jpg

I’ve been spending more quality time with my Ultimaker 3D printer. Making designs from other people is kind of fun, but I really wanted to design and build my own components. So tonight I fired up Autodesk 213D beta and had a go. Turns out to be quite easy and fun. The Autodesk program is quite easy to drive, although it definitely has the feel of beta software, with the odd crash and lockup here and there. You also have to sign into the Autodesk site and the default is to publish your designs for everybody to see, which worried me a bit, particularly as the first design I did was the one above….

It proved quite easy to draw some text, extrude it into 3D and then connect it to a block. The 123D program can export to STL files and I used the Cura program to create the file of printer commands.

Tonight I actually got around to building up the UltiController part of the system which allows me to print objects without needing a computer. I just put the design files onto an SD card, pop the card in the controller and set it off. The printer is behaving itself at the moment, with no leaks (reaches out and touches convenient piece of wood) and did a pretty good job. My first attempt got the size a bit wrong and tried to print one that was a bit large, but I re-rendered the design in Cura with a scale factor of 0.25 and got the result above, which is around half an inch on the long axis.

The next step is to design and make some plastic components to mend the piano, at which point the printer will probably have paid for itself…..

Hull CS Blogs Application Now Live

image

If you are a fan of Hull Computer Science Blogs and have a Windows Phone then your life just got even better. Danny Brown has just made a Windows Phone application that provides ready access to all posts on the site, along with Microsoft Marketplace applications published by Hull students, RSS feeds and all sorts. It’s a free download, works a treat and you can get it from the markeplace here.

Windows Phone 8 Summit


image
Coming to a Windows 8 Phone near you….

Hot on the heels of the Windows Surface announcement, today we had the Windows Phone Summit “sneak peek” at the next generation of Windows Phone. I must admit it looks very nice. Windows 8 phones will be based on the same operating system technology that powers Windows 8. They will be able to sport multiple processors and share driver technology with their bigger brother. They will be able to use Near Field Communication to exchange data with other devices, including Microsoft Surface. Programmers will be able to write games (and other programs) which will be compiled into fast running binary code that executes directly on the processor, with graphics powered by DirectX. There will be support for more screen resolutions. You will be able to upgrade the storage using an SD card. Operating system updates will be sent directly to the phone. And the Start Menu is going to get a bit bigger.

One piece of less good news, for me at any rate. Existing phones will not be upgraded. My lovely Lumia 900 will always be a Windows 7 phone. I can live with that though. When Nissan bring out a new version of the Cube I’m not expecting them to provide a way for me to upgrade my car for free. And actually I love my Cube just the way it is. A new version of Windows Phone 7, version 7.8 (where do they get these numbers from?) will bring some of the UI enhancements to existing devices, which will be nice.

It looks like all my XNA and Silverlight skills will still serve me on the new platform as well as the old one and I can still continue to make a fortune via sales of Cheese Lander on the new device…

All things considered it looks like the phone is on a very good trajectory.

Microsoft Surface for Windows 8: Something else to want

image

I love my iPad. But I don’t find it useful as such. It is great for playing games or consuming data, and should I ever feel the need to paint a portrait or compose some music it might prove useful I suppose. But I like to spend my time creating programs and documents and stuff like that, which the iPad just won’t let me do. But the new Microsoft Surface should.

At the moment I’m loving my Samsung Series 7 Slate, which gets pretty close to the larger of the two new Surface devices. I’ve got my slate running Windows 8 Release Preview and it is a properly useful device. In fact at the moment it is my main computer. I’ve got two docking stations, one at home and one at work, and I now carry my desktop around with me. The machine has more than enough power to do what I want, which is use Office, Visual Studio, Photoshop, play a bit of media and browse the interwebs. It is a bit restricted in terms of built in storage, but I’ve got around 20G free at the moment and a 32G SD card plugged in the side which has got a whole bunch of movies and other stuff on there. Battery life is fine too, with at least 5 hours if I work the machine hard, and up to 8 if I take it a bit easier.

The Surface should be rather like this, but better. It has a case that turns into a touch keyboard, and another that turns into a keyboard with moving keys. It also has a kickstand to make it easy to stand on the desk. The two words that come to mind for me are “want” and “one”. The only snag with the Surface is that it isn’t in the shops yet. But when it is, I’ll be there, queuing up for a blue one.

Hi Toby

image

Every time I log in to Facebook it seems to have a new feature which I have to engage with. The latest is “Close Friends”. Last time used the web site I was invited to pick people to occupy this cherished category. Unfortunately I seem to have pressed one button too many, and selected a chap called Toby Russell, who is one of our first year students and a thoroughly excellent fellow, but not actually a best friend as such. For the last weekend I’ve been getting updates just from Toby on my phone. I’m a bit worried that he might think I’m doing some kind of stalking, so I’ve removed him from that list now. Sorry about that Toby.

Wallace and Gromit’s Fleeced Boardgame

image

Spent a good chunk of last night playing Wallace and Gromit’s Fleeced the Boardgame. This is based on A Close Shave, one of the brilliant series of animations produced by Nick Park at Aardman. You play as one of six characters in the story (I was Preston, the evil robot dog) and you move your beautifully made playing pieces over the board trying to snare sheep and get them back to your lair. You can do this by fair means, picking them up from their hideouts and leading them home. Or you can play foul, and “rustle” sheep from the other players.

The game is full of lovely touches, from the whistles that each player needs to blow before they herd their sheep to the cheese cards that you can pick up on the way. There is even a “Hard Cheese” card that gets you sent straight to the police station.

Some of the reviews in Amazon are quite funny. One complains that you can’t finish the game because everybody keeps stealing sheep from each other and nobody wins. It is true that you could play the game like this, just like two chess players could play for ever by moving their pieces back and forth and not doing much. However, I reckon it is absolutely great fun. I might even spend some of the “Miles Millions” ™ on a copy.

Rob Goes to London

IMG_0184.jpg

It looks as if Her Majesty’s stock is dropping a bit….

Having a couple of days in London. I like the place, but wouldn’t want to live there. Had lunch at The Diner. Always have lunch at the Diner. I insist. And nobody seems to mind. If you want some of the best burgers in London, you should pop along.

Then went off in search of camera stuff and bits and bobs. Paid homage in the Apple store (I always go in there wearing a Microsoft jacket to see if it will burst into flames). The new Macbook Pro looks very nice. But at the moment I’m loving my Samsung Slate 7 (on which more later) and so I’ll stick with that for now.

IMG_0189.jpg

I’m breaking in a new camera at the moment, so I took a whole bunch of pictures.

IMG_0227-Edit.jpg

Bright Shades

IMG_0199.jpg

Patriotic Bike.

Start Here! Learn the Kinect API has gone to print

image

I’ve always wanted to produce a book with an exclamation mark in the title. And today it went off to print. Start Here! Learn the Kinect API is the story of one man’s struggle against the forces of the universe and device drivers as he calls forth the inner strength that we all have within us, and uses it to forge a majestic tome that sits easily amongst the greatest of its peers, telling the tale, once and for all, of how mortal developers can write fun programs using the C#,  .NET and the Microsoft Kinect sensor.  The book is now with the printers, and will be in the shops at the end of July.

The book was great fun to write and I hope it will be fun to read. It is interesting that Microsoft have applied for a patent for a gesture based MIDI interface powered by Kinect, and that one of the examples in the book actually tells you how to do precisely this on your PC. I wonder if I can sue them….

Making Things

A gadget that makes gadgets is probably the ultimate gadget. So a few weeks ago I sold a whole bunch more cameras (I seem to do all my saving by means of the “camera bank”.) and ordered an Ultimaker. Peter reckoned that this was the best of the 3D printers and I was attracted to it by the level of detail that you could print with, and the fact that it came in a kit, which I could spend the upcoming bank holiday working on with Number One Son.

WP_000020 (1).jpg

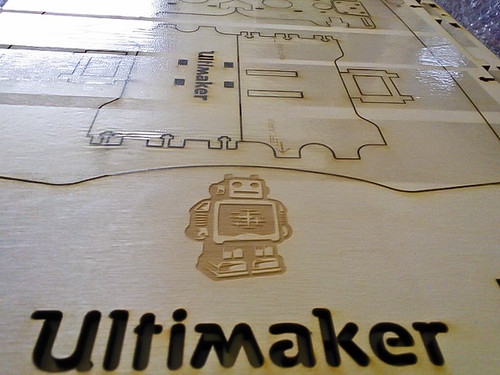
Several weeks later a heavy box arrived which contained motors, circuits and some lovely laser cut birch plywood which would be fitted together to make the finished printer. So, armed with the very detailed instructions and beautifully packaged and labelled pieces we set to work.

It was great fun. Like Lego, but bigger and with bits that light up, bits that get hot and bits that move. And you learn lots of new terms like “Bowden Tube”, “Peek insulator” and “STL file”. And at the end of it you have a thing that makes things. The principle is very simple. At one end you push a plastic fibre which goes down a tube to the “extruder head” which contains a heater and a very fine nozzle.

IMG_0091.jpg

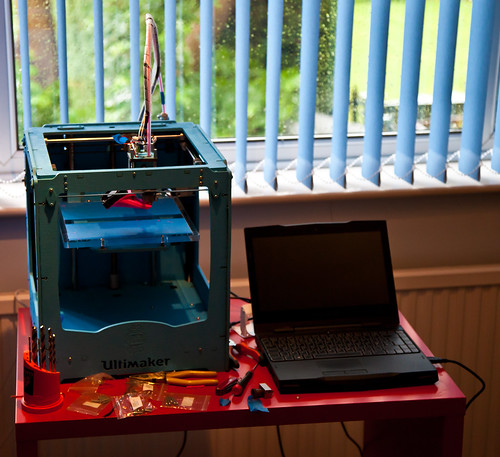
This is the finished product, I painted it blue. The machine “prints” in 3D by moving the head over a build surface, adding successive layers of extruded plastic to create the design you fed into it. It is fascinating to watch the head buzzing around. Number one son made a video of it printing out a Companion Cube here.

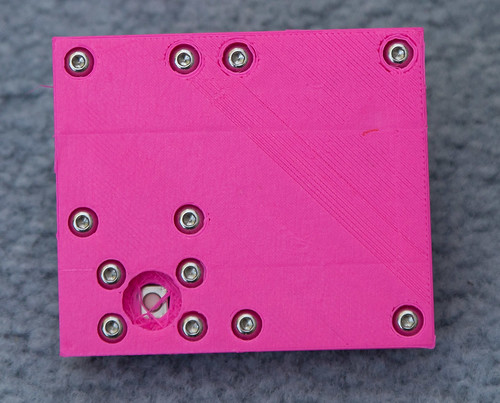
One of the great things about the printer is that it can print extra bits for itself. If you look at the picture above you can see a bright pink fan ducting on the print head which I printed and then fitted to replace the one that the printer ships with. The new duct does a better job of focusing the cool air onto the print so that it hardens more quickly. If I have an idea for a better design I’ll simply print that out and then fit it.

Tonight I decided to print out a new locking assembly for the “Bowden Tube”. This is the tube that guides the raw plastic fibre into the extruder head. I was especially interested in this because it contains a screw thread, and I wanted to see how this would turn out. The print did not go well, mainly because I left the printer heated for too long, and some fibre in the tube melted and formed a plug that stopped the flow. I had to strip down the print head, clean out the blockage and then rebuild everything. Two hours of messing around with bits and bobs. And I loved it. At the moment it is extruding very well, but I’ve got a little leak of plastic around the nozzle which I’ll have to seal up. I’m looking forward to adding some sealant and then trying again.

IMG_0095.jpg

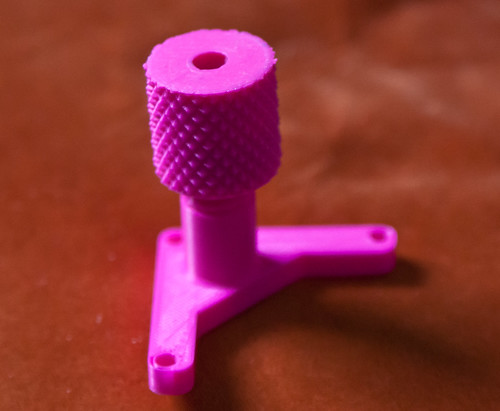
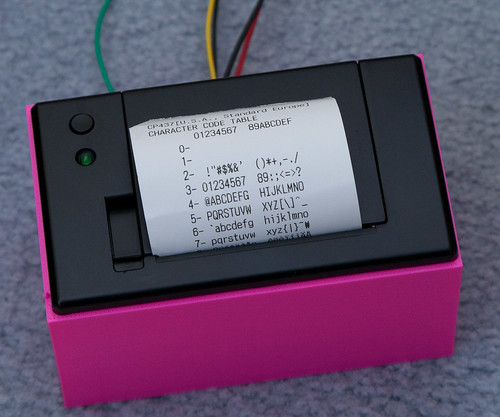
This is the assembly I printed tonight, with a knurled nut on top of the fitting and a thread that works really well. Perhaps I should get some different coloured plastic to work with…

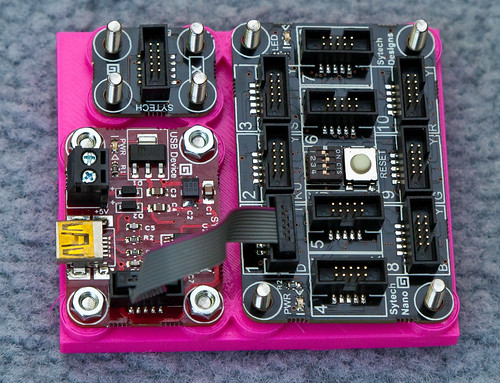
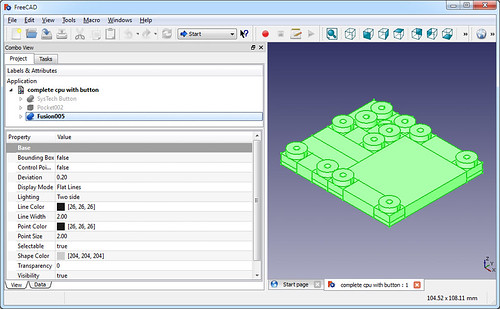
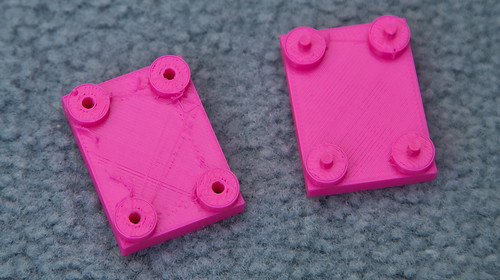
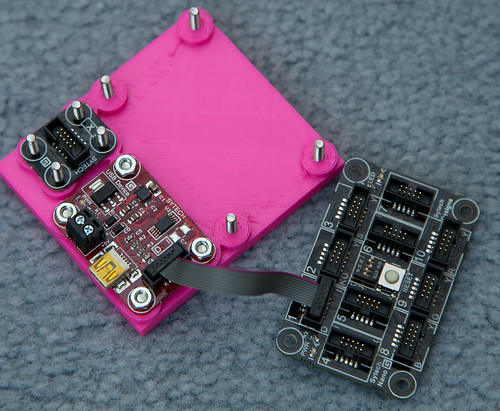
The main reason I got my Ultimaker was not to print parts for it (which would be kind of recursive) but to make cases for other gadgets. The Gadgeteer platform provides a lovely way of making devices, but they will still need a box. As long as the box is smaller than 8 inches in any direction (the build volume of the Ulitimaker) I can design and print it. We already managed to print out a box for number one son’s Raspberry Pie device.

This is not a technology ready for prime time. But it is a tinkerers delight. You don’t just get to play with the bits, you get to make more bits to play with too. There might be people out there who will say that in the future everyone will have an Ultimaker, and that one day the machines will make themselves. This might happen at some point, but great as it is I can’t see my little blue box printing out a Stepper Motor or a Microcontroller any time soon. To me it is very similar to the very first TVs that were made by John Logie Baird. They worked by spinning disks and flashing lights and were thoroughly impractical for proper viewing. But they got people engaged with the idea of being able to view things over long distances. The Ultimaker is just like this. It is slow (although really fast for a 3D printer), noisy and not 100% reliable, but that doesn’t matter. What it does seems as magical as watching someone 100 miles away must have seemed in 1925. When people really figure out how to do this, how to make different colours and build more quickly, then I can see that there really will be one in every household. And another piece of Star Trek technology will have arrived in our lives.

We will be launching a spin off from Three Thing Game (Three Thing Thing) later this year when we will get people building gadgets using Gadgeteer (keep your diaries clear for the 27th – 28th of October folks) and I’ll bring along the printer so that we can make some boxes for whatever gets made.

Oh, and if you want to find out more about Gadgeteer, Peter has produced some superb posts about the platform.

..and we’re back

DSCF8292-Edit.jpg

One of my favourite sayings is “What doesn’t kill you makes a darned good blog post”.

This is not always true.

I can’t say that the last couple of weeks have been fun, but they have been a lot better than they might have been, thanks to the kindness and thoughtfulness of folks around me. Thanks folks. In amongst the bad stuff there have been quite a few good things happening, of which more later. For now, I’ve got some serious marking to catch up on.

How to sell on eBay

IMG_4889-Edit.jpg

Ebay is probably seen as old hat these days, but if, like me, you have a gadget habit to pay for and limited funds, then one way to get some cash is to sell some of the gadgets that you have around the place. I’ve been doing a lot of this lately. Here are my tips for successful sales:

  • Give the auction plenty of time to run, and let it end at a time when folks are sure to be around and take part in a “bidding frenzy”. I quite like Sunday evening for this.
  • Use Buy It Now. I had a lot problems with people making “kamikaze bids” at the last moment to try and snipe the auction. The problem is that if two people are using this “cunning” trick the result is an enormous bid that they is promptly rescinded, leaving you stuck with no sale. The good news is that you do get to hear some great excuses from people about why they did the bid, and how the cat must have pressed the keys, etc, etc, but the bad news is that you have to run the auction over again. For some reason, Buy It Now sales, where you set a price you will instantly sell it for, stop these folk. If you set a price around 10 pounds or so less than the last one sold for then you will at least get the market rate or near enough. You can use Completed Listings on a search to find out how much this was. This can be depressing, but remember the thing you are selling is only worth what people are willing to pay. If charge what you think it is worth you will just lose your listing fees. And sometimes people get so carried away bidding that you actually get paid more than the Buy It Now price, which is rather nice.
  • Have it packed and ready to post before you put it up for sale. As far as I’m concerned, the gadget is gone as soon as the listing goes live. Purchasers expect to get their item as soon as they have paid for it, and so you must have it down at the Post Office the following day and away on Next Day delivery.
  • Do some research on postage prices. I’ve got stung once or twice where the thing I was selling turned out to be a lot more expensive to post than I expected. As a guide, a small mobile phone will cost around 7 pounds for next day, insured, delivery. A laptop will cost around 25 pounds to send. Of course you should always use tracked, signed for, delivery.
  • Use PayPal. And nothing else. Nuff said.
  • Be nice. When you’ve posted the item, send the tracking number in an email so that they can watch the progress of their parcel. And you can use the tracking number to make sure that it has been collected at the far end.
  • If you are buying a gadget that you might fall out of love with one day (it does happen) then keep the box and all the bits so that you can send out a complete package if you do sell it. This helps with both the price and the speed of the sale. And don’t lose the driver disks.

Imagine Cup World Finalists Announced

image

The World Finalists for the Imagine Cup Software Development Challenge have just been announced. All 72 of them. You can find the list here. I’m really looking forward to seeing them at the Finals in Australia.

One thing I forgot to do a while back was to give a shout out to Team WykeWare who won the Hull University heat of the Imagine Cup and got to compete in the UK Finals. Kudos to Katherine Fielding, Samuel Armstrong, William R Dann and David Hart. Good work people, and I know you are enjoying the prizes that you got.

Getting Started with Gadgeteer

image

WE had the folks from Microsoft Gadgeteer here to see us yesterday. They brought with them all kinds of cool interfaces that I’m looking forward to playing with, after I’ve finished marking. If you’ve not come across Gadgeteer before it is a .NET Micro Framework based platform for creating, well, er, gadgets.

If you’ve ever wanted to create a data logging, remote controlled, catflap. Or a GPS-enabled TV remote, or a motion detecting chicken counting camera, etc etc, then Gadgeteer gives you the modules to plug together to make the hardware and Visual Studio and C# to write the software, including in device debugging of your code.

There are a huge number of modules available now including camera, LCD panel, gyro, compass, lights, switches, multi-io boards, barometer, soil moisture sensors, heart rate sensors,  Bluetooth, WiFi, GPS, GPRS, infra-red, ethernet, USB Host and USB client. Plus you can bring out the individual signals from the processor and use them directly.

You can get started with the Fez Hydra Basic Kit, which you can see above. This costs around the same as a video game and a half. The sensors range from a fiver to quite expensive (for things like the VGA adapter, if you need it). If you want to get started in embedded development, or have an idea for a device and want to make it come to life, the Gadgeteer is a great place to start, particularly if you already have C# skills.

We have been using the Gadgeteer’s older brother, the .NET Micro Framework, for the last couple of years and it has been a very successful means of introducing students to the joys of making hardware do stuff. If you want to have a go with this kind of thing you should take a look.

If you are a student at Hull and you have have a really good idea for a device, and you want some hardware to play with over summer, then come and see me and I’ll see if I can find a kit to loan you.