Ringing a bell is surprisingly complicated

def ding(self):
        # start the clapper moving towards bell 1
        GPIO.output(self.bell1GPIO, GPIO.HIGH)
        time.sleep(0.016)
        # stop the clapper moving
        GPIO.output(self.bell1GPIO, GPIO.LOW)
        # pull the clapper back from bell 1
        GPIO.output(self.bell2GPIO, GPIO.HIGH)
        time.sleep(0.01)
        # leave the clapper in the middle
        GPIO.output(self.bell2GPIO, GPIO.LOW)
        # let the bell ring for a while
        time.sleep(0.01)
        # start the clapper moving towards bell 2
        GPIO.output(self.bell2GPIO, GPIO.HIGH)
        time.sleep(0.016)
        # stop the clapper moving towards bell 2
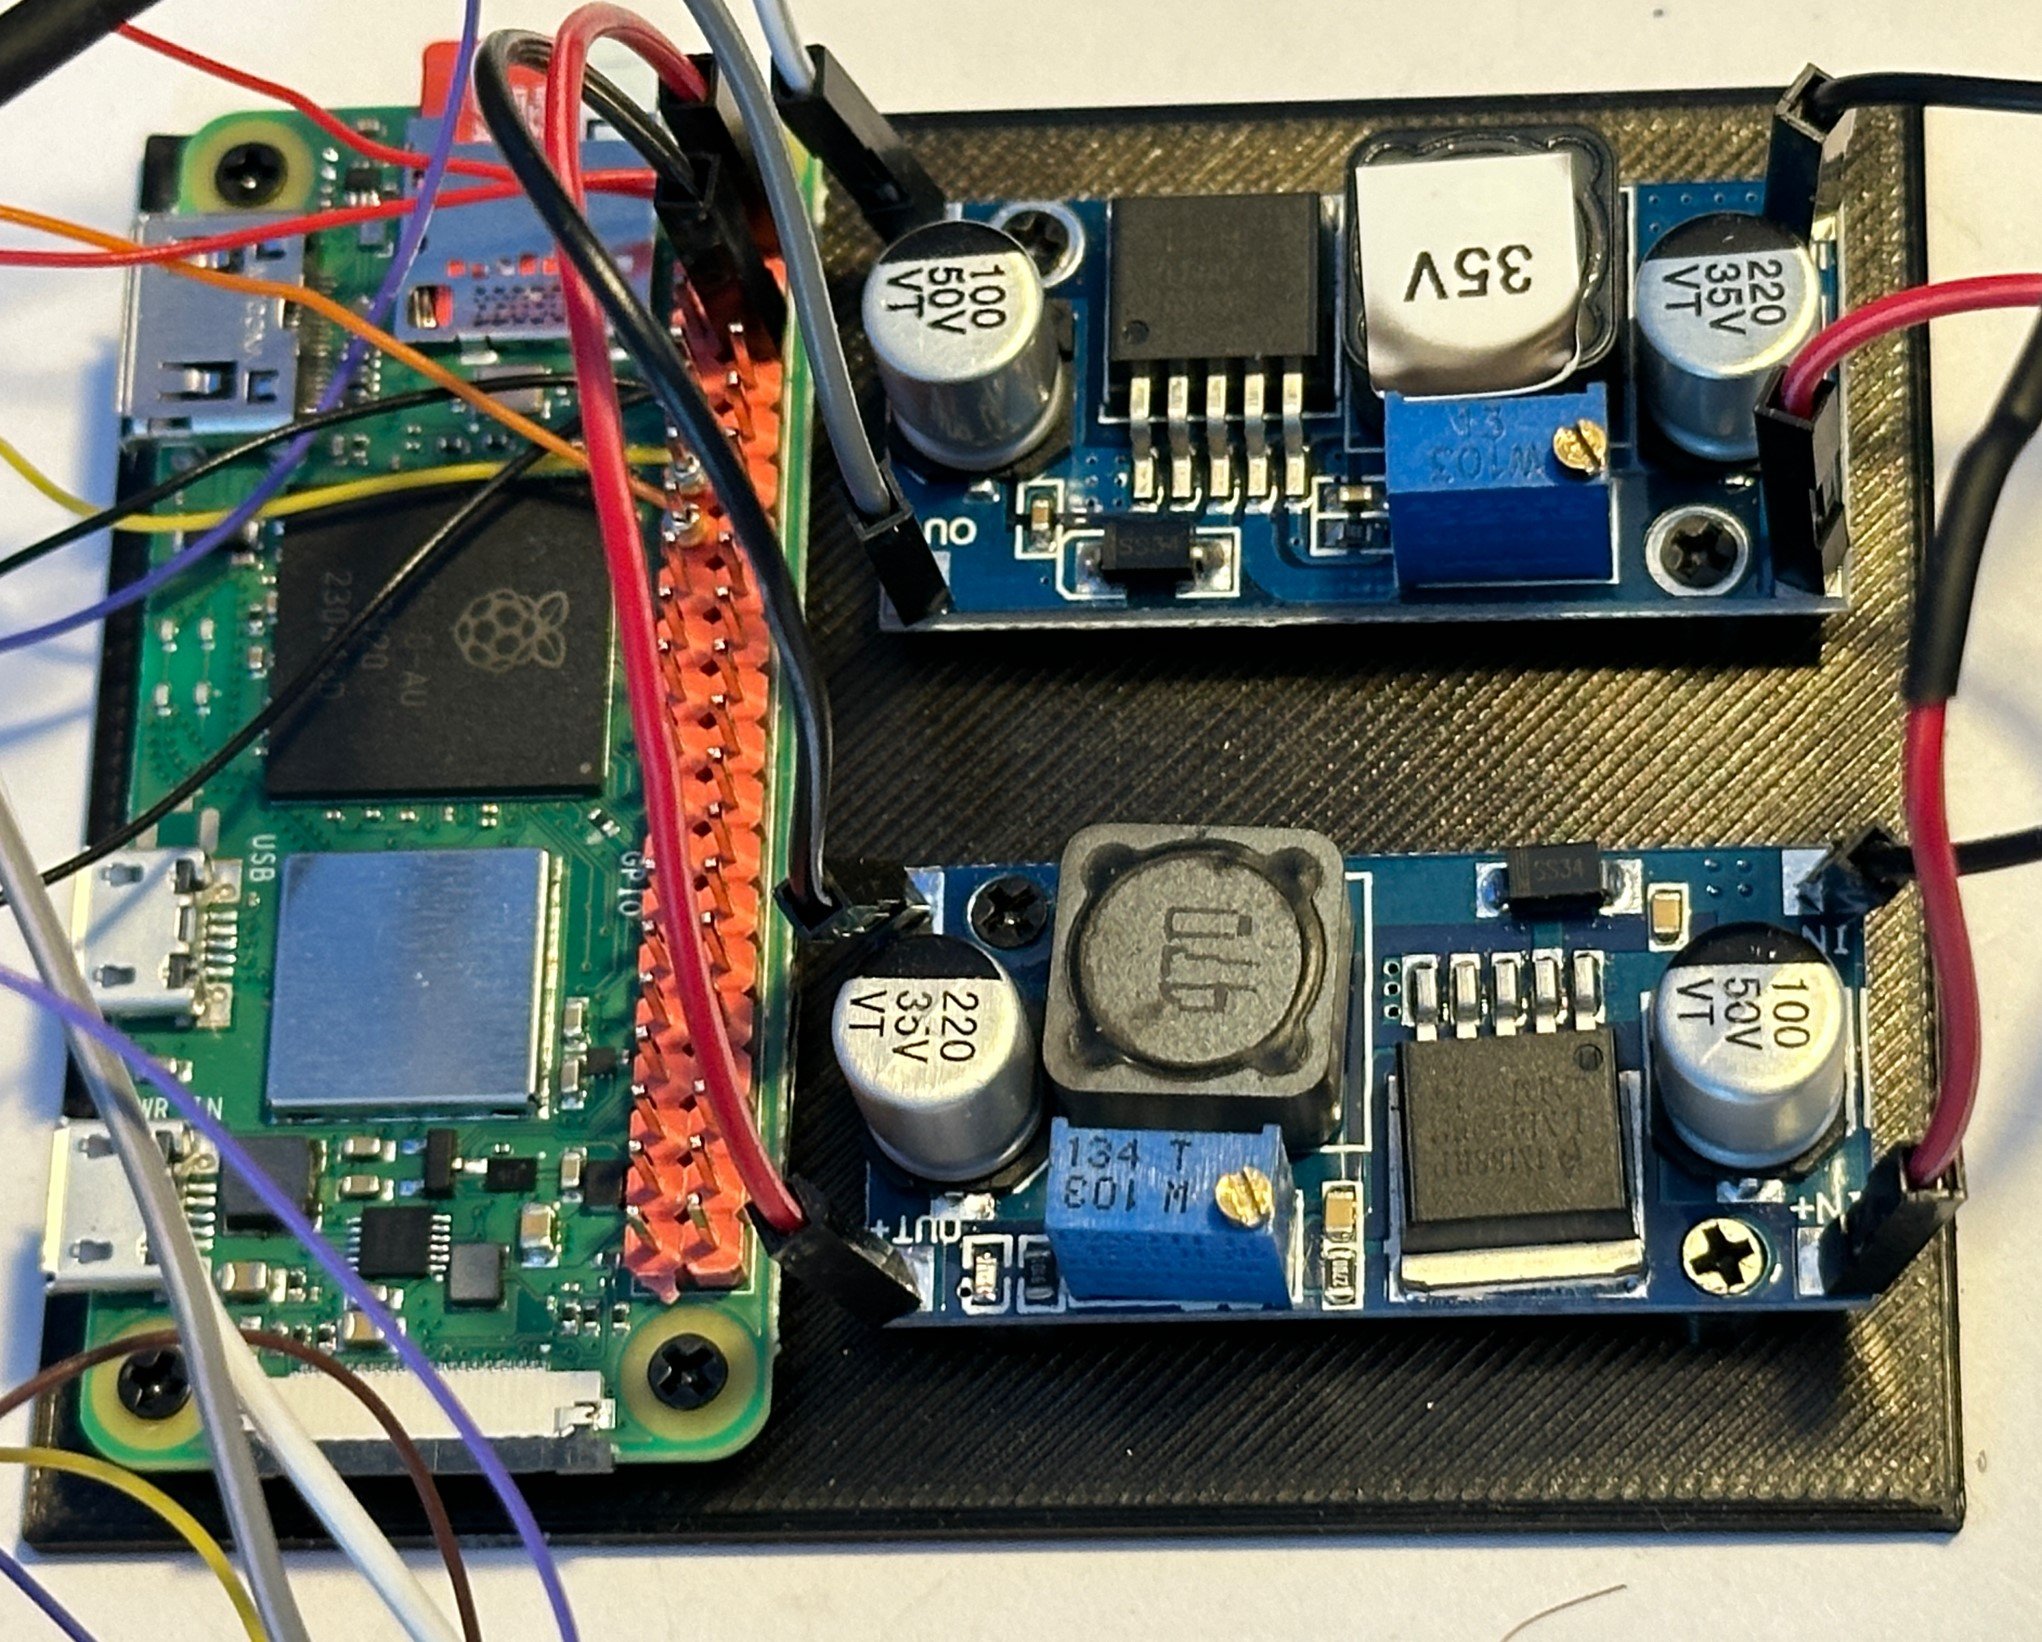
        GPIO.output(self.bell2GPIO, GPIO.LOW)

After a bit of experimentation I’ve managed to make the bell in the old telephone sound realistic. The original bell was just fed with 70 volts AC alternating at 18 cycles a second. The code above triggers the two coils in the bell to allow it to make do with 35 volts. It was quite fun to write. I hope the neighbours don’t mind the way that I seem to be getting a lot of phone calls…….

Decktective: Nightmare in the Mirror

A great way to spend a couple of hours

We had a great time tonight playing “Decktective: Nightmare in the Mirror”. It was passed on to us as something we might enjoy. We did. It’s a card based game which turns each player into a detective racing against time to crack a tricky kidnap case. Clues have to be evaluated, shared and decoded and a crime scene examined. It’s great fun, very clever, and you can only play it once. But then you pass it on to the next person who might like it.

There are more games in the series. We are definitely going to seek them out. Strongly recommended.

Using OctoPrint without a bed sensor

The line you want to comment out is highlighted

This is a rather selfish post, in that it is here so that I can find it in my blog if I need to do it again. Although if you’ve just tried to use OctoPrint and had the print fail because of a “Bed Levelling Not Enabled” error you might find it useful…

Anyhoo, a while back I disabled the bed level sensor on my printer, what with its habit of bashing the print head into the print bed every now and then. I decided that I could manage without automatic bed levelling and things have been going fine. I’ve been copying my print files onto an SD card and plugging it into the printer. But today I decided to reconnect my OctoPrint server. This is useful because it means I can print directly from my computer rather than hopping around with memory cards. But it didn’t work. OctoPrint kept shutting down the printing with an error.

I eventually tracked down the problem, and it wasn’t OctoPrint. It’s just that OctoPrint cares when the printer sends out an error message, whereas if you print from a memory card all printer errors are ignored.

The problem is with Cura, the program I use to convert my designs into code files that control the printer. Cura adds a header of instructions to the printer code file. One of these was asking the printer to turn on bed levelling. The printer complains it hasn’t got bed levelling, sends out an error message and OctoPrint stops the print. The solution is just to comment out the M420 statement that does this, as you can see above. To get to this menu you use Settings>Printer>Manage Printers>Machine Settings

Close up idiocy

This might be quite artistic if I could think of a good caption…

Developed some pictures today. I’d taken them with a Yashica 124G twin lens reflex camera. I’d used close-up lenses so that I could capture intimate portraits over the table in the restaurant. The close up lenses clip on the camera lens to shorten the focus. It’s all part of my “make photography much harder than just getting out your phone” campaign.

I had two close up lenses, one for the viewfinder lens and the other for the taking lens. But, for reasons I still can’t quite comprehend, I’d clipped both of the close-up lenses on the taking lens which meant that I was taking sharp pictures of the cutlery right in front of the camera rather than the person sitting opposite. I’m not completely unhappy with the result, but I think I’d be a bit happier if it was of what I was expecting.

Hull Fair in Daylight

I think the horse is called “Jedi”

I’ve been going to Hull Fair for a while. Take a look here and here and here. Today we went in beautiful sunshine. Hull Fair is awesome. They have multiples of things that most fairs struggle to attract one of. And we must have counted around 10 “Hook a Ducks”. Perhaps the hold the annual “Hook a Duck” convention at the same time as the fair.

This is just a small part of the fair

I went up a Ferris Wheel to take some pictures. They look a bit better in night,

They had three of these

When we left it was just starting to get mad busy. With nougat, fudge and of course brandy snaps. Great stuff.

Stepping up and Stepping Down

Power supplies mounted on a correctly sized holder…

I’m building something to make an ancient (1976) telephone more interesting. I’m putting a Raspberry Pi inside it. It’s very important to me that the Pi is able to ring the telephone bell. To do this I need a 35 volt supply. I also need a 5 volt supply too. The device itself will be supplied with 12 volts. The device at the top right of the picture is my “stepper up” which makes 35 volts from 12 volts. The one at the bottom right is my “stepper down” which makes 5 volts from 12 volts. Both of these devices work in the same way. They have a little transformer coil which is driven by the chip you can see on each. The blue trimmers have a little screw you can use to adjust the output voltage.

You might think you could use two copies of the same device and just adjust one to produce 35 volts and the other to make 5 volts but this is not the case. The step-up ones can’t produce a voltage which is lower than the power input (in this case 12 volts) and the step-down ones on the can’t produce a voltage which is higher than the input. You can buy a bunch of these for not much money and it is useful to have both types in stock. Search your favourite suppliers for “buck converter”.

Connected Little Boxes at the Hardware Meetup

We had little Meetup tonight. Alifeee was there and we had a good chat about Connected Little Boxes (and Brian got his loaded with the new firmware and working). Alifeee has written a great article about the Hull Bus Sign project, which you can find here.

The next meetup will be on Wednesday 1st of November. I’ll be taking along my super-big camera to record the event - so be there if you want to be immortalised on proper film.

More Dominion woes

We will never know who won…

We had another go at Dominion tonight. The game crashed again. Right at the end, just before revealing the final scores. Wah. This has happened before. I’ve even made a program, DominionCalc which attempts to work out the scores from the player logs. Unfortunately the game that we played had a funky scoring mechanism involving the “Wild Hunt” card that doesn’t show up in the log. So we have to add some numbers in by hand now and the results might not be accurate. They really need to sort this out, we used to enjoy playing the game, but it is much less fun when you can’t work out definitively who has won.

Adventures in Minox Scanning

I do like working in OPENSCAD

I’ve been investigating the scanning of Minox films. These films are a mere 9mm or so wide and the negatives are teeny tiny. I’ve been wondering if the distance of the negative from the scanner affects quality. To test the theory I made the film holder above. Each holder is a different distance from the scanner base. I’m 3D printing the holder, so I’ve made each one print layer (0.2mm) different from the other. I got the original height by measuring a PENSO holder I already had. It will be interesting to see if the different negative heights make a difference.

The Future of Work

I asked DALl-E-2 for a picture of an undertaker doing plumbing. I think artists don’t have much to worry about at the moment….

Today I got asked the question “What is the future of work?” by Kofi at Radio Humberside. There’s a lot of concern about the machines taking over. I thought I’d write down what I was thinking.

Humans won’t be replaced by machines. Some human roles will be replaced by some machines. We really need to have a grown up discussion of the role of work in a fulfilled life. Perhaps that will mean holding back on automation. If people don’t have jobs to do, how will they get fulfilment?

Work will be different. We’ll use machines for the “easy” stuff and save the people for the hard bits. Knowing things might not be enough to get on in the world. Being able to describe things might not be enough. Being able to program might not be a long-term thing either, as machines get better at understanding what we want. I’ve got serious doubts about programs written by AI, but AI does make a great “keen assistant” which means we might need program writers. Not knowing about the new tools is not a plan. Figuring out how to use them is. Learn how to talk to the new AI. And get good at asking the machines questions. You can get a lot more out of them by asking your questions in the right way.  

Just like electronic keyboards and music sequencers let lots of people into the music business back in the day, tools like ChatGPT can help people with ideas but nowhere to take them. If you need a business plan, a product description or even a devil’s advocate to spot flaws, then you should use AI. Keep having ideas. Keep doing things. Keep putting yourself out there. Look at everything you do and ask “How can I build my brand from this”. Don’t prepare to do one thing, prepare to do lots of things. And do lots of things to find out which ones you like.

And make you keep up to speed with the bad things that new technology makes possible. If you can use AI to write a business plan, you can also use it to write very plausible and personalised lies. And you can add very persuasive fake pictures and video too. The world is filling up with untruths and the people that distribute them don’t seem to care. So be careful out there..

Don't Buy a Raspberry Pi3 Model A+

Just Say No

It seemed an appealing purchase. I need a small Raspberry Pi to put inside a telephone (as you do) and this looked like it might offer a bit more power and connectivity than a Pi Zero. It arrived yesterday and I must say I’ve been completely underwhelmed by its performance. I was kind of hoping to be able to use remote development in Visual Studio Code to write and deploy Python code in the Pi. It doesn’t work. It never actually displays an error message. It just maxes out and then stops.

On the other hand the Pi Zero 2 that I got seems to work a lot better. I thought the devices would be broadly equivalent, but it seems that the zero is much better.

Scanning Minox negatives

The film got a bit scratched as I was loading it

I love my little Minox camera. It takes tiny pictures on 9mm wide film. I make the film by slicing 35mm film into strips and then loading it into Minox cassettes. Then, once I’ve developed the film I scan the negatives. I use an Epson V750 scanner that I got a while back. It’s quite an old device, but the good news is that scanners age quite well (or at least I hope they do). To hold the negatives on the scanner I use a 3D printed PENSO mask. When I started scanning I got spectacularly bad results, with black streaks everywhere.

I’ve discovered that if I rotate the holders through ninety degrees on the scanner glass, so that they are in a “portrait” rather than a “landscape” orientation they work just fine. This must be due to the way that my scanner shines the light through the film when scanning.

I have no idea why this works, but I’m rather glad it does

Lensboard a gogo

This makes the camera a lot more useful…

Today, after a trip to the dentist for a filling (am I the only person who gets to the dentist half an hour early?), it was time to print yesterday’s lensboard design for my Micro-Press camera. It just fitted. I’m very pleased with myself, even though it was actually a pretty simple design. The board seems quite light-tight and my test pictures came out fine.

The hardest part of the job was finding where I’d put my black filament - the board nearly ended up being printed in shocking pink.

I might do another one with higher infill. This will make it slightly heftier and even more lighttight, but the camera was quite usable with the first version I printed. I’ll put the design on Thingiverse later for those many readers of my blog who have a need for a lensboard for a 1950’s Micro-Press press camera.

Making a lensboard

I already had some code that made rounded cornered plates

One of the truly great things about having a 3D printer is that if you have a need for something you can just print one. My “auction packed” camera arrived last week and today I thought I’d pop a lens in it so that I can try taking some pictures. For these type of cameras the lens is mounted on a plate called a “lensboard” which is then fitted into the camera. This makes it much easier to swap lenses when you are out and about. The camera didn’t come with a lens, but it did have a lensboard.

Unfortunately it was the wrong size. The hole in the middle was too big for the lens I wanted to use. So, I decided to make my own lensboard. I’ve made a quick version in OpenScad and tomorrow I’ll print it out and discover just how wrong it is.

Looking inside the mind of a running MicroPython program

The text in red is just the REPL code in ThONNY getting upset…

I love typing in interactive commands to the MicroPython REPL console. It makes development much easier as I can test out program constructions and even view the contents of variables after I have interrupted the code. But the problem is that I lose the REPL console when the program starts running. MindReader fixes that. It lets you type in Python statements which will be executed as your program is running.

To use it you add the MindReader class to your program. Then make an instance of the class (I called it m) and call m.update() in your program at regular intervals. The update method scans the serial port and builds up a command. When you press return it executes the command. This means that you can still type in REPL commands when your code is running, which is neat. You can enter print statements to view variables or even modify them for testing. I’ve found it very useful. You can find the code on GitHub here.

Connected Little Boxes at the Hardware Meetup

I’ll bring along a text display too.

I’m bringing a bunch of Connected Little Boxes to the Hardware Meetup next Wednesday. I want to show off the web configuration and deployment and what you can do with QR codes.

If you fancy coming along you can just turn up at Hull MakerSpace on Wednesday 11th of October from around 5:00 pm onwards. I’ll be around with some devices to show off, and even ones that you can take home with you (numbers permitting). It would be lovely to see you.

My diodes arrived...

I’ve been making a circuit that lets a Raspberry PI PICO ring an old style telephone bell. Yesterday I discovered that voltage pulses generated in the coils that power the bell were destroying the MOSFETS that I was using to control the power. Today I got some diodes that I was able to fit across the coil connections. Now the bells ring out loud and clear. It’s so loud you can hear it next door. Which might not be a good thing.

Exploding MOSFETS

I didn’t see any sparks though..

My MOSFETS arrived today. I connected them into a circuit that controls the power to a telephone bell using a Raspberry Pi PICO. They worked quite well. For a while. Then the ringing stopped. I was pretty sure what the problem was. It’s all to do with collapsing magnetic fields. The bell is operated by a coil which turns magnetic when you put power through it. This attracts the “donger” (for want of a better name) which strikes the bell making it ring. Then, the coil is turned off and another one turned on to move the “donger” in the opposite direction towards the other bell. If you do this around 20 times a second you get the ringing sound you get in old films and TV shows.

The snag is that when you turn off a circuit containing a coil the magnetic field the coil has generated collapses, and when it does this it induces a voltage in the coil. This behaviour is used to good effect in transformers and car ignition systems but in this case we end up with a bunch of voltage with nowhere particular to go except back up the wire into the MOSFET that just turned it off. Sometimes you get lucky and he pulse causes no damage. Other times you don’t. I’ve been kind of lucky. Only one of my MOSFETS is broken. The good news is that I know exactly what to do. I need to put a diode across the coils to short out any induced voltages and stop them causing damage.

They really knew how to make things back in the sixties

Started a new project today. I’m taking an old phone and making it more interesting. It’s going to have a Raspberry Pi inside along with extra circuitry to make the bell ring. Which is proving interesting. The bell in old phones is triggered by a 70 volt ac signal. Now, 70 volts is the far side of “tingly”. Anything below 50 volts is probably OK to grab hold of, but 70 could give you a shock you could do without. Especially at my age.

I’ve manged to get an inverter to convert 12 volts into a slightly less nerve jangling 35 volts or so. The plan is to drive the two coils that work the bell (you can just see them at the very top of the picture above) separately. So that I only use half the voltage. All I need is another MOSFET power driver (I’ve said this many times) so that I can control each coil individually. It should arrive tomorrow. I’ll add it to the circuit that I’ve already built which uses one MOSFET so that I can make the bell both “ding” and “dong”.