Adventures in Colour at the Connected Humber Hardware Group

We had a great time at the Connected Humber Hardware group meetup tonight. We talked air quality, transistor design, top hats (of course) and making colours.

There’s nothing like playing with something to build your understanding of what is happening. Jay has been making remote controlled lights and has built a remote controlled a three colour led. Individual colours worked fine, but mixing them didn’t give the colours that we were expecting. This turned out to be because the individual red, green and blue light sources in the led were all very different in brightness. However after a bit of experimentation with series resistors he managed to get a reasonably balanced result, as you can see above. What’s more this serves as a lovely illustration of how primary colours can be combined to make others.

Great fun. If you want to take part (and why wouldn’t you), our next meeting is on the 3rd of April at 6:00. You can find our more about our meetups here.

Laser Cutting at Hull Makerspace

I really like it when I head out of the house with the intention of achieving something and then actually manage to complete the task. Today I headed down to the wonderful Hull Makerspace with the intention of completing my air quality sensor mount design and maybe even cutting it out of perspex.

And that’s exactly what I did.

Fair enough, some of the holes are in the wrong places and some are completely missing. But a little drill work and my first prototype is now ready to be fitted.

The holder has our custom circuit board on one side and the SDS011 sensor on the other.

Using an Edge Triggered Serial Interface with the ESP8266

The Air Quality sensor that I’m working on uses a GPS receiver and particle sensor. Both these devices use a serial connection to deliver their values into the processor. This poses a problem, in that the esp8266 (the chip that I’m using) doesn’t have very many serial connections. The usual solution is to use a software simulation of a serial port instead of a “proper” hardware one. The difficulty with this approach is that software serial ports slow down the processor because the processor has to stop and wait for each incoming character.

To solve this problem I’ve written an interrupt driven serial port that uses the edges of the serial data stream to trigger readings, which means that it doesn’t hold things up as much. You can find out more in the video above. You can download the code and play with it here.

Making an Air Quality Top Hat

This how I made my Air Quality Top Hat. It’s actually more of an Air Quality belt really, in that the sensors and the lights are attached to a strip of webbing which can then be fitted around the hat. I’ve made it slightly too long, so that it can also be turned into an Air Quality belt if you prefer.

Click on the image for a large version on Flickr

I’m using a Wemos D1 Mini and a Winsen ZPH01 particle sensor. The sensor will detect 2.5 micron particles but it’s not super stable (mind you - it is very cheap). For the light display I’ve added a strip of NeoPixels.

The wiring is just point to point, with some wires twisted together, soldered and then covered with heat shrink cable. The ground line is connected to the grounds on the pixel strip, the Wenos, the ZPH01 ground and the ZPH01 control line to pull that line low and request that the sensor sends serial data out of the TX line. The 5V line from the WEMOS is connected to V+ on the ZPH01 and the V+ of the NeoPixels.

The data line of the NeoPixels is connected to D4 on the WEMOS which is actually GPIO2. I’m using a lovely pixel library from Makuna which uses the onboard UART on the ESP8266 to drive the pixels. This forces them to be connected to GPIO2.

I’m using a specially hand tampered SoftwareSeral driver to get the sensor data, which is read on GPIO12 which is exposed as D6 on the WEMOS device.

The device is powered by a short usb cable that I’ve plugged into the WEMOS and then taped in place. I can use a USB extension lead to program the Wemos and plug it directly into a usb power bank to power the whole thing.

Rather than find a plug and wire up a cable, I’ve actually soldered the wires directly to the back of the sensor. I’m not proud of this, but it does seem to work. The Air Quality sensor and the Wemos are secured to the belt by double sided adhesive foam.

The software I’m using is an early release of my Monitair software for Air Quality sensors. You can find the “Top Hat” version on GitHub here.

Red Nose Day Screencast Recorded and Ready for Premiere

I’m actually ahead of myself. Amazing. I’ve got the words for the lecture written (a mere 96 slides), the Air Quality Top Hat works, and I’ve even had time to record a quick screencast of the material.

The screencast goes live after the lecture, at 14:00 GMT tomorrow on Red Nose Day.

I’ll update it with footage of the event over the weekend.

Oh, and you can still sponsor me here.

Azure Storage Explorer

I’ve been playing with Azure Functions and storing values in Azure Tables. It’s very easy to do. If you decide to have a to have a play with these (and you should - you can do it for free) you should download Azure Storage Explorer. It lets you explore your storage (the clue’s in the name) but it also lets you download CSV files, manage binary objects and lots of other nice things. And it works a treat.

Amazing facts to impress your friends....

If you want to really impress someone just tell them this:

“If you want to use MQTT with PubSubClient and talk to an Azure IoT Hub over secure sockets you should use Version 2.4.2 of the LOLIN Wemos framework or your program will crash when it runs out of memory during socket open.”

Then again, it might just be me that would be impressed by this.

Building an Air Quality Top Hat and Letting the Smoke Out

I’m building an Air Quality Measuring Top Hat for my Red Nose Day Lecture in Rhyme next week.

I think I’m the first person in the world to do this. No idea why.

Anyhoo. I’m going to equip the hat with a bunch of coloured leds to indicate the quality of the air around the wearer. Yesterday I started building up the hardware. I was driving all the leds with one of my trusty Wemos 8266 devices. Half way through my first test of the leds I noticed smoke rising from the device. Now, I don’t know much about electronics (obviously) but I do know that all electronic devices are actually powered by “magic smoke”. I know this for one simple reason.

If you let the magic smoke out of a device, it stops working.

It turns out that I hadn’t turned on my main power supply for the leds, so all the power was being drawn through the Wemos device; specifically the blackened and unhappy looking component above. Which got very hot, let out its magic smoke and stopped working.

Oh well.

The good news is that the Wemos devices only cost around two pounds each. I’ve ordered ten more…

Sponsor Me for Red Nose Day Madness

I’ve just sponsored myself for my lecture in Rhyme next week. I’d love it if you did too. Click on the image above to go straight to my donation page.

If you can make it to the lecture I’d love to see you. It should be fun and there will be FREE DONUTS as well as lots of the usual fun and games.

You might even learn something about air quality, which is what I’ll be rhyming about.

The lecture is at the University of Hull on 15th of March (Red Nose Day) at 1:00pm in Lecture Theatre A in the Robert Blackburn Building. David from c4di-Eagles Labs is bringing the donuts. I’m bringing air quality sensors and maybe even a light up top hat. As you do.

You can find out all about my illustrious Red Nose Day history at my special red nose day page.

Connected Humber MonitAIR Circuit Board

There comes a point in a project where things start to look real. I think we’ve hit that in our Air Quality monitoring project. At the Connected Humber hardware group this evening Brian gave out some populated versions of the sensor circuit board he’s designed and had made. Rather than making all the individual connections by hand we now have a beautiful little board that takes our processor, some power supply and switching circuitry and sensor connections.

It’s very pretty. The next step is to marry it up with our housing designs and start putting sensors into the hands of our waiting test users.

Exciting times.

Sensor Base Design the Hard Way

If I ever join you climbing a mountain, I’ll probably be the one wearing roller skates and carrying a piano.

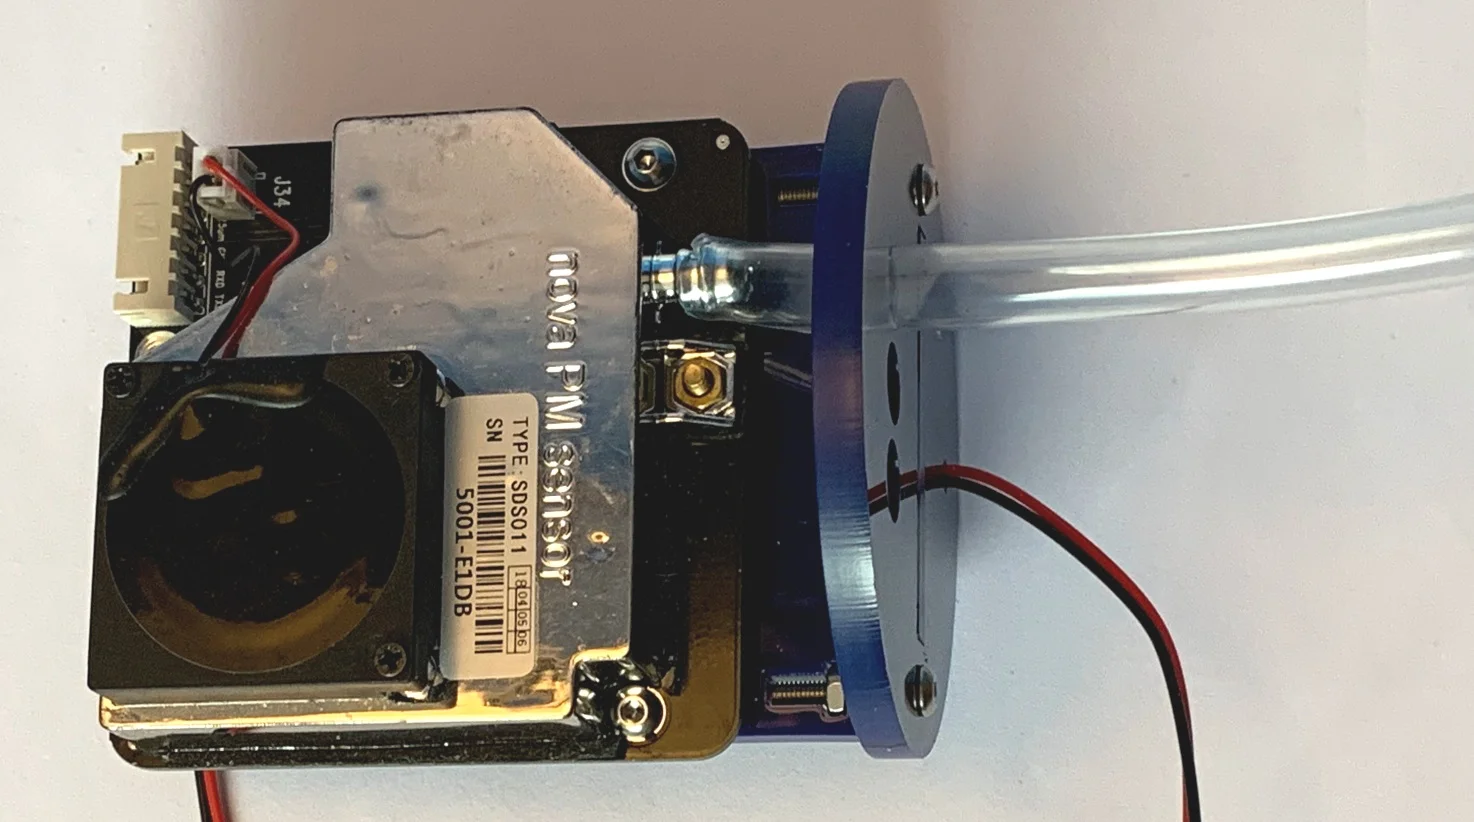
Sometimes it seems to me that I have a stubborn determination to do things the hard way. For example, today’s task was to create some designs for an outdoor air quality sensor. I wanted a circular fitting to go in the base of a pipe and a support that would attach to the fitting and hold the processor and air quality sensor.

Some people (I think I call these people the “sensible ones”) would reach for their CAD tool and begin designing. Not me though. I reached for my Python interpeter and the ezdxf library that lets you write Autocad files from your code.

I wanted to use the “nut holder” approach to fitting where the laser cut plastic (which is what I want to make the stand out of) holds nuts that a bolt engages with to grip it. I’ve used these on the Hull Pixelbot quite successfully. I was quite proud of the “nut holder generator” that I’d written for the Pixelbot, it even makes each change of direction into a tiny curve, which apparently reduces the chances of the plastic cracking after it has been cut. However, my original code only drew the holders in one direction, whereas for the holder I wanted to put them all around the edges of a circle, as shown above.

Cue lots of bits of paper covered in drawings of triangles, sines and cosines and cursing over code. Eventually I managed it though, and the next step will be to get the plans cut into plastic so that we can make some sensors.