Make your own Theremin. Sort of.

A Theremin is a musical instrument that you control by waving your hands. It's used a lot to provide spooky sounds for science fiction and horror movies. A "proper" theremin uses a tuned circuit that is which is controlled by the player waving their hands near a couple of antennas. 

I thought we could have a go at making something similar using just a light sensor and an Arduino, so I've come up with the circuit above to get started. You can find the detailed instructions here. We've been using these little exercises at the c4di Hardware Group, which met again today and will meet again on Thursday 5th July. Sign up here if you want to come along and make some annoying noises....

Working with the Arduino at the Hardware Group

I really must take more, or at least some, pictures of the Hardware Group at c4di in action. But I'm always too busy talking about stuff to get out the camera.

Anyhoo, we had a great meetup today. We've got a bunch of new members who are just getting started, so we've put together some tiny hardware kits that they can use to get started. Like those "Build an Aston Martin in easy steps" magazines that you can buy in the new year, If you want to pick up a kit and have a go, come along to our next meetup on the 7th of June. You can sign up here

Hardware Meetup - now with biscuits

I had to tear myself away from a really good conversation to take this picture

We had another really good Hardware Meetup at c4di yesterday. Three new folks turned up and we’re going to start working with Arduino devices at the next session. We’re assembling some kits and some content to get folks playing with hardware. The idea is that you spend a princely five pounds on a starter kit containing an Arduino and some lights and switches. And then over the next sessions we’ll introduce other components to play with. If you fancy coming along, you’d be more than welcome.

The next meeting is on the 17th Mary at c4di as usual. Only now we have coffee, tea and biscuits. And hardware. It would be great to see you. 

esp8266 wacky wifi

one way to get a screenshot....

This is rather weird. It all started when I got my old Nexus 7 tablet out of retirement. I'm doing some upgrades for the web server for the Raspberry Pi event coming up, and I wanted to use the Nexus to see if the web site would work on an Android powered browser. 

One of the applications on the Nexus is a WiFi analyser that I've used to pick and choose my WiFi channels. When I fired it up I noticed a few strange transmitters which were taking over the spectrum (as you can see above). 

I finally tracked this down to the esp8266 devices that I use in Hull Pixelbots. For some reason, when they wake up, they start doing things on WiFi channels. I've no idea of the precise meaning of this transmission, but I don't particularly like it. It turns out that if you turn off the WiFi before you do anything else (even turn it back on to connect to an access point) then you don't see this. 

I'd love comments from anyone else who've seen this, or has more knowledge of what is going on. In the meantime all my programs now start with:

WiFi.mode(WIFI_OFF);

Another awesome Hardware Group Meetup

Why I like c4di. 2.4 Gigabytes to download. In a couple of minutes. 

I keep taking my camera to our Hardware Meetups with the intention of getting some pictures of what goes on, and then getting into so many chats about different things that I completely forget to get any pictures. 

It happened again tonight. We had some new members with awesome ideas about projects they want to build. And folks I've seen many times were rocking up with some splendid new stuff that they had made, or were working on. With the LoRa project just around the corner, you really should come along if you've any interest in making interesting stuff. 

The next meeting is on 3rd of May. Sign up here

Hardware

We had another superb Hardware group meetup at c4di tonight. Two new members, plus a host of others braved the horrid snow to come and talk tech. I was telling everyone of my problems with my soldering iron, which had come un-soldered (see above) leading to some nice "Catch-22" issues (in the end I bought another iron and mended my "proper" one).

Plans are afoot for another soldering evening, and a "build your own LoRa node" event too. Turns out that it's all happening..

c4di Hardware Group Monster Meetup

Actually we didn't have any monsters turn up. But we did have a lot of people. Hayden was running a soldering masterclass. I was talking about Hull Pixelbots to a whole bunch of students who turned up to find out what we're about. Brian showed off a work in progress which simulates Hull Pixelbot movements in a nifty Python program. And we did some work with one of our youngest attendees, who's trying to make a remote controlled missile launcher (but only a small one).

We were playing with these super-cheap wireless devices. Connect a transmitter to an output pin on an Arduino, wiggle the pin up and down, and the receiver will wiggle an output up and down at the same time. So you can send messages wirelessly from one Arduino to another.

In the past I've not had much success with these, but we tried the RadioHead library and it seems to work rather well, We're going to look into adding a carefully crafted antenna to try and improve the range. And have a look at other wireless options too. 

It was great fun. If you fancy coming along,  the next one is on the 1st of March starting at 6:00 in c4di. 

Arduino Retro Computer

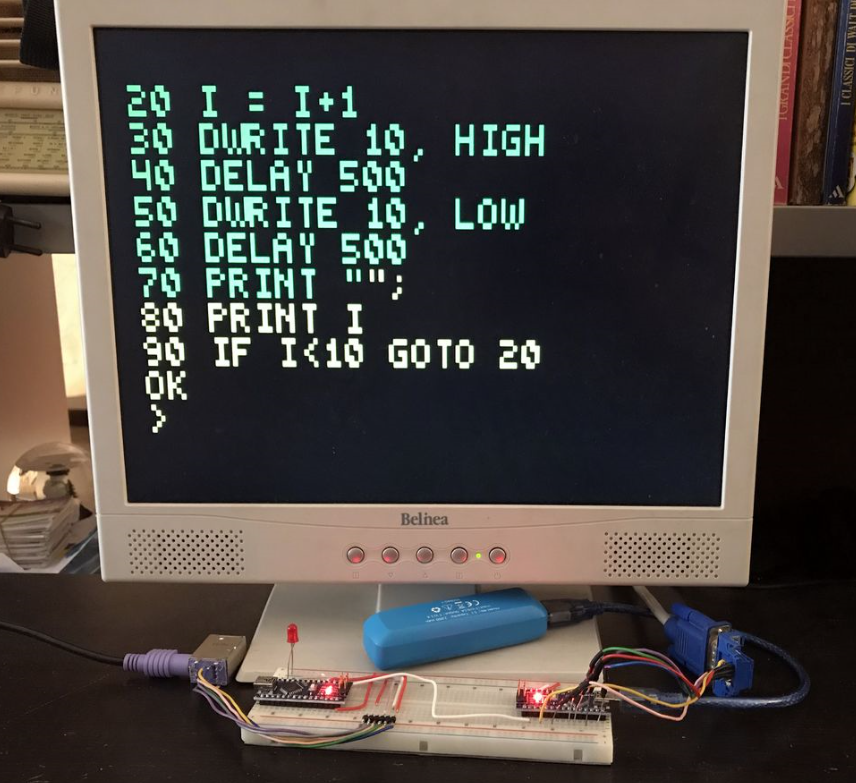
Derek put me onto this. It's a retro computer made from two Arduino devices, one of which generates VGA output. Many years ago I discovered that people were using PIC devices to produce video output, this does something similar with an Arduino to generate VGA video. It uses a tiny interpreted basic that is not a million miles away from my HullOS software, although the Basic implementation uses a lot more gotos....

Super Duper Hardware Meetup

We had a really good hardware meetup today at c4di. A whole bunch of new members turned up. along with a bunch of "regulars".

I did a talk about the latest developments on the Hull Pixelbot front. The system that controls the Hull Pixelbot has been renamed "HullOS" for marketing reasons, and is now available on GitHub. There's also a manual for the new scripting language supported by HullOS and an editor program you can use to create HullOS scripts and load them into the robot. 

Finally, I've added the DXF files for laser cutting Hull Pixelbot chassis components, along with STL files for the 3D printed parts that you need as well.

I'll be adding more Hull Pixelbot stuff in blog posts over the next few weeks. 

There were lots of really interesting conversations going on all round the room, which was great. We've still got room for more though, the next meetup is on the 15th of February. You can sign up here

An MP3 player for 88 pence

I remember when mp3 players first came out. They weren't cheap. Now they are 88 pence. Brian showed me one at the Hardware Group on Thursday.

Going to the group is always a calculated risk for me, in that people frequently show me things that I want to buy one of. Mind you, at 88 pence each I can afford to go mad and order a number, so I've bought 5. 

They can be controlled by an Arduino (or any other device with digital I/O) or directly. You'll need a micro-sd card to hold the music and a speaker of some kind of course, but I'm thinking of using them to make an orchestra of Hull Pixelbots.....

Lora at the c4di Hardware Group

We had a great hardware meetup tonight. I showed off a bit of the latest Hull Pixelbot scripting stuff (once I'd got it to work - note to self - don't turn up with a machine and think you can install the software and it will just work. Doesn't happen). 

Then we talked a bit about Lora (or low powered radio to you). I've blogged a bit about this in the past but now we want to take things a bit further, and get going making Lora stuff. We've got all kinds of plans, none of them involving world domination. At least that's what we're saying for now. 

Anyhoo, expect to hear more about our Lora plans in the not too distant future. It looks like a great technology to get in on the ground floor of. If you fancy getting involved you should come along to our next meetup and utter the magic phrase "I fancy getting involved". You can sign up for the next meetup here

World's Smallest Arduino compatible board at c4di Hardware Group

Did you know that the worlds smallest Arduino compatible device is made in Hull? I didn't until Hayden turned up with one at the hardware group at c4di tonight. He's designed and built a lovely little device. I've played with tiny Arduinos before. They are usually a bit hard to connect to a computer because they lack a proper usb connection and are a bit under-powered when you get them going. 

The device that Hayden has made gives you serious computing power in a device you can hang off any micro-usb cable and program using the standard Arduino SDK. It puts a 48 Mhz  device with 256K of ROM and 32K of RAM onto your fingernail. You can find out more (and buy one for yourself) here. We had it flashing a led, which is probably not really the best use of its power, but it is a start....

It was a great meetup. We had some new folks turn up keen to learn, and some who had brought things to talk about. You can sign up for the next one on Thursday 7th December (and you should) here.

Plenty of Hardware at c4di

We had a great meeting at the Hardware meetup this week. We had digital video, DC motor control, Lora networking and transistor insights. And some new faces. If you want to come along you can sign up here

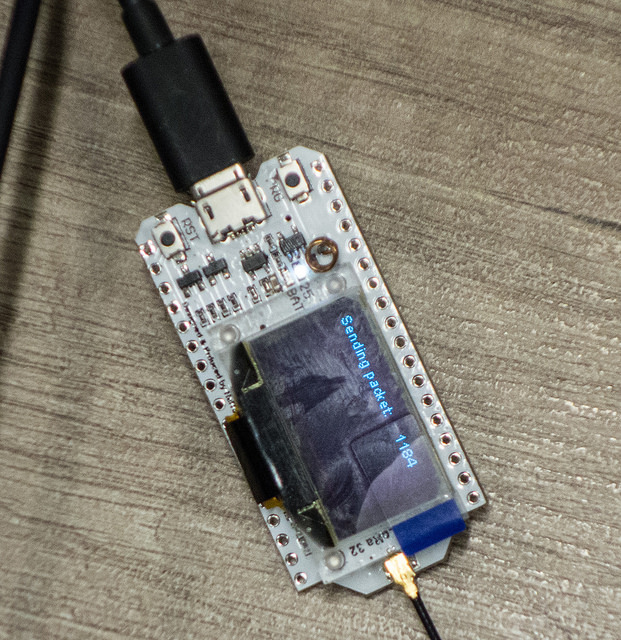
This is what I was working on. I had another Lora node receiving the messages. When it works properly I'm going to take the plastic cover off the display.....

Hardware meetup, with hardware

It's coming to something when I'm too busy having an interesting time to get around to taking pictures. But that's how it was at the Hardware meetup tonight at c4di. Ross was trying to get his Gameboy emulator to run off a rechargeable battery. He has the not unreasonable desire to be able to play games while the battery is charging. And one of his power supplies keeps glitching and cutting out. We actually used a soldering iron to try and fix things, but by the end we were perhaps a bit closer to getting everything working as it should. And we are having a lot of fun in the journey. And Paul showed me a bunch of very impressive stuff he had a hand in making work. 

All good stuff. More in two weeks. 

Microsoft Surface Ergnomic Keyboard and Bluetooth

Ha. It works now I've replaced the Bluetooth adapator. So, pro-tip. If you want to use the Microsoft Surface Ergnomic keyboard with your desktop under Windows 10 I would suggest that you use the Pluggable Bluetooth USB adaptor. This works a treat. If you've got a Surface Pro 3 I'd advise you not to get this keyboard at all, or at least try it to make sure it works before you part with any cash.

I'm hammering away at the keyboard now and I like it very, very, much. My previous keyboard, the Microsoft Sculpt Comfort one, was very good but it lacked the numeric keyboard and arrow keys that I'm used to. Mine version of the Sculpt Comfort also has the American keyboard layout which works fine most of the time, but had me keeping an old keyboard around (really) just so I could type the backslash character. Which I can type just like this now: \\\\ Yay.

The Pimoroni Mood Light Rocks

I just love a busy desk. 

A while back I ordered a Mood Light kit from Pimoroni. It never came (sad face). I told them about this and they dispatched a replacement. The same day. With no quibble or question (happy face). It arrived a couple of days ago and today I found enough time to assemble it.

With it being based on the Raspberry Pi I had to find a video display and a keyboard for it to get things going. I ended up using my video projector of Logo Blaster fame and a little remote keyboard that didn't work until I connected it via a usb hub.

The good news is that the Raspberry Pi experience has come on a lot since my early days with my Pi B. The great news is that the kit itself is awesome. Lovely attention to detail, even down to little rubber feet for the stand. It all fits together in a very impressive way and worked first time. If you're thinking of building one, you'll need to solder the connectors onto the Pi and the display device. If you've not soldered before it might not be the best thing to learn on, but if you've soldered a bit you'll have no problems. You'll need a power supply and a micro-SD card but nothing else, the kit has everything and comes beautifully packed in a nice plastic box. 

Once I'd got the Pi going and set up remote access I was able to do everything via my PC, so I could put my keyboard and monitor away. You control the lights (there are 32 neopixel leds on the lamp) from Python, so there is no limit to what you can make the light do. 

I'm very impressed with the kit and the Raspberry Pi Zero that it is based on. The fact that you can get the thing for thirty quid (or even less if they are having a discount offer running) makes this thing astonishing value. You should get one. So much power and potential for less than a full price video game. I'm going to get the Scroll Bot next.